Do-it-yourself rafter system for a gable roof: an overview of hanging and layered structures. Strengthening rafter structures How to strengthen roof rafters
The rafter system is the roof frame, which is the basis for laying roof coverings.
The rafter system is designed to withstand the load of the roof, taking into account natural loads: winds, snow, rain.
The roof option is approved at the design stage.
The purpose of the roof includes several functions: warmth in the house, protection of the room from natural phenomena, That's why the rafter system must be given Special attention.
You can read how to calculate the rafter system.
It is customary to classify rafter systems so that the task of choosing an option future roof was easier to solve:
- Single-pitch. The simplest ones. More suitable for utility rooms, bathhouses, small private houses, gazebos. Provides for an inclined position of the structure at a slight angle (no more than 25°);
- Gable. Used for small houses And country houses . They have the form of a triangle, in which the rafter boards are connected by a beam and are at a certain angle;
- Gable broken lines. They have two slopes with a fracture, thanks to which there is an opportunity to increase the attic area;
- Three-slope (half-hip). They have two trapezoid-shaped slopes, which are connected by one end triangular slope (hip);
- Four-slope (hip). Used for residential buildings, require significant labor costs. They have two end triangular slopes and two trapezoidal ones;
- Tent. Used for square-shaped buildings. They consist of four triangular slopes, the upper corner of which is connected in the center of the roof;
- Multi-pincer. Consist of trapezoidal or other slopes different forms, connected to each other.
The most suitable designs for - and broken gables. There are others, but they are less common and not as practical as the above.
Rafter structures are also classified into:
- Hanging. With this type of roof frame due to the lack of load-bearing walls in the room;
- Layered. Option rafter installation, providing support on a load-bearing internal wall or support in a building.
When designing a building, the material for the roof frame is calculated based on the intended configuration and load. It’s not difficult to make rafters for yourself, it’s important to approach the matter wisely.

Rafter systems of layered and hanging type
Calculation of the load on the rafters
To correctly calculate the load on the rafters, it is necessary to take into account many factors that can affect the weight of the structure.
Important indicators to consider:
- Constant load: includes mass roofing pie, covering material;
- Temporary load: permanent and maximum amount snow, rain, intensity of wind gusts, and in areas with high seismic activity - the effect of storm winds, tornadoes, hurricanes.
In addition, you should keep in mind the mass and strength of the rafter legs, and also pay attention to the fastening of the rafters gable roof and installation option.

Scheme of rafter systems
The distance between the rafters of a gable roof and the thickness of the rafters
Rafter pitch gable roof- this is the empty space between the rafters. The functionality of the roof depends on the correct calculation of the pitch. As a rule, the step is about a meter.
To more accurately calculate the distance between rafter boards, there is a specific calculation scheme:
- Determine the length of the slope.
- The length of the slope is divided by the distance between the rafters.
- To determine the number of rafters, one is added to the resulting value and rounded up. This is how they determine how many boards are needed for the slope.
- The length of the slope is divided by the number of boards to obtain the distance between the rafters.
This calculation is not always final.
Additionally, the load should be taken into account roofing covering(its weight), the thickness of the rafters, as well as the dimensions of the rafters for a gable roof.
The thickness of the rafter board largely depends on the covering material:
- . Boards are used with a cross-section of 5x20 cm at a pitch of 60 to 90 cm with a sheathing section of 4x5 cm;
- . Rafter boards - 5x15 cm, pitch - from 60 cm to 95 cm;
- . The section of the board is 6x18 cm or 5x15 cm, the distance between the bars is from 80 cm to 130 cm;
- . Rafter cross-section - 5x15 cm, 5x10 cm with pitches from 60 cm to 90 cm;
- . The cross-section of the timber is the same as for corrugated sheeting at a pitch of 60-80 cm.
All indicators should be taken into account and the thickness of the rafters should be accurately calculated so that there is no excessive load on the foundation.
Incorrect calculation of the length of the gable roof rafters, as well as incorrect calculation of the pitch indicators, can lead to sagging of the roof.
Installing the rafters of a gable roof with your own hands requires taking into account the weight of the rafter board and all additional fastenings designs.

What does the rafter system consist of?
Rafter structure - a complex system and installing a gable roof rafter system is not an easy task. Rafter system consists not only of rafter boards, but also of other additional elements:
- Mauerlat. An element that distributes the entire load evenly across the supports;
- Run. Boards holding the legs of the rafters together: at the top - a ridge, at the side - a side girder;
- Puffs. A connecting beam that prevents the rafter legs from diverging;
- Struts, racks. The bars, which fix the stability of the rafters, resting on the bed;
- . A lattice made of bars, which is applied perpendicular to the rafters. Transfers the load of the covering material to the rafter frame;
- . A connecting beam that serves as a connection between the roof slopes;
- Fillies. If the length of the rafter legs is insufficient, they are mounted to form an overhang;
- Roof overhang. Extends beyond the bottom line of the slope to prevent precipitation from entering the walls.
The rafter system involves rafters, braces, braces and racks located in the same plane. They are located in such a way that the main load roofing structure falls vertically onto external load-bearing walls. Therefore, the manufacture of gable roof rafters is a very important process.

What does it consist of? rafter system gable roof
Installation of a rafter system with layered rafters
A layered rafter system is used when the span length does not exceed 6.5 meters.
In the presence of load-bearing structures It is possible to install additional racks inside the building.
The main support of the rafter legs is the mauerlat.
Mauerlat installation
Before installing the Mauerlat, it is necessary to install an armored belt. It consists of formwork, into which reinforcement is laid and filled with concrete. At the base, when the concrete has not yet hardened, studs are installed, to which the Mauerlat is then attached.
Mauerlat - a beam that is laid on a support (load-bearing wall) and serves as a base rafter frame. Pre-laid layer waterproofing material. If the length of the beam is not enough to cover the length of the wall, then it is extended.
- Check the equality of the diagonals. A discrepancy of a few centimeters can lead to refurbishment of the frame;
- Secure the corners of the Mauerlat;
- Attach the Mauerlat using pins or wire. The studs are tightened in two steps, having previously drilled holes for them.
The stability of the roof structure depends on how firmly the Mauerlat is installed.
Therefore, it is necessary to take seriously the attachment of the Mauerlat to the supporting support.

Mauerlat installation
Sill
After the Mauerlat has dried (after 5 days), mark the installation of the plank on the Mauerlat timber: its axis should be equally spaced on each side of the mauerlat beam. The bed is attached to a two-layer waterproofing layer anchor bolts. To the wall with inside The bench should be secured with wire twists or staples. Next, markings are made for installing the rafters.

Installation of a gable roof rafter system
The supporting points of layered rafters are the walls and racks inside the frame. The rafters are mounted with hinged fastening units. When using sliders for fastening, a slight lowering of the roof frame is ensured in the first years of the roof's service.
This installation method is necessary to prevent distortions, since in the first years the building settles a little.
The rafter beams should be secured either by installing them in prepared grooves and strengthening them with fasteners, or by attaching board overlays.

Installation of rafters
Ridge knot
The rafters are connected end-to-end by cutting the edge of the beam so that the angle when connecting the opposite beams corresponds to the angle of the slope. They hammer the rafters under the ridge with nails. An option is possible in which the beams are connected with bolts, nails or pins, that is, overlapped.
If necessary (if provided for by the project), a cut is made in the rafter beams to attach the ridge beam (purlin).
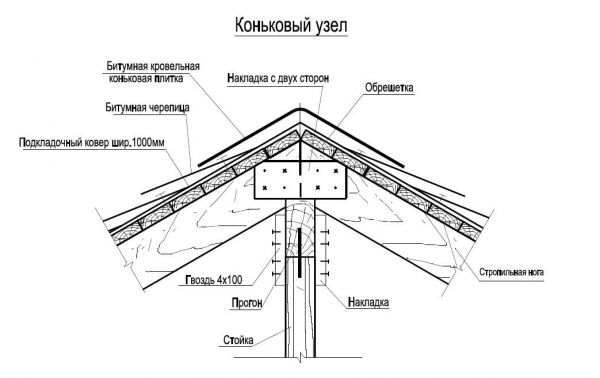
Ridge knot
Racks
The racks are attached with a short span - in the center, on the sides and in the center - with a wider roof base. The fastening is carried out vertically from the ridge to the inner wall.

Run
Purlin - a connecting beam for securing rafter legs. Attaches with bolts or brackets to the rack.

Filly installation
The final stage of installation of the roofing system is the installation of fillets with a short length of rafter legs for the overhang. To install the canopy, it is necessary to install additional small rafter boards.


Installation of a rafter system with layered rafters
DIY gable roof rafter system: installation with hanging rafters
Rafter system, equipped hanging rafters,is a triangular structure, where the sides are rafters, and the base is a tie connected to the lower heels of the rafters.
Installation of a hanging type rafter frame can be done without installing a Mauerlat: a board that is fixed to a two-layer waterproofing can replace it.
If the structure has a large span, then struts, headstocks, and crossbars are attached to it.
There are no racks in the hanging system.
Puffs
The tie is the longest beam of the roof frame. To prevent it from sagging, it is necessary to attach headstocks - boards that are attached to the top of the structure on one side, and to the tie on the other. Fastened with bolts or wooden plates. Using threaded clamps, you can adjust the sagging tightening.

Construction of the rafter system
Installation of strut beams
The headstock can be complemented by strutted beams, forming a rhombus, where two struts are the lower sides, and the rafter boards are the upper ones, the upper corner being the ridge. Thus, the struts rest against the headstock, distributing the load.

Strut beams
Rafters
Rafters hanging structure mounted like a layered one. When installing attics, the tie is installed closer to the ridge, providing more space under the ceiling. In this case, the tightening is secured by cutting and bolting.
ATTENTION!
During installation hanging system prerequisite installation is the accuracy of calculations and the strength of the rafters and tightening.
The presence of errors leads to displacement of the axes of system elements, which ensures distortion of the structure.
This photo will tell you how to install rafters for a gable roof:

Installation of rafters

Hanging rafters
How to strengthen the rafters of a gable roof
 It is necessary to strengthen the rafters of a gable roof when the load calculation is incorrect or frame defects are detected.
Strengthening can be done using:
- Beams, which are installed to transfer the load to them;
- Installation of struts with an inclined mount with an emphasis on the bed;
- Application of double-sided slats;
- Increasing the cross-section of rafter beams in the place of supports on the strut by applying sheathing from boards with nails or bolts;
- Wall made of boards, which are attached to the rafters in places where snow accumulation is expected to increase the load-bearing capacity of the rafters.
You can resort to strengthening the mauerlat beam and the base of the rafter beam. Due to high humidity and reduced ventilation, these parts of the frame are more susceptible to rotting, so when arranging the roof special attention needs to be paid
December 12, 2017Specialization: facade finishing, interior decoration, construction of cottages, garages. Experience of an amateur gardener and gardener. We also have experience in repairing cars and motorcycles. Hobbies: playing the guitar and many other things that I don’t have time for :)
If the rafter system was not designed correctly, it may not cope with snow and wind loads, which manifests itself in the form of its deformation and even breakage of the load-bearing elements. This problem can be solved by strengthening the structure, but how to properly cope with the task? This is what I want to tell you further.
Gain Options
So, you can strengthen the roof in two ways:

As a rule, both methods are used simultaneously, so we will consider each of them separately below.
Method 1: strengthening the rafters
The need to strengthen the structure may arise due to various reasons. Most often, novice builders make the following mistakes:
- The cross-section of the rafters is selected incorrectly;
- The trusses take too large a step, as a result of which both the legs themselves and the sheathing bend;
![]()
- The structure is assembled incorrectly, so it lacks strength and rigidity;
- In order to save money, low quality lumber is used.
If the slope is deformed, regardless of the cause of the problem, first of all it is necessary to strengthen the rafter legs. This can be done, depending on the situation, in three ways:
| Illustrations | Actions |
 |
Increase in cross section. If the leg deflection exceeds permissible rate, it is strengthened by increasing the cross section. This is done as follows:
|
 |
Installation of overlays. If the rafter system bends in the area where it is supported by the strut, cross section in this unit it increases with the help of side pads. This is done as follows:
|
 |
Extension of rafters. There are situations when, as a result of non-compliance with installation technology or due to low-quality lumber, the lower part of the leg rots. In this case, strengthening, or rather, repair is carried out as follows:
|
It should be noted that the rod repair method is used extremely rarely, since in such situations the entire rafter is often replaced. But the use of supports and overlays are quite simple and common methods of strengthening rafter legs, and therefore are very popular.
Moreover, overlays can be used not only to strengthen the supporting part of the rafter leg, but also in the event of cracks appearing in the rafters. In addition, the overlays do an excellent job of strengthening horizontal beams.

Method 2: strengthening the structure
There are quite a lot in various ways increasing the load-bearing capacity of the roof, or rather, parts that can increase the strength of the rafter system. Next, let's look at all the most common elements:
- Crossbars (tightenings). They are horizontal beams located between the rafter legs. With their help, the lower parts of the legs are, as it were, attracted to each other, as a result of which the thrust load on the walls is reduced, i.e. the stingrays do not move away.
It must be said that the tie-downs can be installed at the very base of the trusses, and serve as wooden beams on which supports and rafter legs are installed to unload the slopes;

- Supports. They are vertical posts. They can support both individual rafters and the entire slope. In the latter case, the supports are supported not by the rafters, but by the girder ( horizontal beam), and that in turn serves as a support for all the rafters of the slope.
Most often, supports are installed on load-bearing walls. But, if the rafter system is hanging, as I said above, they can rest against the tie or floor beams, as shown in the diagram below;

- Struts (rafter legs). They are inclined supports that perform the same functions as racks. They can be installed between floor beams and rafters, or between load-bearing walls and legs;
- Headstock (ridge post). It is a support that supports the ridge girder. The headstock can be installed not only on load-bearing walls, but also on a crossbar located under the ridge itself.

If the supports transfer the load from the roof load-bearing walls, a bed must be placed under them. It is a beam that performs the same function as the Mauerlat - it evenly distributes the load on the wall.
All these elements are installed from the inside, i.e. from the attic side, thanks to which you can strengthen the structure without dismantling the roofing. This, of course, is a big plus, but there is also a minus - in the case of deformation of the rafter structures, the elements described above, in most cases, cannot level the roof.
They only strengthen the system, i.e. as I already said, they increase bearing capacity and prevent further deformation.

To level the ridge or slopes, you will still have to dismantle the roofing covering, since the principle of repair is to apply a new sheathing and, if necessary, a new ridge girder. But keep in mind that you can resort to this method only after strengthening the supporting nodes and all load-bearing elements.
Conclusion
We have considered all the most effective ways strengthening the rafter system, and now you can undertake its repair yourself. If any difficulties arise, contact me in the comments, and I will be happy to help you with advice.
December 12, 2017If you want to express gratitude, add a clarification or objection, or ask the author something - add a comment or say thank you!
One of the most important stages of building a house is installing the roof, because for this you need to choose best option rafter locations. To build a roof yourself, you need to consider several options for installing the roof, and also learn about the sequence of actions performed.
Rafter system design
For each house, you should design a rafter system that is suitable specifically for this building. If this is not done, the load will be distributed unevenly, which can lead to the roof skewing.
To create the right project, keep in mind that:
- If it is necessary to lay insulation, the rafter system must be done in such a way as to facilitate further work. Insulation materials are usually sold in width
- 1200 mm, so the pitch between the rafters should be selected taking into account this particular characteristic. Otherwise, the insulation will have to be constantly trimmed.
- The power of the supports is determined by the cross-section of the timber from which they are made. Attention is also paid to the condition of the wood. It is better to choose resin beams, as they last longer.

Pre-treatment of wood and preparatory work
Before starting work, the timber must be processed special compounds so that it is protected from exposure to microorganisms and fire. The application of antiseptic occurs before installation. The composition must be applied using hard brushes.
In order for the composition to protect the wood for as long as possible, it is applied in two layers (the material is dried before this). Installation of rafters on the roof occurs only after the applied compounds have completely dried.
Preparation begins with checking all walls and ceilings, as well as taking measurements. If in some places the wall deviates from the horizontal, this can be corrected using cement screed. If the house is built from wood, unevenness is removed by installing wood underlays.
To make work easier, install scaffolding. They should be located at roof level.
Mauerlat
The Mauerlat is the base on which the load is applied, therefore it is from this that the construction of the rafter system begins. The location of this element is carried out in such a way as to evenly distribute the load from each support. This element of the rafter system is a log or beam that is laid on external walls. This option for creating a rafter system is the most effective.
Important ! To prevent moisture from getting on the Mauerlat reducing its service life, two layers of roofing felt are laid under the timber.

A beam with a cross-section of 10x15 cm is used as a mauerlat. This element is laid after the construction of the walls has been completed. After laying before fastening, the horizontal is determined using building level. The most popular fastening method is the use of anchor bolts.
The bolts are fixed to reinforced belt during the completion of the wall construction. After this, holes are drilled in the beam that coincide with the location of the bolts.
Types of rafters
Before building a rafter system, it is necessary to determine the type of rafters used. They are divided into 2 types:
- on one's back;
- hanging.
If the structure is small, only simple rafters are used, which are attached to the mauerlat and connected to each other by lathing. If the structure is large (for example, a residential building), then more complex design roofs. Before installing the rafters of a gable roof with your own hands, you select the slope, which is determined based on the expected load from snow and wind.
Hanging rafters are a structure that is supported in only two places. This means that with this scheme, intermediate supports are not used. Distinctive feature This type of rafters is to create a bursting load on the walls of the building. This type of frame is most often used in construction residential buildings. If the roof slope angle is less than 45 degrees, then additional elements are installed. Most often, ties are used to connect the rafters to each other.
Important ! The higher the tension, the stronger it should be.
To construct a layered rafter system, a third support is required, which is usually another load-bearing wall.
Preparing for installation
Before starting work, you should prepare necessary tools And Consumables. To avoid dangerous situations, it is better to build scaffolding near the house. Don’t forget about individual insurance.

To work you will need:
- timber, the cross-section of which is 15X15 cm;
- waterproofing material;
- an adjustable wrench, which will be needed when tightening the anchor bolts;
- building level;
- hammer;
- drill;
- nails.
For the rafters, a beam is selected whose cross-section is 50X200 mm
Installation stages
Installation of gable roof rafters is as follows:
- lifting the timber onto the roof;
- sawing out part of the lower ends of the rafter legs in such a way that a reliable connection is formed in contact with the Mauerlat;
- connection of paired rafter legs;
- installation of the outer rafters and connecting them using a ridge girder.
In order for the rafter legs to be connected to each other more securely, half of their thickness is cut out at the place where they are connected. Cutting out parts of the rafters takes place on the ground, since it is inconvenient to do this on the roof.
Before installing the rafters, the Mauerlat is marked in order to maintain the selected spacing between the supports. Usually the distance between them is one meter. The same marks are applied to the ridge run.
Methods for installing rafter legs on walls
If the rafters are installed on brick walls, they are secured using a device called a “ruff”. It is a metal element that is driven into the wall from the inside of the building and loops around the rafters.

On all structures that do not shrink, fastening occurs by cutting out a recess in the rafters for attachment to the Mauerlat. Attachment occurs using nails or corners.
Important ! There must be a distance of at least 130 mm between the rafter system and the pipe.
Reinforcing rafter legs with additional elements
If the rafter system has already been created, but the owner of the house finds out that it is not adapted to the loads that will affect it, he needs to strengthen the rafters. This happens by inserting additional wooden beams, which are called supports. Attaching to the rafters occurs using metal clamps or toothed plates.
Strengthening can also occur when there is too much load in the middle of the rafters, which threatens to break the beam. To avoid this, additional overlays are created on the connection area with the support. The new part of the rafter system can be erected both above and below the old roof elements.
If the installation occurs higher, then in addition to strengthening the roof, the slope also changes. This method avoids wasting time on complete replacement rafters and involves attaching new rafter legs to those already installed. The process of changing the roof begins with removing the sheathing. After this, new elements are installed, which in terms of the method of connection do not differ from the old rafter system.
In some cases, it is necessary to strengthen the bottom of the rafter leg. This is necessary in situations where the Mauerlat begins to rot and become less reliable. To strengthen the rafter legs, struts are attached, resting on the Mauerlat or on an additional support. For more reliable fastening, notches are cut out on the rafters. Additional items fastened with nails.
Ways to strengthen damaged structures
Methods for restoring damaged parts of the roof include:
- installation of wooden overlays;
- creation of rod prostheses;
- use of overlays resting on the beam.
The first method is used for single damage to rafter legs. To strengthen the element of the rafter system, wooden overlays are attached and secured with bolts or nails. Additional elements must rest securely against the Mauerlat and be secured in this position by twisting.
Rod prostheses are more often used in cases of massive damage to rafters. To strengthen, temporary supports are first installed so that the rafters are in a stationary position. After this, the damaged parts of the structure are cut out. Then the prosthesis is put on, which rests on the Mauerlat.
Overlays that rest on the beam are used when part of the Mauerlat has rotted. In this case, this area is cut out. To support the rafter leg, an additional reinforcing strut is created, which rests against a pre-fixed beam. The beam is located below the Mauerlat, if the wall structure allows it. In order to make a sheathing in a place where there is no longer support, an attachment takes place additional board, on which the sheathing is attached.
Most suitable material For the roof frame, pine or larch wood is considered. This is due to their strength.
An important requirement for the bars and boards used is their integrity and absence of damage. Before their installation, directly in, they should be treated with antiseptic and fire-resistant solutions.
There are the following types of roofs: single- and double-slope, hipped, hipped, half-hipped, hipped or multi-gabled. All of the listed types are shown in the figure:
Mounting the Mauerlat
The Mauerlat is the base that bears a significant part of the load of the entire structure. The Mauerlat consists of beams with a cross-section of 15x15 cm, installed parallel to the ridge. These beams require reliable fastening. The beginning of strengthening this foundation begins when laying the walls, when the so-called wire rod - thick wire - is laid between the bricks. In the future, beams are tied with its free ends.
Frame installation

The frame is usually called rafters engaged with the Mauerlat. Their fastening device consists of three nails per knot. In this case, two nails are driven crosswise through the rafter directly into the Mauerlat, and the third is driven perpendicular to the surface. The ends of the beams are also attached overlapping each other with nails or bolts.
Roof reinforcement

To strengthen roofs, a device such as a crossbar is used - these are beams that fasten rafters opposite each other. The fastening is also nailed.
During installation of the frame, a problem may arise with the construction under right angle. So how can you avoid making mistakes in your calculations?
The angle of the roof may depend on the local climate. For areas with cold climates, a slope angle of 40-45 degrees is typical, which prevents the accumulation of snow on the roof surface. In hot regions, the angle of inclination can drop down to three degrees. The angle should be measured with an “inclinometer”, after it is calculated using the formula. So, the length of the roof should be divided in two, and the height of the ridge should be divided by the resulting result.

Before covering the roof, sheathing is carried out. The dimensions of the boards for it are 25 cm thick and 2 m long. In the case of double sheathing, the first layer is laid parallel to the ridge, the second - perpendicular.

As a result, we find that making the roof of a house with your own hands is a quick process, but requires proper attention to the smallest details. In order for the building to last long years, during its construction it is necessary to comply with all necessary requirements and nuances.
Also, you shouldn’t waste time on trifles when choosing building materials, as this will negatively affect the quality. All boards and covering materials must be checked for integrity and quality.
The roof is top structural element structures that protect a wooden house from atmospheric influences. consists of rafter legs and sheathing. This system supports the roof, greatly facilitates the installation of roofing coverings and is one of the most important structural element Houses.
The durability and safety of the roof is ensured by proper arrangement of the attic ventilation system or a ventilated air layer in the attic roof, proper maintenance of the roof covering, and, most importantly, it is necessary to carry out timely reinforcement or repair of the rafters. The reasons for repairing the truss structure may depend on large snow loads, in which the rafters break, and, as a result, from prolonged wicking, they rot and collapse. The reasons for repairing rafters when rotting are explained by the fact that boards and beams from are used as the material for the rafter system in the construction of houses.
In our article, we will look at options that allow us to strengthen the rafter structure, and we will also talk about ways to restore damaged and rotten rafter legs and sections of the mauerlat.
Strengthening the load-bearing truss structure using various options
In rafter systems, in order to increase the load-bearing capacity of rafter legs, several installation options are used. Strengthen the rafters with an additional wooden beam - help, double-sided overlays and installation struts, or arrangement of a board-and-nail farm.
The section of the rafter leg span between the rafter leg and the mauerlat beam, even with a cross-section of material suitable for the strength characteristics, may not pass the deflection calculation. IN in this case, the only solution in this situation is to increase the height of the rafter legs. Strengthening the rafters can also be done by including support in the beam. The role of support is performed by additional wooden beam, with a cross-section selected for deflection calculations, including the height of the rafter section. The location of the help is in the gap between the rafter leg and the mauerlat (Fig.). The additional beam is attached to the rafter leg with jagged metal plates or bolted clamps.
 The place where the continuous rafter leg rests on the strut is a rather dangerous node, where a fairly large bending moment can occur. When the bending moment increases by leaving dangerous situation there can only be an increase in the cross-section and height of the rafter leg. Another solution is to increase the width of the rafters. The width of the continuous rafter leg can be increased using double-sided board overlays(rice.). We select the width of the linings by calculating the total cross-section of the rafter beam for the maximum bending moment. The linings are attached to the beam on both sides with bolted clamps, bolts or nails.
When strengthening a rafter leg in two ways at the same time, for example, strengthening the rafter with help and double-sided plank overlays, it is recommended to increase the length of the rafter leg beam and move the edge of its support on the mow beyond the knot. Application of this constructive solution It will decide not only the strengthening of the deflection location in the span, but also the strengthening of the support unit.
 Often, under various circumstances, there is a need to reconstruct the roof to a steeper slope. In this case, the installation of new rafter legs is done by merging them with a cross wall of boards using nails with the old rafter system, if the integrity and safety of the old rafters allows this. New rafters are introduced into the structure below or on top of the old rafters. This creates board and nail truss(Fig.), which provides a new roof slope angle and increases the rigidity of the rafter system.
The method of strengthening the truss structure discussed above speeds up the work process due to the fact that old roof can not be dismantled. At the same time, the under-roof space does not increase, and if the purpose of changing the roof slope angle was, then we will not get additional volume.
Methods for restoring damaged truss structures
Often, strengthening the rafter structure involves timely repair of the rafters. The reasons for repairing a rafter structure arise when the end of the rafter leg rots. Wood rot can occur due to the use of raw material for beams or in the absence of properly equipped ventilation in a cold attic space. Rotting of the mauerlat or the ends of the rafter legs can also occur due to the lack of attic vents.
With sufficient ventilation and adequate insulation of the attic, damage to air vents and vapor barriers in the structure may occur. attic room. main reason Rotting of rafter legs and mauerlat is hidden in a leak in the roof or in the absence of a waterproofing layer between the wall masonry and the wood, where moisture in the wood often occurs from the masonry.
 In this case, when the end of the rafter leg rots, the support unit for the beam on the mauerlat loses its reliability and reinforcement of the rafters at the support unit is required. The problem can be solved using the attachment method additional strut to the lower end of the rafter leg, and rest it against the same Mauerlat beam (Fig.). Additional struts are fastened using nails and resting on the rafters in the grooves.
Additional stability can be given to the rafter beam by extending the lower ends of the additional struts. If the reinforcing struts are rested against an additional support, it becomes possible to partially reduce the deflection of the rafter leg in the span between the mauerlat and the rafter leg.
Damaged areas of the structure can be restored and strengthened using several methods, which we will consider below.
For example, repairing the unit that supports the rafter leg on the mauerlat can be done using wooden plates that rest on the mauerlat with its end. Note that this method is used only in case of a single damage to the rafter beam with subsequent installation of twisted wire.
 Repair of the rafter leg can be done using bar prostheses (Fig.). The advantage of this method is its use in case of massive damage to the rafter beam. Repair of rafters using bar prostheses begins with securing the rafter beam to temporary supports. Next, the damaged part of the rafters must be cut out; to do this, you need to disassemble part of the roofing. The rod prosthesis is put on the rafter beam and rests on the Mauerlat. The prosthesis must be provided with a support platform that prevents the rafter leg that rests on it from sliding. The braced grid ensures compressive rigidity upper belt prosthesis.
 The reasons for repairing a rafter structure often include damage to the end of the rafter leg and rotting of the section of the mauerlat on which it rests. rafter beam. In such a situation, you can use pads resting on the beam (Fig.). To begin with, we will fix the rafter leg on temporary supports and cut out the damaged areas of the Mauerlat and the rafter leg. Next, we’ll hammer the crutches into the masonry and lay them on them. meter beam. A one-meter-long bench can be laid on the ceiling or directly on the wall, if the structure of the ceiling or walls allows this. On both sides of the rafter leg we strengthen the reinforcing strut with nails and rest it against the laid beam. To support the sheathing, we will make a new elongated filly.
Ensuring a normal air exchange process in the attic floor is one of the most important points to preserve the wood of the wooden roof structure. If there is insufficient air exchange in attic Fungal spores develop and, as a result, wood rots. To restore ventilation, a number of measures must be taken (Fig.).
 It is worth knowing that the cross-sectional area of vents and dormer windows should be from 1/300 to 1/500 of the total area attic floor. The width of the vents should not exceed 2.5 cm. Having studied the nature of the movement of air flows in the room and determined the air temperature at the boundary of the insulation, there may be a need for additional dormer windows and vents. Note that at the upper limit of the insulation, the air temperature should not exceed two degrees, regardless of the level negative indicator outside air temperature.
It may be necessary to increase the thickness of the insulation layer. To do this, it is worth measuring it; maybe it will be enough to simply loosen the caked insulation (this must be done once every five years). The problem with insufficient air exchange may also be hidden in a damaged vapor barrier located under a layer of insulation; to do this, it simply needs to be restored.
It is worth adding that people who decide to build a log house may be confused Brick wall on the images. Don’t worry, it doesn’t play any role here, since the rafter system is the same, both in brick and in wooden house. Your task is to familiarize yourself with how to repair it, and in this article we tried to provide comprehensive information. Use it and everything will be fine. But besides this, you can also familiarize yourself with other materials on our site.