How to weave a willow hedge. We weave a fence with our own hands: horizontal design. Types of wattle fences: from fencing a site to decorating flower beds
Very often the desire to do something with your own hands is driven not by the desire to save money, but simply by putting your soul into the arrangement living space. For example, many are happy to enclose their plots with fences woven from willow twigs. The entire process of harvesting, storing and weaving takes a lot of time. And the result is an original fence made from branches of the well-known willow tree, made in the best Slavic traditions, emphasizing all the charm of the rustic style. It can be made alive or inanimate. And you need to start with preparatory work.
DIY wicker willow fence
Preparation of material for braiding
Probably somewhere you can buy ready-made rods for a wicker fence. But willows grow almost everywhere, so it’s easier to prepare them yourself. And work done from start to finish with your own hands brings greater satisfaction.
More than six hundred species of willow are known. And only two of them are not suitable for making a wicker fence. White willow, or willow, grows up to 30 meters, so a living wicker can soon become a real fortress. White willow branches are only suitable for non-living fences. Brittle willow, or broom, has very fragile branches that are not suitable for weaving.
The most suitable time for harvesting willow branches for a hedge is considered to be the period when there is no sap flow, that is in early spring or late autumn. You need to cut the suitable rods with a knife.
For non-living fencing, harvesting can be done between October and March, weather permitting. Some people do this during sap flow, because for non-living wickerwork the twigs do not need to be rooted. But this is not always convenient, since it is more difficult to choose shoots of the required length and thickness among the foliage.
The branches need to be selected the same length to facilitate the weaving process. The thickness of the core of the rods should be from 15 to 40 mm in diameter. If the wood is red-brown in color and the core is loose, then such rods, due to their fragility, are not suitable for weaving a fence.
Storage secrets
To prevent the work of preparing material for the future fence from going to waste, it is important to properly preserve the cut willow branches. If the collection took place during the period of sap flow, then all branches must be cleared of foliage and bark. Then they need to be dried in the sun, laid out on boards. So that they do not lose their natural luster, they need to be laid out as rarely as possible. In heaps they become stained and dull.
If the harvesting was carried out in the cold season, from late autumn to early spring, then additional work is required so that the material is completely ready by the time of weaving. If the twigs are going to be stored for a long time, then there is no need to remove the bark from them. But they require good cooking. To do this, the branches are dipped in boiling water for about five minutes. To avoid fungus or mold, they must be washed after cooking.
To store willow twigs, you need to choose something that is not very wet, closed room. Otherwise they will begin to rot. A cellar or insulated attic is well suited for this purpose. It is important that the temperature there does not fall below 0 degrees, but also does not exceed 40 degrees.
Vertical living wattle fence
To make a living wicker fence with your own hands from willow branches, you don’t need any special skills. An ardent desire and an idea of what should happen as a result are enough.
 Living vertical wattle fence
 First you need to make markings for the future fence. In the marked area it is necessary to install supports made of willow branches. The diameter of each support must be at least 5 centimeters. The distance between supporting branches is from 1 to 1.5 meters. Digging depth is 40 - 50 centimeters.
Not only willow branches can be installed in pre-prepared holes. Metal supports or wooden beams are also suitable for this purpose. Over time, they will still not be visible behind the overgrown branches.
The supports are connected to each other using crossbars made from prepared rods. You can secure them with wire. For a fence more than 1.5 meters high, it is necessary to make two rows of crossbars, top and bottom.
After this, the main part of the work begins - the construction of a future living willow fence with your own hands. Each twig is stuck into the ground to a depth of 30–40 centimeters at a distance of 15–30 centimeters from each other. In this case, they should be tilted in opposite directions. Thus, by alternating inclination, the rods are intertwined with each other, as well as with transverse branches and supports.
The dimensions of the weaving cells can be adjusted using the pitch (the distance between each twig). If the cells are small, then the fence will not be visible at all in the future, and access to the site will be denied even to small animals.
It should be remembered that rooted branches will grow and thicken. In order for the wattle fence to be solid and reliable, cuts must be made at the points where the twigs touch. The cut branches are secured with tape or rope. Then they will grow together, and the fence will become not only a natural decoration of the site, but also reliable protection.
DIY classic wattle fence
To work you will need following tools: knife, pruning shears, awl, hammer, screwdriver, shovel and gloves to protect hands.
For supports, select willow branches with a diameter of 3–5 centimeters. They need to be dug to a depth of 30-50 centimeters with the same step, 30-50 centimeters. The height of the supporting branches should be 20 centimeters higher than the expected height of the future wicker fence.
 The process of making a wicker fence
 To make the wattle even and neat, before weaving begins, strips are attached to the tops of the supports, which will serve as a kind of guide. They are removed upon completion of work.
Weaving starts from the bottom. The thick edge of the rod is held against the support. The rod itself is passed between the supports as long as its length is sufficient. The edges of the twigs are left on the inside of the fence so that they can then be carefully cut off. The appearance of the fence will not be affected.
The next row of weaving starts from the adjacent support. If desired, you can weave not one, but several rods at once. In this case, the pattern of the fence will be clearer, and the fence itself will be stronger.
Every five or six rows are compacted. To do this, tap the top row with a hammer near the supports. To ensure that the lower edge of the fence does not suffer from excessive moisture after rains, you can place the bottom row a little higher. To do this, screws are screwed into the supports at the required distance from the ground.
At the end of the work, the screws are screwed in at the upper level of the supports above the last row of the braid. This will protect the wattle fence from losing its shape due to high humidity and temperature changes.
Anyone can master the art of weaving a fence with their own hands from willow twigs. A little time and effort will make your work a source of pride and imitation. And your new fence will fit harmoniously into the rural landscape.
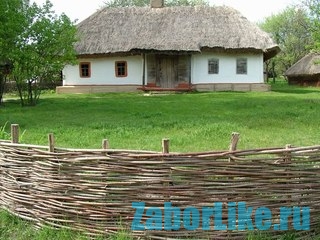
A wicker fence is a stylish fence made of branches or twigs intertwined with each other, which is selected for fencing personal plot or one of its component parts. Has a decent appearance, looks great against the backdrop of the usual rural landscape, but at the same time it is more of a landscape design than a reliable protection of the home.
The wattle fence has long been considered a symbol of comfort and measured rural life. The technology of weaving such a fence has been preserved since ancient times. To carry out this design, you can use all kinds of available materials, but the most popular are branches of different trees.

Peculiarities
Wicker type fences differ from each other in various parameters: in height, in differences in weaving methods and in external design.
Wicker fences come in 3 types in height:
- High ones (from 2 meters and above) can become quite high-quality protection. Such a fence will look decent if the pillars in it are made of stone, and a wicker product is placed between these pillars.
- Low products. Their height will not exceed 0.5-0.7 m. They are more suitable for decorating a flower bed; they are used as elements stylish design landscape.
- Wicker fences a meter high are used to highlight a recreation area from the rest of the territory summer cottage.


According to the methods of weaving, fences are divided into:
- Horizontal- the most common type, the easiest to perform. These fences will serve you much longer than their vertical counterparts.
- Vertical It is very difficult to weave fences with your own hands if you do not have experience, but those who know how to do it masterfully create stunning masterpieces, decorating a new fence with intricate patterns.


Wicker fences can also differ in the methods of creation and use:
- A wicker fence less than 0.7 m in height is installed on a prepared base; most often a metal base is used to increase the service life of the product.
- Flat wattle fence is best installed in sections; the length of just one such section can be up to 2 meters. This weaving method is easier than all others to repair, and if necessary, one of the parts can be easily completely replaced.
- Decorative fences installed in the form of a circle are most often used to decorate flower beds and flower beds.
- A wicker type fence is, first of all, pillars that are dug into the ground, with branches or vine twigs woven around them. To increase the durability of the product or create unusual and interesting patterns, special durable poles are installed between the racks.


A fence of this type will completely satisfy the owners in all aesthetic aspects. It will give any site a special rural charm. In terms of strength, such wickerwork will naturally be inferior to a stone fence, but it will decorate your site.
For the weaving procedure itself, you will need long and thin rods that will create a flat fence, and slightly thicker stakes - the rods will be held on them. You can choose the vine of any plant that suits certain requirements. A “living” fence is often grown from willow twigs and bamboo. In addition to twigs, you can choose other materials - boards, picket fence (thin and flexible).

Advantages and disadvantages
Wicker fencing has the following main advantages:
- Interesting view. Weaving helps turn the fence into a real decoration for the entire area. Tall or low products with different types plexuses become a stylish addition to the design of any garden plot.
- A wicker fence is completely safe, since no life-threatening substances are used in its creation.
- Low price. If you make a fence yourself from wood from your own site, you won’t have to spend anything at all. But if you buy already made fences, their cost will fluctuate depending on the amount of material, the height of the structure itself and the type of weaving chosen.
- Easy to install. You can decorate your yard with fences without specialists.


However, this product also has a number of disadvantages:
- Short service life, since such a product is afraid of gusts of wind and any precipitation.
- If you want to put a fence on your property, then it is worth remembering that it will only serve a decorative function and will not save you from unexpected visitors.
- Complex repair work. When at least one of the elements in such a fence breaks, you will have to redo the entire fence or an entire section.

Before choosing a wicker fence, remember all its positive and negative qualities, check the duration of its service and all the features repair work, installation duration and environmental aspects.
Types of weaving
Before you start weaving from twigs or branches, you need to choose the method by which you will create a new fence. The most commonly used options:
- Vertical type will require the presence of strong horizontal sticks between the supports. They will be fixed in increments of 20-30 cm. The rods are woven between them, starting from the bottom to the top. The length of the branches in this case should be 15-20 cm less than the height of the fence itself. Vertical weaving is often done from boards - then it turns out beautiful wooden fence. You just need to take the boards, use them to weave vertically, and use a support to align the ends. The support is usually installed at the top of the fence. To give beautiful effect The same support is made at the bottom of the fence.

- Horizontal weaving everyone calls it classic. The rods are intertwined with an “8” or an “infinity” sign. That is, each new workpiece is a natural continuation of the one in front. The length of the blanks in this case will be at least 2 m. The supports are installed in increments of 25-30 cm so that the branches are easy to bend. If you have a lot of small twigs, collect them all together in bundles and weave them all at once. One of the varieties of such weaving is the inclined method, which is done diagonally, which looks very beautiful.

A horizontal fence can also be built using shields. First, the shields themselves are made, in each of them required quantity supports and the workpieces themselves are carefully woven between them. The panels are secured to each other with nails and self-tapping screws.
Panel wickerwork is also constructed from boards, only the spans between the supports will be larger.

Manufacturing materials
Wicker fences can be constructed from those materials that are particularly flexible. The most unreliable of them are cattails and reeds. They are unlikely to last more than 4 years, as they dry out, and after that, fences made from them quickly lose their appearance and collapse. More often, vines and willow are used to produce wattle fence, and today this kind of fence made from small boards is especially in demand, as they look stylish and are very durable. Companies that produce wicker products offer universal PVC fences, and although this is not a natural material, it is very durable and will last for many years.

Willow
The branches of this tree are strong and flexible, so they are often used to weave baskets and fences. Before you start weaving, the rods should be steamed well so that they are even more bendable.
You can make fences from willow twigs using any method. The vertical version looks best with them. Place it horizontally first. support structures, then willow branches are woven vertically, burying their ends in the ground. A little later, the willow twigs will take shape, turn green and create the effect of a natural fence design.

In order for willow wicker to last a long time, the wood must be treated special composition, and where the fence is installed, dig a trench for drainage and pour sand instead of soil.
Vine
Vine is very bendable and rather long branches of trees and various shrubs that are chosen for building fences and even used to build houses. The wickerwork is aesthetic, natural and beautiful.
In order for the fence to be strong and last longer, the following requirements must be met:
- To make it easier to work with the rods and give them flexibility, they are soaked in hot water or left in a well-heated bath for a couple of hours. After this, you should immediately begin weaving, because after the material dries, it will lose its flexibility, but will perfectly hold any shape.
- For a low decorative fence you need to select branches no more than 2 cm thick, for tall wooden wicker fences - from 2 to 3 cm.
- First, you should carefully remove all the bark from the vine, apply a disinfectant, potassium permanganate, stain and varnish.


The vine is chosen for decoration decorative fences, which will complement the design of a personal plot, divide it into different zones or decorate courtyard flower beds.
Boards
A wicker fence made of boards will carry both a decorative and protective load due to its reliability and ability to protect against uninvited guests appearing on the site.
Selected for production unedged board, planed boards and posts (they can be made of metal, wood or concrete). The fence will stand using the tension of “woven” boards, but nails can be used for additional fastening.
A small hole at the bottom, under finished product, more often they are laid with ordinary bricks or stones of different sizes.


Wicker elements made of wood in a brick fence are very popular. If you want to weave a fence from boards yourself, then be sure to look for an assistant, since it is very difficult to build this structure alone.
The most popular type of fence is Austrian wicker. For its construction they choose pine - inexpensive material, characterized by a long service life. Such a structure must be coated with an antifungal substance.
Fence supports are made of wooden beams or metal corrugated pipes. They are fixed at equal distances and can be painted in any color or decorated with boards for style.


PVC
Most often, wicker fencing is associated by ordinary people with natural materials, but Today it is also produced from PVC, which has a number of positive features:
- Long service life. This is the main difference between PVC and other materials. Throughout its operation, the fence will not lose its stylish appearance.
- Mobility. Anyone can make and install a plastic fence. The design is lightweight and convenient for transportation.
- Ease of use. PVC fences will not fade in the sun, will not be afraid of heat, cold and high humidity. In order for the fence to maintain its decent appearance for a long time, it is necessary to cover it with a special compound from time to time. Metal components are constantly treated with a special agent.
- Wide choice of models. Fences can be selected in all sorts of colors, which will perfectly complement the design of your garden plot. It is also important to initially choose the right parameters for the PVC fence.
- Acceptable price. Due to the ease of production, PVC fences have a reasonable and affordable price.


What to choose?
You have an excellent opportunity to first choose what material to make your new wicker fence from. In addition to those already mentioned, you can opt for hazel - this is a type of twig that is collected only in early spring, before the first buds appear on the branches, it is then that the young shoots have special flexibility. Hazel is not inferior to willows in terms of service life.

You should also pay attention to artificial rattan, which has many advantages: it looks natural, in terms of external characteristics it is not inferior to natural samples, and thanks to it, it preserves Natural resources. Rattan will not respond to climate change and therefore can last for decades without requiring repair costs. Natural rattan quickly grows into the ground, which artificial rattan does not. Synthetic rattan costs much less than natural rattan.


Alpine vine is very popular today due to its neat appearance, so you can always combine it with other types of weaving to make your fence even more exclusive.
By the way, all kinds of weaving can be used not only for fences, but also in flower beds. A flowerbed with a wicker base in the form of a fence will not require extra costs and it will look great both in the country house and in the garden of a house in the city.


Decoration
Wicker fences can be very successfully decorated with a number of secondary elements to make the decor of the site unique.
Checkerboard is when the vine is taken in a bunch and woven horizontally. The end result is an original product.
Pletni and tyny are a traditional type of fence made of branches and stakes. Once upon a time they were an indispensable attribute South Russian, Belarusian and Ukrainian villages. Most of today's summer residents prefer more durable modern materials. However, among amateurs ethnic style interest in wicker fences is still high. In this article we will tell you how to make a fence at the dacha with your own hands, and we will look at step-by-step instructions.
Using wickerwork in site design
Wicker fences look especially organic in areas where there are small log buildings, lattice gazebos made of slats, garden furniture from rattan. Installing a high fence along the entire contour is a labor-intensive task, especially if the area is large enough. But to withstand the style and tie individual elements ethnic design into a single whole, this is not necessary. Small fences can also be used in the internal space of the site:
- to divide the territory into zones;
- for fencing flower beds and beds;
- to create supports for climbing plants.
If it is not possible to enclose the entire area with a fence, you can fit “windows” from it into a stone fence.
A medium-height wattle fence successfully zones inner space plot.Mistakes when creating wicker fences
Wattle is a short-lived structure. Even a well-made wicker fence rarely lasts longer than ten years. A number of mistakes that are made when creating such fences can further reduce their service life:
Mistake #1. Insufficient preliminary preparation of materials.
Remains of bark, breaks and other defects of stakes and rods cause premature damage to the fence.
Mistake #2. Poor site preparation.
A wattle fence installed in a damp, flooded area will be susceptible to rotting, distortion and debris.
Mistake #3. Poor base preparation.
Tall wicker fences have a lot of windage, and in strong winds they easily fall over. If the supports are not strong enough, are sparsely located, and are not dug deep, there is a chance that the fence will quickly crumble.
Tip #1. It is better to install a wicker fence in small spans. This will allow you to easily remove and replace the damaged area if necessary.
Selecting material for creating a fence
Most traditional material to create a wattle fence - thin tree shoots. Most often, flexible hazel or willow rods are used, but you can use branches of almost any tree on the site or grape vines remaining after pruning. In addition, you can weave other materials:
| Material | Peculiarities |
| Wooden poles | Unlike wire fences, they have increased strength and greater wear resistance. Disadvantage: they are less bendable and harder to install. |
| Stems of reeds (cattail) | Easily accessible and cheap material. It is easy to prepare, flexible when weaving, and does not attract rodents. It has two disadvantages: high flammability and instability to mechanical loads. |
| Straw | Available raw materials that do not require separate procurement of materials for the base. It is woven in bunches into the mesh cells of the Chainlink. Disadvantages: flammability, attractive to rodents, fragility. |
| Veneer | Highly decorative, pliable material. Requires additional fastening to the base using staples. The disadvantage is the high cost. |
| Thin PVC pipes | Lasting, flexible material, not subject to rotting and weathering. Looks original and easy to install. Disadvantage: Requires financial investment. |
| Boards | A material that allows you to create a solid, durable and original design - “Austrian wicker”. Excellent for enclosing the outer contour of a site. The relatively high cost is compensated by the “rich” appearance. |
 Wicker planks are suitable for European-style areas.
 Pre-treatment of wattle material
The creation of a classic wicker fence from flexible rods begins with the preparation and pre-treatment material. For medium-height fences or small fences, it is better to take thin annual shoots. For taller structures, thicker branches are suitable - about 1 cm in diameter. The length of the cut material should be approximately the same - this will make installation of the fence easier.
Freshly cut rods are usually used - they have high bending strength and will not break during weaving. Preliminary preparation involves the following operations:
- Soaking the rods. The material is placed in a container with water for several days. During this time, the bark will soften a little and begin to peel off.
- Barking of twigs. Removing the bark – mandatory procedure. The bark is the first to begin to deteriorate from external atmospheric influences. In addition, unbarked wattle fence can attract hares in winter. It is more convenient to remove the bark using a pincher - a narrow board with a split in the middle.
- Antiseptic impregnation. Antiseptics will not only protect the material from mold fungi and putrefactive bacteria, but will also give it a tint.
The following tools are usually used for processing:
| Means | Dilution and application | Coloring effect |
| Hydrogen peroxide and ammonia | Mix 50 ml of 10% peroxide with 5 ml of ammonia. Use a sponge or brush to treat the rods 3 times with an interval of 15 minutes. | Bleaching of rods |
| Oxalic acid | Dissolve 50 g of acid in 1 liter of water. Use a sponge or brush to treat the rods once. After 10 hours, wash off the solution with any detergent. | Bleaching of rods |
| Potassium permanganate | Dissolve potassium permanganate powder in water to obtain a strong, intense color. Soak the rods in the solution for several hours. | Brown color |
| Iron sulfate and oak bark | Dissolve 50 g of iron sulfate in 1.5 hot water. Boil the rods in the solution. After drying, wipe with a sponge soaked in a decoction of oak bark. | Olive color |
Tip #2. Aniline dyes can be used to color rods. However, you need to take into account that they quickly fade under the sun and will require updating. You can also treat the rods with ordinary stain - it reliably protects the wood from damage and gives a lasting, pleasant color.
Site preparation and foundation installation
Depending on the height of the fence, different materials are selected as the basis for the fence:
| Base material | Height of fence | Peculiarities |
| Wooden stakes | Up to 1 m | Require additional protection from rotting. Before digging into the ground, you can insert the lower ends of the stakes into a piece of plastic pipe. |
| Metal rods | Up to 1 m | They do not rot, but have an unesthetic appearance. Requires painting to match the color of the rods. |
| Wooden poles or posts | Up to 1.5 m | They require additional protection from rotting and good penetration into the ground. You can insert the lower ends into a piece of pipe or cement the base. |
It is better to install wattle fences over 1.5 m in height in sections, each of which is woven separately. The finished sections are installed in the spans between the timber support pillars.
 To protect wooden supports from rotting, you can dip their lower part in liquid tar.
 Classic horizontal weaving of branches
Having prepared the base, you can proceed directly to weaving. Classic weaving is performed as follows:
- The rods are taken one at a time and, starting from the thick end, are threaded between the stakes of the base. The bends go alternately - left and right.
- Each row of weaving begins on the other side of the warp: if the previous one went on the right, the next one should start on the left.
- The first and last rod of each row is attached to the base with a wire lock.
- After weaving is completed, the sides of the fence are leveled with pruning shears.
 Classic way You can make a fence not only from rods, but also from poles.
If thin willow twigs or vine, you can make beautiful decorative weaving “checkerboard”. Technically, it differs little from the classic one. The difference is that the rods for each row are taken not one at a time, but in bunches at once.
All shoots in the bundle must be folded in the same way - with the lower ends in the hand. The end beams must be well fixed on the first and last column of the base. If you manage to weave a row to the outermost column, but there is still a fair amount of length left from the bunch, there is no need to trim it. It is better to wrap it around the support and braid it into the next row.
 Thanks to the greater visual emphasis of each row, a checkerboard pattern is created.
 Vertical weaving: creating tyns
One of unusual varieties high wattle fence - tyn, in which long, vertically located poles are used as the material. Preparing the base for tyna occurs a little differently than for ordinary wattle:
- On the drained site, durable support pillars. The interval between them is 1.5 m.
- The supports are connected to each other by two horizontal veins, around which the weaving will be carried out.
The poles for tyn should be well soaked, or better yet, evaporated. This will give them sufficient bending strength. Each pole is inserted from above and placed under the lower vein on the other side. The next one should go around the horizontal bases in a different direction.

Current questions about wicker fences
Question No. 1. What is a “living wattle fence” and how to make it?
“Live” is a wattle made from unrooted twigs that continue to vegetate. Typically, such structures are created from willow - it easily takes root. It is better to take material from basket, rosemary, purple or white willow. Place the rods in water and wait for the roots to appear. Then plant two rods in a row close to each other with an interval of 30 cm between pairs.
 “Living wattle fence” needs regular pruning of side shoots to maintain its shape.
 Question No. 2. How can you decorate a wattle fence?
The classic method is to plant tall sunflowers along the fence. You can sow both oilseeds and rodents, and decorative varieties. Sweet peas, morning glory, and kobeya climb well along the fence. Protruding vertical supports or poles of the tyn can be decorated with clay jugs, small cast iron pots, and hollowed out pumpkins. At the foot of the fence, benches made of logs and stumps and medium-sized daisies look organic.
Question No. 3. How to properly care for a fence?
Care wicker fence uncomplicated. It is enough to walk over it once a year with a brush dipped in a solution of some garden fungicide. The drugs “Horus”, “Skor”, “Abiga-Peak” are suitable. You also need to monitor the condition of the lower rows - they should not lie in puddles of water.
Question No. 4. How to protect a fence from insect pests?
Barked hedges are extremely rarely affected by pests. A fence made of poles can become the object of a shashel’s attention, but usually he prefers something “tastier.” If there are still concerns that the fence may be damaged by insects, you can treat it with Antishashelin with silicone.
Question No. 5. Is it possible to make a wattle fence from dry branches?
You can, but you need to soak them in water first. cold water for several days, and then boil for 2-3 hours. Further processing is carried out as usual - removal of the bark, impregnation with an antiseptic. It is important to check each rod for bending. It is better to throw away the excessively brittle ones immediately - they will break anyway, if not during installation of the fence, then during operation.
Recently, in the exterior of a suburban landscape design The rustic style has gained great popularity. In this regard, many craftsmen began to make wicker fences with their own hands, wooden gazebos, benches and much more. Quite often, in order to obtain a natural effect, wattle fence is used when decorating a summer cottage. Making it yourself is quite simple. To do this, just look at the proposed photo examples of various wicker fences and carefully study the master class.
Types of wicker fences
The eye of any summer resident will be pleased with a decorative wattle fence made with his own hands in one summer. The main value of such a fence is that it can be done practically from any available material. To make a wicker fence you can use:
Wicker fences differ not only in the material they are made of, but also in the method of weaving.
The classic way to weave a decorative hedge is horizontal laying of branches between supports However, to make a more unusual fence at your dacha with your own hands, you can use other types of weaving.
All types of wicker fences can be seen in the photo.
Choosing a wicker fence material
The service life of the fence will depend on the correctly selected material. So, for example, if the fence is built from reeds, then you need to be prepared for the fact that it will last no more than four years. A more durable wattle fence for the dacha will be obtained from vine, hazel or willow. It can last for more than 10 years, especially if the material is treated with antiseptic compounds.
The vine can be purchased at nurseries. For making an openwork fence, thin branches with a diameter of up to one centimeter are best suited.
Material for decorative fencing You can prepare it yourself, saving flexible bending branches after pruning trees in the garden. You can use rods for work chokeberry, cherries, plums, pears, apple trees. It is best if they are up to two centimeters in diameter. In this case, the weaving will be dense and the fence will have no gaps.
Particular attention should be paid to the base of the fence, which should consist from stakes with a diameter of over five centimeters. If you plan to install a high fence, then you will need to take steel supports as a basis.
Features of rod preparation
 To make a wicker fence with your own hands, prepare long, even branches. They need to be dried and tied into bundles.
To make the branches more flexible, they can be boiled in water or treated with steam. In addition to flexibility, “boiling” will give the vine branches brown tint. To obtain a brighter, rich color, crystals of potassium permanganate are added to the water.
If possible, the rods can be cleared of bark and treated with hydrogen peroxide. The result of using this material will be a very beautiful white fence.
Using iron sulfate, branches can be given greyish-brown tint, and stain can be used to paint a fence in almost any color.
In order to remove the bark from the twigs, you can use nippers or special tool- a pincher. It is very easy to remove the bark from branches that have stood in water for about a week.
Removing bark with your own hands is a long and labor-intensive process, so it is recommended to first prepare a comfortable work place.
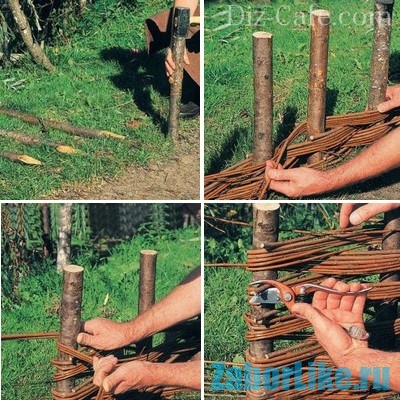
How to make a wattle fence with your own hands?
Having selected and prepared the material for the wicker fence, you can begin its construction.
First of all, supports are dug in, which can serve as stakes, metal pipes or wooden posts. The stakes should be buried 30-40 cm into the ground. If the prepared rods are very thick, then the hole should be at least 50 cm deep. Step between supports must be done at 50-60 cm.
To ensure that the fence stands level during operation, the support posts in the upper part are fixed with even strips, which are removed after the weaving is completed.
Weaving starts from the bottom row and gradually rises to the top. It is recommended to place the first row 5-10 cm above the ground. This will save the wattle fence from putrefactive processes, and it will last longer. The branches are alternately drawn between the supports so that the result is a figure 8.
The ends of the rods are secured with wire prepared in advance, and the tails are cut off with a knife. IN last row the ends of the branches are tucked along the stakes.
To make the appearance of the fence attractive, the ends of the blanks must be placed only on the inside of the fence.
A homemade wicker can be decorated with artificial sunflowers, clay pots or other items that suit the rustic style.
How to make a “living” hedge?
 Fenced summer cottages look beautiful ornamental shrubs. However, they require careful care, which includes crown formation and annual pruning.
A “living” hedge can be made from willow, which is unpretentious and responsive to care. To do this, in early spring, the rods are cut off and placed in water. Within 3-4 weeks, the cuttings should have roots and can be planted. This is best done in May, when the weather is favorable.
To mark the area under the fence, it is recommended use pegs and twine. Since willow is a moisture-loving plant, the best option for planting petioles there will be a groove from which water will not flow to the side. At the same time, throughout summer season You will need to ensure that the soil is always moist, but not swampy.
When planting rods, they need to be woven together in the form of a mesh. Such a “living” fence will delight its owners with its appearance all year round.
A wicker fence made with your own hands will become the pride of the owner and business card summer cottage plot. Of course, such a fence is more decorative, and its strength is inferior brick fences, but it gives a feeling of something unusual, kind, old.
On city streets, blank high fences are considered the norm. Homeowners strive to reliably protect their territory from uninvited guests, and if they want to socialize, they go to visit or invite loved ones to their place. Another thing is a village or country house. In a small village everyone knows each other. Many people are accustomed to greeting each other and communicating with each other without leaving the yard, but simply standing at the fence.
A decorative fence made of branches, woven by hand, will become a perfect choice for dacha residents. a real find. The construction of the structure costs pennies, the fence looks very original, and it fulfills its purpose - highlighting the boundaries of the site.
Making a braided pattern, or Ukrainian tyn, is not difficult. For this purpose they use birch branches, flexible willow vine, reeds, peeled veneer and boards. More modern look have fences woven from synthetic materials. The main thing is that they have increased wear resistance and strength.
Types of wicker fence
A boring fence assembled from branches can be easily improved by a creative owner with the form of weaving and working material.
Let's consider several options for wicker structures that can transform the tyn into an interesting fence:

The service life of a wicker fence made of branches depends on the speed of work. Tyn, concocted in haste, will last no more than 2 years. Careful weaving followed by varnish or other coating prolongs the life of the fence up to 10 years.
How to prepare the material correctly
You can build a strong village fence from different natural materials, as long as they are strong and stable in aggressive conditions environment. Most often, tyn is made from willow, and it can be living or non-living. In the first case, we are talking about planting young trees in the soil, which, as they grow, form a fence. Non-living fencing is created by hand from cut willow shoots.

A good option for weaving is grapevine. Its thin rods are highly flexible and able to withstand unpredictable weather conditions. A hedge of grapes carries high humidity and temperature changes.
Reeds and cattails as building materials are more suitable for zoning a site or creating low fences for flower beds. These plants are fragile and short-lived. After a few years, the wattle fence deteriorates and requires complete replacement. Therefore, it is not recommended to install it as a full-fledged fence.
An attractive hazel wickerwork is created using young flexible shoots. The harvesting of this natural raw material should be done in early spring, when there are no buds on the tree yet.
Fruiting branches are also suitable for weaving:
- Pears
- Cherries
- Apple trees
- Plums
- Rowan trees.
If there is free time, the owner can wander through the copses near the holiday village and cut any suitable twigs. Cut the branches at right angles using sharp garden pruners. In order for a wicker fence made of branches to be solid, the vine must have a small diameter. Optimally – up to 2 cm.
structure increases the service life of the fence. Other tree species quickly lose their attractiveness and are destroyed.
The shoots are harvested in early spring or closer to winter. The thickness of the rods is 1 – 3 cm. To create fences up to 1.2 m high, the thinnest rods are used. Thick vines are harvested for weaving high hedges.
It is better to remove the bark from the rods, and the exposed material– cover with stain or special oil for wood. The brown color is obtained by soaking the twigs in a manganese solution. Copper sulfate gives the material a gray tint.
Unskinned shoots can also be used. However, over time, the bark will begin to peel off, and the fence will lose its attractive appearance. It is convenient to clean the hard layer with a split thick branch taken from any tree.
If the shoots are prepared ahead of time, and the fence itself will not be erected soon, they must be tied in bunches and stored in the basement. Shortly before use, the “bouquets” are placed in a container with water and liquid is added periodically. Swollen rods become more elastic and obedient in work - it is easier to remove the bark from them. Some craftsmen have adapted to keeping the branches over steam, then the bark peels off like a banana peel.
Stages of making wattle fence in the country
In order for the process of weaving a country fence to proceed without delay, the owner must first ensure that there is a sufficient amount of material and auxiliary tools.
What will be required in the work:
- Garden secateurs.
- Hand drill for gardening.
- Willow vine with a diameter of 1 – 3 cm.
- Support posts made of corrugated pipes or wooden beams. At the end of the work they will hide under the wicker.
- Wire for mounting stiffeners.
- Screwdriver/screwdriver.
- Self-tapping screws.
- Knife, awl, hammer.
We will go through all the stages of making a wattle fence at the dacha.
Single weaving makes a fence made of branches lighter and more openwork. If the owner puts together a structure from tufts of vegetation, the fence becomes stronger and more monumental.
- Branch correction. The rods in the last panels are trimmed along the edge. At this stage, it is important to ensure that the material does not protrude beyond the pillars. Secure the shoots with screws or wire. The tops of vertical supports made from thick willow are also trimmed. Flexible pliable rods are bent onto inner side filled span and exit through the weaving.
- Fence protection. To preserve the colorful appearance of the wicker for as long as possible, thin wood must be treated with stain or special impregnation. The substance can be placed in a spray bottle and sprayed on both sides.
Weaving Basics
Real craftsmen who specialize in building fences from branches know several weaving techniques.

Features of horizontal weaving
The process preceding the weaving itself is always long and painstaking. To carry out the preparatory work, the owner needs a shovel and a screwdriver, pruning shears and a knife, an awl and a hammer. The marking is done by stretching the fishing line around the perimeter of the planned fence. The locations of the load-bearing parts are marked immediately.


It is recommended to take posts with a diameter of 4 cm. And it is better to use metal pipes for them, since wooden beams rot quickly. The supports should be deepened by half a meter. The interval between them should be 30 cm. But at the beginning and end of the fence, the step is taken a little less, which increases the reliability of the structure. The length of the post should exceed the fence by 20 cm.
It is better to weave tall hedges from thick rods. To ensure evenness of the weaving, a plank is placed on the support; as the work is completed, it is removed or left if the area is blown by the wind.
Weaving a fence from branches begins from the bottom, using the thickest vine and subsequently intertwining it with other pillars. The unused ends should only show on one side - this will make it easier to align them.
The weaving of the second row is carried out from the next support. As soon as the 4th row is created, the fence is compacted by tapping next to the post with a hammer. All work is completed by fixing the shoots with nails, protecting the shape of the fence from distortion by dampness, heat, cold and other weather phenomena.
Wicker fence decoration
A fence made from branches is already a decoration of the site. But if the owner wishes, she can make the tyn even more beautiful. Some homeowners place stones along the fence, creating fancy shapes from them. For romantic natures I will love the way of hanging flowering baskets with fragrant petunias, marigolds, violets and other pretty vegetation.

Will help to emphasize the country style clay pots, dry spikelets, bright pumpkin. Sunflowers planted scatteredly also enhance the rustic flavor. Attention to the fence will definitely be attracted by a cart wheel or a house made of a huge dry pumpkin.
Living wicker hedge
A feature of a hedge is its gradual growth, which leads to strengthening of the fabric. Caring for a green fence is easy - you just need to trim the growing branches and give them the desired direction. The living fence is not a reliable defender of the yard, but over the years it becomes stronger and turns into a solid fence.

Let's look at how to make a wicker hedge with your own hands. When using willow, work begins in early spring before or after sap flow. The bark is not removed from the cut material; the shoots are placed in water in a warm room. temperature conditions. Cuttings take root in 3–4 weeks, so planting a hedge should be planned taking into account the climatic conditions of the region.
Once the roots appear, the cuttings are planted in a row marked with pegs and rope and provided with sufficient moisture. Perfect option– plant the shoots in a ditch in which water will be stored during irrigation.
Like any fence, a wicker hedge requires a supporting part. Wells for posts should be dug every meter and a half. Thick rods with a diameter of 4–5 cm act as supports. They are stuck into the ground to a depth of 40–50 cm. To make work easier, the bottom of the sticks can be sharpened. Any pillars can be used to create a load-bearing part. Both metal and wooden supports will disappear from view after weaving.
The cross sections are fastened by horizontally laying thin branches on the posts. For a fence no more than 1.5 m high, 3 rows of branched logs are laid. Weaving begins when completely finished frame. Branches Ø 3 cm are deepened into the ground by 30 cm. Between the shoots, voids of 10 - 30 cm are left.

As the willows grow, they will be filled with greenery. The shoots are placed at a slight angle to make it more convenient to combine them with neighboring branches and drag them between pillars and joists. IN additional processing Living wickerwork does not need any decoration. It is attractive in itself, because nature took care of the beauty of the willow.
Pros and cons of a wicker fence
Every owner who has worked on creating a wicker fence with his own hands must note the following points among the advantages of the fence::
- Easy to assemble.
- Environmental friendliness of the material.
- Originality of design.
- The ability to twist the hedge in a curvilinear manner.
- There is no need for concreting supports and pouring strip foundations.
However, every sane person understands that twigs do not belong to durable materials. In the event of a fire, they will quickly ignite, and over time they will simply rot. Another disadvantage is that fences only harmonize with rural landscapes.
How Alternative option short-lived fence, it is worth considering a plastic imitation of a non-living hedge. The fence is constructed from PVC material, resulting in a fabric identical to real wicker.
What is good about a synthetic fence:
- Possibility of dismantling and moving.
- Longer service life compared to natural rods.
- The presence of a flat top and side frame makes the fence more perfect.
The disadvantage of a fence woven from synthetics is its cost. If a simple wicker can be created from branches cut in the garden or forest, then you need to pay money for the building materials. And if the owner is inexperienced in installing fences, then he will have to spend money on paying hired workers.


