Decorative fireplace made of paper. We make a fireplace from cardboard (carton box) with our own hands. Options for decorative fireplaces
A false fireplace made of cardboard boxes is a common interior item in city apartments and photo studios. There are several ways to make such a structure yourself, but all of them do not require construction skills or serious financial investments.
A decorative fireplace is a solution for those who want to create an atmosphere of comfort and warmth in their home, but it is impossible to install a real fireplace. A false fireplace can be built without difficulty and expense from ordinary cardboard boxes.

Options for decorative fireplaces
There are many tips on the topic: “How to make a decorative fireplace from boxes with your own hands?” This article will discuss the three most common options for creating a false hearth from cardboard:
- fake wall fireplace;
- fake corner fireplace;
- Christmas hearth.

Making a fireplace from boxes is a simple and inexpensive process. The installation of such a piece of furniture takes no more than 2-3 hours.
Creating a wall fireplace
A wall-mounted fake fireplace made from boxes is very often found in the apartments of city residents. To make such a piece of furniture, you need to prepare following materials and tools:
Step-by-step instructions for creating a false fireplace from boxes:
- First, a sketch of the future structure is made on paper. Craftsmen without imagination can find a fireplace diagram on the Internet. The dimensions of the parts are indicated in the figure.
- For convenience, the installation layout is transferred to a cardboard box. To make it easier to work, all main lines are drawn with a pen or marker, auxiliary lines - with a pencil.

- At the bottom of the box, a stationery knife (cutter) is used to make a furnace rectangular hole for "fire". The cut off blades of the box are glued to the back wall of the package. If the box is very large, then the excess part is simply cut off.


- After creating the main frame, proceed to finishing works. The surface of the box can be covered with wallpaper, film or tracing paper. Many craftsmen apply Chinese ornaments using special prepared templates. If you plan to do classic version fireplace, then most often they resort to the following decoration technology. Individual parts are cut out from foam borders to create decorative decoration. They cut the foam at an angle of 45 degrees, so that later the parts can be easily assembled into squares/rectangles.

Advice! You can buy parts for decorating the fireplace (curbs, baseboards, etc.) at any hardware store.
- Squares and rectangles are made from the cut out strips on the walls of the future fireplace and glued to the surface of the box. Typically, the figures are placed symmetrically to each other, two rectangles on each side relative to the combustion hole and directly above it. The place for the “hearth” can also be decorated with such borders.

Advice! As decoration, some use foam plastic parts in the form of angels, flowers, etc.
- At the top of the decorative fireplace made from boxes you need to glue the baseboard. It forms a mantelpiece and gives the structure a finished look.
Important! The mantelpiece is made from thicker foam or plywood.
- The material under the shelf is glued to the top of the fireplace.

- Next we start painting the box. Water-based paint is most often used white. If you plan to do decorative false fireplace antique, then instead of coloring compounds use ordinary putty for drywall. It is applied to the future fireplace and dried with a hairdryer.
Advice! The paint is applied in several layers using a brush, in hard to reach places use a sponge to cover.
The wall-mounted fireplace made from boxes is ready, all that remains is to decorate the structure. To simulate fire, you can glue a photograph of a live fire to the inner wall of the fireplace. You can put homemade “firewood” in the firebox or put candlesticks. It all depends on the flight of fancy of the master.

Master class on creating a corner fireplace from boxes
A corner false fireplace is most often installed in small rooms. The creation of this design takes place in several stages:
- Selecting a location, taking measurements.
- Place a cardboard box in a suitable corner. It is advisable that its parameters correspond to the parameters of the corner space - this will make it easier to make a fireplace.

- A semicircular slit is made in the front wall of the package so that it can be folded inward.
- At the top of the cut part, two arcs are made so that it takes the shape of a triangle. The resulting part is fixed with tape or glue between the sides and front of the fireplace.
- The back wall of the box is cut off and the structure is “adjusted” to an angle.
- The walls of the box are glued together with tape.
- The resulting false fireplace from the boxes is wallpapered or painted. The “hearth” covered with paper or film “like a brick” looks impressive.
- The fireplace tabletop is made of plywood or thick cardboard, glued in several layers. The shelf is covered with paint or pasted over to look like wood.

The mantelpiece can be made of lightweight building material- plywood, thick cardboard, etc.
You can decorate a corner decorative fireplace made from boxes using any attributes - candles, garlands, figurines, etc.

Homemade fireplace from boxes for Christmas
To create a festive “hearth” you will need three cardboard boxes - one large and two smaller. They are glued together - the big one is in the center, the small ones are at the edges.

New Year is a holiday of magic and miracle. Both children and adults are looking forward to it. It is on this holiday that there is an opportunity to get at least a little into a fairy tale, hear warm words and wishes, spend time with family, loved ones and friends. The New Year requires thorough preparation - from gift wrapping to decoration festive table. The main place in the pre-holiday bustle is home decoration. The presence of a fireplace in the house creates a special warmth and mood. According to tradition, New Year's gifts usually lie near it. Therefore, a beautifully decorated fireplace can be the highlight of your home this holiday.
Advice! If the boxes have different heights, then they are trimmed and made the same size.

In the central box, the front wall is removed and a combustion hole is obtained. Visually it is distinguished using a foam border or plinth. To make a fireplace “like a brick”, small rectangular pieces of the same size are cut from cardboard or polystyrene foam, glued to the surface of the boxes in checkerboard pattern like brickwork. The fireplace is primed in several layers so that all parts are the same color. Next, the installation is painted brown, and the borders are painted yellow. To make the “bricks” more textured, gold paint is applied pointwise to them using a sponge. The finished decorative fireplace is decorated with New Year's tinsel, toys and garlands. We advise you to study the material in more detail and add the article to your bookmarks.

You can easily make a decorative fireplace from boxes with your own hands. Such a structure will make the room warmer and more comfortable.
An imitation fireplace, decorative fireplace, false fireplace or bio-fireplace, whatever you call it, is a great thing, especially for city dwellers, for whom a fireplace is, at first glance, a pipe dream. Of course, it’s impossible to make a real fireplace in an apartment, but a false fireplace is easy to make, even with your own hands. So, how and from what you can make a decorative fireplace with your own hands, see below.
DIY decorative fireplace made of cardboard
You can make a false fireplace from an ordinary cardboard TV box.
For this you will need:
- cardboard box
- foam baseboards and figures
Supporting materials:
- plan drawing
- scissors
- stationery knife
- pen or pencil
- ruler
- construction tape
- special glue (installation time for gluing foam)
To complete:
- putty and spatula (optional - if you decide to putty the fireplace before painting)
- white water-based paint (you can use paint of a different color)
- brush
Having prepared the necessary materials, you can safely start making a false fireplace. First you need to transfer the drawing from the drawing plan to the box: use a pencil and a ruler for this.
Do not use a marker as it will bleed through the paint and even if you don’t want to bother with putty, you will have to putty the box before painting.
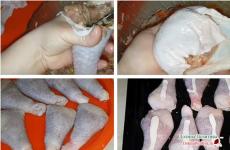
At the future location of the fire, we make slits with a stationery knife, it should look like in photo No. 5 - 2 labels that we bend towards the back wall of the box and glue with construction tape (carefully glue them with tape on all sides, including the bottom of the box).
Now we glue the foam parts in accordance with your sketch (we cut the borders at the junction of the corners at an angle of 45 degrees). We glue a wide patterned plinth on top - this will be the basis of the future fireplace shelf.
We place foam plastic supports behind the baseboard (photo No. 10) and place the bed on top foam board- you will have to work hard with the corners to glue them without gaps.
Once we have glued all the parts, we carefully putty our false fireplace. Let the putty dry, then paint the fireplace water-based paint. That's all, we admire the finished false fireplace. This fireplace will fit perfectly into a photography location.

You can just as easily make a false fireplace out of cardboard in a corner partition (corner fireplace). To make this false fireplace you will need: again a cardboard box, adhesive film or brick wallpaper, scissors, tape and a garland.
We make a triangular base from a cardboard box, as shown in the photo. Next we cover it with wallpaper or film (in fact, in this case you can also use foam parts and paint everything at the end). But the tabletop for the future fireplace can be made not only from polystyrene foam, as is the case in in this case several layers of cardboard were glued together, which were then covered with wood-look film. We place a garland or battery-powered candles into the firebox of the finished fireplace or admire the result.

By the way, if you want to make a false fireplace out of cardboard, but you don’t think you have a box of the right size, don’t forget that you can simply glue several boxes together. Further progress of work according to the principles described above.

By the way, if you are making a fireplace not for a couple of photo shoots or just for Christmas, but plan to leave it in your interior for a long time, it makes sense to use the space in the walls of the fireplace. It could make a great hiding place or just shelves for handicrafts.
Creating a fireplace with secret shelves begins with the formation of a “skeleton” - its structure is shown in photo below No. 1 (the structure of the skeleton will directly depend on the size of the shelves you want). The finished skeleton is covered on all sides with sheets of cardboard (photo No. 2, 3, 4). Next, we make podium No. 5 and tabletop No. 6 (the bed is made from 6 sheets of cardboard glued together). For reliability, we cover all joints with newspaper and PVA glue.

Now let’s finish the tabletop: glue it to the top of the fireplace ceiling plinth, so that its top is flush with the 6 sheets of cardboard that were previously glued. And on top of the cardboard sheets and the baseboard we glue the seventh sheet of cardboard - as shown in photo No. 8 (No. 9 - the table top from the wrong side, No. 10 - carefully evenly glue the table top from the wrong side).
We close all the corners of the fireplace with a special construction corner No. 11. We cut out “bricks” from cardboard and glue them into the firebox, simulating brickwork No. 12. We make an uneven relief on the bricks with putty or ordinary crumpled paper soaked in glue, when the brickwork dries, we paint it in desired color. We cover the shelves with paper or self-adhesive film. We putty No. 13, 14 on all sides of the fireplace.

But that is not all! Decorations will bring your almost finished fireplace to perfection. We glue the baseboard around the firebox, we also make it with our own hands: we simply glue three newspaper tubes No. 15, 16 together in a pile. We cover the top of the tabletop with a sheet of crumpled wallpaper No. 17, 18 - it turns out beautifully. If you have any unevenness on the fireplace, they can be easily leveled thanks to liquid wallpaper(if all sides are smooth, you can simply paint it with paint). And the final touch is to glue “stones” made of foam plastic No. 20 onto the podium. That’s all, the beautiful false fireplace with hidden shelves is ready.
As you probably guessed, such a fireplace can be made by gluing several boxes together different sizes- each box will serve directly as a shelf.

A false fireplace made of cardboard will be stronger if you first make a reliable U-shaped frame from wooden laminated boards (as shown in photo No. 1). Next, we glue the sheets of cardboard onto liquid nails. finished frame. Then we cover the entire surface with newspaper using PVA glue No. 4, try not to soak it too much - the cardboard will be deformed. In the lower cavity we glue the supporting posts and cardboard on them, then we also glue them with newspaper sheets. Let it dry.

The next step is putty. There will be a lot of puttying and sanding due to the uneven cardboard.
Next, we make the tabletop and bottom: we glue the foam backing for the laminate on top and bottom of the pva, and on top of the backing we again glue newspaper scraps No. 9. After drying, we glue the baseboards No. 10, cut off the excess from the lid No. 11 and putty. We do the same with the bottom; the plinth can be used without a pattern.
Once again we sand the entire fireplace - finishing. We decorate the portal with narrow plinth No. 13. When everything is dry, thoroughly wash the entire fireplace, give it more time to dry. And you can prime it. Then we paint it in the desired color; after the main painting, the stucco molding can be painted white.

The inner surface of the portal can be painted with white paint with the addition of sparkles - everything will flicker from the candles. That's all, the decorative fireplace made of cardboard on a solid base is ready.

How to make a false fireplace from plasterboard with your own hands
A decorative fireplace made of cardboard with your own hands is, of course, beautiful and easy, but still it cannot be compared with its more reliable brother in the form of a false fireplace made of plasterboard. So, how to make a false fireplace from plasterboard with your own hands?
First of all, let's start with what you will need:
Essential elements:
- aluminum profile (the basis of the future fireplace)
- drywall directly (you can use scraps if you have them)
- shelf (you can buy wooden step for stairs)
Decorative:
- tile
- mirror panels (for finishing the walls of the hearth)
Auxiliary:
- screws
- screwdriver
- tile adhesive
- liquid Nails
- grout
- varnish for covering tiles and paint (optional)
First you need to decide on the size of the future fireplace. To do this, it’s better to draw a fireplace - the way you want it, and then in order to decide on the size of a real false fireplace, it’s better to first choose decorative tiles and shelf and, based on their sizes, modify the dimensions of your fireplace.
Having decided on the dimensions, you need to make a structure from profile No. 1, 2, which is then sheathed with plasterboard No. 3, 4. Moreover, it is better to first draw out the floor and walls, and also transfer the markings from the working drawing to the details of the fireplace.
Next, we attach the shelf with glue or No. 5 screws. side walls of the hearth we glue mirrors No. 6 onto liquid nails. Before laying the tiles, we plaster the entire structure thin layer tile adhesive and let it dry No. 7 (this will improve the adhesion of the tiles to the surface of the drywall). Well, you can actually start laying tile No. 8. After a day, you can start grouting, and after a while you can start coating the tiles with varnish (if desired).

In addition, with the help of a sponge and acrylic paint, you can slightly transform the appearance of your fireplace (the main thing to remember: after dipping the sponge in the paint, you need to blot it on the paper until dry).
That's all, the beautiful false fireplace made of plasterboard is ready! We admire the photos and come up with our own decor.
Fireplace dimensions: height 100 cm, width 90 cm.
Leg width and depth 24 cm;
Shelf: 90*30 cm, tile: 20*6 cm.

A fireplace made of plasterboard can be made of any size, of different shapes, and the fireplace can also be finished different ways- It all depends on your imagination. You can make an arch in a niche, glue a mirror into it, or make glass shelves on which to place candles. You can also install an electric fireplace or a screen with an image of a flame, however, for this it is worth prudently connecting electricity to the niche. At the same time, if you are attaching the profile to the walls, remember about the electrical cable routes so that you do not inadvertently damage the electrical network with screws.

You can make a corner false fireplace with your own hands, and decorate the walls of the fireplace not with tiles, but, for example, with Venetian plaster.
If you decide to install an electric fireplace, pay attention to the convex ears for ventilation - you will need to cut holes opposite the ears for ventilation.


If possible, you can build a cast iron fireplace into a plasterboard base. You will get a very unusual false fireplace.

Another thing that caught my attention was the option of “hiding” the holes for cleaning soot. The false fireplace is made according to the above principle; see the beauty of the idea in the photo below. Great idea for those who have a stove.

In addition, you don’t have to stop solely at creating a decorative fireplace; they go well with a false fireplace. various designs: shelves, cabinets, etc. By the way, they are also easy to make, all from the same profiles and drywall.


By the way, it is worth noting that a decorative fireplace made of plasterboard does not have to be screwed to the wall; you can make a completely “independent” piece of furniture that can be easily rearranged.
In this case, the main detail: smooth floors and walls.


DIY wooden fireplace
If you don’t like working with profiles and drywall, you can use timber and plywood. Again, you need to calculate in advance the dimensions of the future false fireplace based on the number and size of tiles (do not forget to take into account the space for grouting). We make a frame from a beam (a beam with a cross section of 40 by 40 mm is taken in the photo). Which is then covered with sheets of plywood. The mouth of the future fireplace is cut out electric jigsaw. The most important stage of work is gluing artificial stone on plywood. Modern adhesives and mastics allow this to be done flawlessly.
note that glue solution In no case should it get on the front surface of the stone... It will be almost impossible to clean it...
Used as a table top wooden canvas for window sills. Thickness 4 cm.
Painted with English water-based varnish in mahogany color.

To finish the vent, a smaller stone was taken and painted with water-based paint.
A beautiful fireplace is made from timber.

A fireplace attached to a windowsill looks good.


But in the end, these fireplaces made of timber and plywood are practically no different from a fireplace made of plasterboard and profiles. Another false fireplace made of wood (carved wood fireplace) deserves attention. You can make a fireplace out of wood from blanks for staircases (as an option, beech wood).
In order to make a wood fireplace presented below, it was necessary: 3 steps 140 cm, 3 steps 90 cm, 2 risers 140 and 1 riser 90 cm, 2 stair posts and a Chinese electric insert for the fireplace (photo No. 1, 2).
Quantity necessary materials depends on what kind of fireplace you decide to make (first draw the future fireplace, calculate required amount materials and only then go to the store).
On the existing parts, cut off all excess (No. 3), mill, sand. Next, apply stain to all parts (2 layers with an interval of 6 hours) the next day varnish (also 2 layers with intermediate sanding with 220 and 400 sandpaper, photo No. 8, 9). Afterwards you need to let them dry for two days.

And you can start assembling. A beautiful wooden fireplace is ready.

Of course, in order to create such a decorative fireplace, certain skills and special tools: drawing board, hand-held circular saw, belt sander, milling cutter, jigsaw, drill and delta sander.
You can make a decorative fireplace out of wood in another way - as shown in the photo below. It turns out to be a very nice imitation of a fireplace, and most importantly, such a false fireplace is easy to make with your own hands.


By the way, you can make not just a false fireplace from wood, but original stand for shoes.

Or you can buy a beautiful textured board only for the top, and make the entire base from sheets of plywood, but in the end this version of a false fireplace is not like any of the previous ones. First you need to cut strips 7-8 cm wide from sheets of plywood, sand the edges and paint them in different colors. While they dry, we nail the base boards to the wall. Next, using wood glue, glue the strips of plywood to the base on the wall and glue them together. And so that the structure does not fall apart during drying, you can use a press - you can press the entire structure using railings, boards and sticks from the shower curtain (or a mop). As a result, you will get this unusual decorative fireplace.

For those who cannot afford the above methods for making a false fireplace, or simply do not have enough free time, we can recommend false beams made of polyurethane. In this case, you won’t need a lot of effort, the main thing is to buy a beam (one, if you buy it long enough, or 2 shorter ones), cut it into 3 parts of the required size, and simply glue them together. Such a false fireplace can be supplemented with stucco, paints can create an aged effect, or attach glass shelf and admire the result. In addition, on the wall next to which the fireplace will be located, you can make an imitation brickwork. It turns out to be a spectacular decorative fireplace, and most importantly, making such a fireplace with your own hands is very simple.

Do-it-yourself desktop biofireplace
And for those who definitely want a fireplace with a real fire, whose hands grow where they need them and at the same time have enough free time, we can advise you to make a tabletop bio-fireplace with your own hands.
In order to make a tabletop biofireplace you will need:
- transparent sealant
- 4 glasses
- metal box (ceramic, terracotta)
- metal grid
- pebbles
- metal can with fuel for biofireplaces
Prepare all materials; the glass must match the size of the box. The edges of the glass must be degreased with alcohol (the better the surface is degreased, the more reliable the connection will be). Apply sealant to the edge of the glass and place another glass on top. Press lightly and hold for several minutes. We give the U-shaped structure time to dry and glue the last glass.
Don't worry if the sealant goes beyond the edges; it can be easily cut off with a razor after it has completely dried.
Now the screen needs to be attached to the metal box photo No. 6. We apply sealant to the glass and install it on the base (the metal surface must first be degreased).
We place a can of fuel in the box and cover it with a metal mesh.
If the mesh is small, then you can use several parts: the surface will still be covered with stones.
We lay out the pebbles over the entire area of the grid, leaving a free part above the can of fuel.

That's all, the bio-fireplace is ready to set on fire and admire the fire.
To ignite the fuel, use a long torch. You can make do with spaghetti.

In general, as you can see, there are many ways to make a false fireplace with your own hands. Good luck with your experiments!
Not many people can afford to spend a cozy evening warming themselves by the fireplace. But it is quite possible to make a small false fireplace with your own hands; this will make it possible to make the dream of a home come true. Even you can make a cardboard product yourself a common person without skills, you just need to take into account the recommendations for making this product.


Peculiarities
In private households, a fireplace is often installed. This product is usually located in the central part of the house. Such original model will decorate any room, its installation will help create a comfortable atmosphere. Products decorated with bright garlands, toys and candles for the New Year or Christmas holidays look especially interesting. In many countries, a fireplace in a home is considered an object that symbolizes happiness in the family.
IN modern apartments It's difficult to install a real fireplace, therefore, to make your dream come true, you can make a product out of cardboard yourself, and besides, the beauty of a fake fireplace is not inferior to a real object. You can build and place a cardboard product in any room, even the smallest one.


A decorative fireplace will certainly attract the attention of visitors, so it should be placed in the most convenient place for better viewing. The product will look very organic, especially if you install it between the windows.


Often decorative products are installed in common rooms, such as living rooms, dining rooms; Fireplaces in the bedroom will look no less organic. When making them, it is worth understanding that this product must fit the overall style of the room. Such designs are unlikely to be appropriate in rooms designed in high-tech or modern styles.
A fireplace made by yourself should complement the already created design., help improve the chosen style. In the process of manufacturing and decoration, you can create unique designs and come up with unusual attributes.
It is unlikely that it will be possible to light a fire in a decorative fireplace; its task is only a decorative function. To make the flame more realistic, you can place candles deep into the fireplace instead of a regular fire or connect an electric garland. False fireplaces made from cardboard are practically no different from real products made from brick.


Advantages of cardboard false fireplaces:
- The products are very original and beautiful appearance;
- can add sophistication to the room;
- they are placed in any place convenient for this purpose;
- constructing such structures with your own hands can give you the opportunity to feel like an experienced designer;
- building such a fireplace does not require large material expenditures;
- the ability to quickly disassemble such a product if necessary.


The disadvantages of these designs include:
- Unreliability of the structure. To make products they take soft materials, such as cardboard, paper, so over time the product may become deformed.
- It is impossible to light a real fire in false fireplaces, so such a product will only have a decorative function and will not create heat in the room.
- To build a structure, you should spend several days making and decorating it.


Style and design
Before starting work on making a structure from cardboard, it is worth carrying out preparatory work. You should decide on the installation location of the product. A wall without furniture or a corner of the room is more suitable for this. To determine the size of the structure, it is worth calculating it right at the installation site. A model or dummy for a future building will allow you to determine the size of the product and choose the decor for it.
A homemade fireplace can be made in any size, choosing the optimal length and width for this, taking into account the style of the room. A false fireplace should fit harmoniously into the interior of any room. You should not allow the product to clutter up a large part of the room or not to harmonize with the furniture. In addition, you should take into account the size of the product and not make it too small if there is bulky furniture in the room. The fireplace should complement big picture and make the room more interesting, rather than drowning it out or introducing dissonance.


When choosing a finish for a product, it is important to take into account that it should be decorated as carefully as possible, otherwise flaws may remain, which will reduce the effect of the work done. To end up with an interesting and original product, you can draw on unusual and interesting ideas at experienced designers or design a fireplace based on your preferences.


Necessary tools and components
When making a structure from cardboard with your own hands, you need to prepare working tools and materials that may be needed during the work process.
It’s good if you have a large cardboard box at home for office equipment or furniture. It will be enough to make the intended model. If you don’t have a large box, you can use smaller shoe boxes to work with. If you don’t store unnecessary things at home, then you can simply buy boxes. An interesting fireplace model can be made from postal parcel boxes.


In addition to the boxes, you should prepare:
- stationery knife;
- scissors;
- PVA glue or any assembly adhesive for working with decorative elements;
- masking, double-sided and regular tape;
- water-based paint.
In addition to the basic tools, you will also need additional ones, which can be used both during the work process and when decorating the product:
- roulette;
- ruler;
- pencil;
- paper napkins;
- foam tiles;
- different types of paints;
- simple or decorative wallpaper.


While working, sponges and dry rags will be useful. For decoration, you can purchase various details, such as moldings, columns, stucco products. All these materials and decorative elements can be purchased at a construction and stationery store.


To make the fireplace look like a real one, to build an imitation fire, you need to lay out the firewood, placing a device with flashing lights under it. Thanks to this lighting, you will get the impression that there is a real fireplace burning in the room.
In addition, you can embed in decorative design speaker connected to a device. Such a device will create sounds that imitate the crackling sound of burning wood. With the lights off and a sound and lighting source connected to the fireplace, an unusually cozy and fabulous atmosphere will be created. The grille installed on the front of the product will look very interesting.
The purchase of parts and materials depends on what design model is planned. Decorative elements can be purchased at the store or made yourself decorative details for a false fireplace.


How to do it yourself?
After you have decided on the materials and tools, you should draw a plan with detailed measurements. Step-by-step instructions will greatly simplify the process of making a fireplace from cardboard.
Making a cardboard structure is not difficult if you approach the work responsibly. Each master has his own secrets for making a product, so it’s worth familiarizing yourself with the work process by watching several options on video or attending a master class, where you can immerse yourself in the working atmosphere in more detail.

Even the simplest design manufacturing option should consist of the following steps:
- you need to choose the type of product, decide on the shape and place for it;
- select materials for the manufacture of the frame and subsequent finishing;
- prepare necessary tools and materials;
- mark the parts on cardboard;
- cut out all the parts, glue them and install the structure;
- produce external finishing products


Let's consider an option where a large cardboard box is used as a basis for production. This box will make a product rectangular shape. When choosing a size, experts recommend focusing on a product height of about 90 cm with a width of 80-90 cm. The dimensions of the fireplace can be different, it depends on the preferences of the master manufacturer. In addition, you can often see models much taller, wider and deeper than standard sizes, and some of them can be equipped with decorative chimneys and stands and shelves.
When making a product, we first make the central part, then we begin to form the columns. The main thing is to measure and bend the parts correctly in the right places. To ensure that the columns are even, you can take a ruler or other durable object and, pressing on the cardboard, bend it. After preparing the parts, they are glued and painted. To glue parts together, use masking tape, with its help the parts are glued on both sides. In order to make the structure more durable, it is recommended to glue an additional partition to the walls.


At this stage, the main part of the work is completed. Next you should work on painting the product and decorating the fireplace. Since tape was used to glue the cardboard, it should be hidden so that its traces are not visible. To do this, you can take a large sheet of white paper and cover the entire surface with it, or apply a primer to the model, and only after priming paint the product.


After the paint has dried, they begin to decorate the fireplace. You can approach this kind of work creatively and make details for decoration from different materials. You can simply cover the surface with wallpaper that imitates brickwork, or make bricks with your own hands from cardboard, polystyrene foam or other materials.
If cardboard is chosen to imitate brick, it should be painted with white or colored water-based paint. After drying, to give the brickwork texture to the walls. finished product glue the most ordinary paper napkins, which are then spread with PVA glue. After the surface dries, it will look like real bricks were used to decorate the fireplace.


Self-adhesive paper is also suitable for product design, from which brick-shaped shapes are cut out and laid out on the surface according to a specific pattern.
To imitate brickwork, you can use polystyrene foam, from which parts are cut out that will serve as bricks for decorating the fireplace. The foam figures are glued with PVA glue to the surface of the fireplace, then the places where there are defects are covered, after which water-based paint is applied. When decorating a product, they often use moldings and other decorative elements and glue the corners.


Product assembly:
- Having a drawing in hand, you can assemble all the parts. The design of a decorative fireplace made of cardboard consists of its base and portal.
- For the base, choose a rectangular shape of the product, which is glued with tape. The cardboard is compacted by gluing several pieces together. Now the structure will not sag.
- The base of the structure should be 7 cm greater than the thickness of the fireplace, and its length should be 10 cm greater than the width.
- For the portal and front part it is better to take a solid sheet of cardboard. The middle is cut out inside the sheet, which will be the firebox. The side walls are attached to the back wall using tape.
- The parts should be connected to each other.
- After all the fireplace parts are glued together, it's time for decoration. The entire structure should be coated with white water-based paint. Seams and joints are carefully painted.


- If desired, you can leave the fireplace white or make an imitation of brickwork.
- After drying, the entire structure is covered clear varnish. Surfaces coated with varnish will become less dirty. Such products are easier to clean, they are not afraid of moisture, and they also look more impressive than without varnish.
- The finished product is installed on it permanent place and decorated with candles, tinsel, and decorative items.
If you don't have a large box at home, but you have shoe boxes, you can use them. It is better to choose several pieces with the same size. To work, tape the bottom of the box and connect several identical elements together

Kinds
Decorative fireplaces for indoors are often located:
- Near the wall. Wall structures are placed near the wall, the facade of the product will protrude forward for some distance.
- Corner option. Place the product in the corner of the room.
- Built-in design. This product is mounted directly into the wall.
- Ostrovny. Such a false fireplace is placed in the center of the room.


Each author of his own product can make it from various materials, various shapes and in any style. The main thing is that the product matches the decor of the room and harmonizes with the chosen interior. The product will look very beautiful in a room decorated in a classic or english style. For rooms decorated in the Art Deco style, models with curls and original patterns are suitable. If the room is decorated in rustic style, it’s a good idea to make a fireplace with a rectangular firebox or in the form of an arch. It is important to make a fireplace that will complement the overall style of the room and fit perfectly into the design of the room.


If there are children in the house, you should take them as your assistants. Schoolchildren can be trusted to build the simplest model of a false fireplace. The kids will be simply delighted and will be happy to build a toy decorative fireplace.


To make a toy fireplace, you will need the same materials and tools, but the dimensions of the product should be kept small to make the work process easier. Drawing up a plan and drawing, preparing material and cutting out parts will be within the power of older schoolchildren. Young children can help decorate the model by applying glue or cutting out bricks for the fireplace.
The least complicated option is the one where the fireplace is made in the shape of the letter “P”. This design can be gradually supplemented with various decorative elements.


Material
When choosing a material to imitate a real fireplace, you can choose not only cardboard. You can make a product from plywood, foam tiles, plasterboard. But a cardboard fireplace is the easiest to make, and once decorated it looks very beautiful. The main thing in working with cardboard is to do everything correctly and scrupulously, otherwise instead of beautiful product you can get sideways cardboard house. To make the material more rigid, an additional layer of cardboard is glued along the load-bearing sides of the product.
To glue the surface, you should choose construction tape or paper paper for covering windows. You can also take regular tape, but it will be suitable if you plan to wallpaper the surface. When painting a product using regular tape, the paint may not adhere evenly.


When assembling the structure, you can use corners - with their help you can make the corners of the product much smoother. After assembly, you don’t have to take them out; they won’t be visible, but such a product will become more durable.


Since the product is assembled from parts, the internal parts should be processed before the assembly process. To do this, they are laid out on the floor, painted or pasted over. This is especially true for the firebox, since getting to it for processing is much more difficult when folded. If the hole chosen for it is small, then finishing it will be much easier before assembling the product.
And here external sides designs should be designed in already finished form. In addition, if you plan to paint the product, you should first prime the surface, this way you can hide traces of the tape.


Dimensions
To decide what size you need for a fireplace, you should think in advance about the place where it will be located and determine how well this model will fit into the room. It's also worth looking at what materials and boxes are available. If you have a large box, you can build one type of structure, but if you have several small shoe boxes, the design can be completely different.


Drawing of a fireplace made from one large box
Many people prefer corner models. Such products take up little space. Corner fireplaces are more suitable for small rooms; such a product is also suitable for a bedroom or children's room.

Drawing of a corner false fireplace
More often, decorative items are placed in rooms common use so that everyone has the opportunity to spend time around them free time. A fireplace decorated with New Year's attributes will immediately add a festive atmosphere to the room. If you put it next to christmas tree and arrange gifts, such a room with a decorative fireplace will become the most beautiful and cozy place for spending time with family, friends and loved ones.
The dimensions of decorative fireplaces should correspond to the size of the room. For small rooms, you can choose standard-sized designs, but for a large, spacious room it is worth building a fireplace measuring from 1.5 to 2 meters.

Reading time ≈ 8 minutes
It's just around the corner new year holidays, which means it’s time to think about creating the appropriate mood. In this case, a fireplace will help us, and we’ll look in more detail at how to make one out of a box with your own hands for the New Year 2020 with step-by-step instructions and photo examples.
Decorative fireplace styles
Making a false fireplace is possible in one of the following styles:

Calculation of parts and pattern
The photo shows standard size hearth, which can be used as a basis when assembling a New Year's fireplace. However, this does not mean that you cannot make changes or add something of your own. The design parameters are determined by the installation location, the number and size of the boxes used.

The fireplace can be assembled either wall-mounted or corner-mounted.
If the box has big sizes, using a pen and ruler, mark the size of the firebox, cut the cardboard with a knife and bend it in the right places. When using small boxes, they can be joined together using tape, giving the product the desired shape.

Finishing a false fireplace
An important role when making a hearth from cardboard boxes is played by its decoration. Basically, such products are covered with materials that imitate brick. The decor can be made either from red paper or painted using a template.

Convenient receiving option beautiful finishes– use wallpaper to resemble brick or plaster.

Brickwork can also be made from thin foam, which requires cutting the material into pieces the right size. As a result, the finished structure will be white.

Another option for finishing a fireplace is a laminate underlay, for example, beige colour, which is quite suitable for the purposes under consideration.

To decorate the fireplace, rectangles are cut from the substrate and pasted over the workpiece.

The easiest way to finish is to cover the fireplace with white paper or cover the cardboard with water-based emulsion.

How to imitate fire in a fireplace
Not a single hearth, even a decorative one, is complete without fire.

When using a fireplace made of cardboard, do not forget about safety precautions - you cannot use candles inside a structure with an open fire. All lighting elements must operate exclusively on batteries or mains power.
Let's consider options for adding fire to the fireplace:
- draw a fire on cardboard, cut it out and paste it into the firebox;
- place LED candles in the hearth;
- use garlands and strips with LED elements;
- decorate the firebox New Year's decor, for example, balls.

How to make logs
To make the fireplace look like a real one, you can add logs to it. For these purposes, they are suitable as real birch logs. small sizes, and artificial. If you don’t want to search for material for logs, you can make them yourself.

For this you will need:
- corrugated cardboard;
- glue;
- knife and scissors;
- gouache paint and brush;
- twine.
The procedure for making logs is as follows:

The best ideas for New Year's fireplaces made from boxes
There are artificial foci different forms and dimensions. We will consider some options step by step.
Christmas fireplace
To manufacture the product in question, the following tools and materials are needed:
- cardboard boxes;
- ruler;
- pencil;
- White paint;
- brush;
- golden acrylic paint;
- construction tape;
- small nails;
- New Year's accessories.
Having prepared everything you need, follow these steps:
- In the center of the box we mark the firebox itself.

- We cut the cardboard from the sides and top.

- To ensure that the cardboard bends well, we press down the markings with the corner of a ruler. We repeat this procedure several times and give the workpiece its shape.


- We bend the cardboard inward and secure it with tape.

- Using another box, we cut out two pieces of equal size: they will serve as the walls of the future fireplace.

- We fasten the blanks with tape in such a way as to form a fireplace insert. Then we paint our product with white paint and leave it until completely dry.

- We finish the fireplace by applying a brick pattern.

- Using small nails we attach the garland and tinsel to the product.

Brick fireplace
To make the fireplace look like a real one, you can use self-adhesive film as a material that will imitate brickwork. First we prepare:
- carton boxes;
- self-adhesive;
- scotch;
- glue;
- metal ruler;
- scissors.
The brick fireplace master class consists of the following step-by-step actions:
- We cut the box into two parts.

- We push the blanks so that the cardboard can be bent.

- We prepare the self-adhesive.

- We cut the decorative film with a margin so that the edges overlap reverse side cardboard.

- We glue the decorative film. If self-adhesive is used, then you need to apply it slightly tightly, carefully smoothing it out and removing bubbles.

- We connect the blanks with tape and seal them with decor. If the length of the film is not enough, you can attach it in short pieces, since it will not be noticeable.

- Cut out and paste over the remaining elements. The result should be a central piece, two corners and a top.

- We fold the parts so that a firebox is formed, and then glue them together with tape.

- We also glue the top with tape. To decorate the product we use socks and garlands.

From the video you can learn how to make a hearth from cardboard boxes.
Corner false fireplace
If the room that you intend to decorate is small in size, you can make a corner fireplace from cardboard. Thus, it will be possible to update the decor and get a shelf. We will need the following list:
- box;
- ruler;
- pencil;
- scotch;
- decor
Let's consider step by step instructions for making a fireplace from cardboard for the New Year with your own hands:

Trapezoid fireplace
How to make an unusual trapezoidal fireplace out of a box with your own hands for the New Year 2020, let’s take a closer look at the step-by-step instructions with photo examples:

Nowadays, almost every person dreams of a cozy and warm home. When we say “home” we often mean family hearth. Thus, the idea arose to create hearth and home with your own hands. Most associate comfort with a fireplace, but many do not have the opportunity to install one. However, not everyone knows that you can make it yourself and not using brickwork, but from simple cardboard boxes. Don't listen to those who will claim that he is not real. This can be done in one day, and in appearance it can be even better than the original.
Our country can boast of great ability to produce masterpieces from improvised materials. In this case, we will look at fireplaces, the production of which will take a little time. The most important thing, without which a false fireplace will not work, even if you have the most detailed instructions- This is a large cardboard box. It can be taken from the TV, refrigerator and even from a vacuum cleaner.

But the most important thing is that it must meet 3 requirements:
- The cardboard must be packable and very strong. It must be rigid enough to support the weight of the top shelf and future finishing.
- The box must be big size, so that there is ample scope for the fulfillment of fantasies. If the box with the required parameters is not found, you can use smaller dimensions and create a corner fireplace.
- The material must be unnecessary. For example, if you bought a refrigerator and its repair warranty has expired, you can use the box for your own purposes. Otherwise, if the equipment breaks down, it may not be accepted for service.
In addition, for the work you will need: masking tape, hot glue, primer, a stationery knife, a spatula of the required size, acrylic paint. If you want to organize additional finishing, you can purchase polystyrene foam, drywall, mosaic borders, varnishes and grout. To make the work more comfortable, you can use a grinder and a jigsaw.
Preparation before creating a fireplace with your own hands from boxes
Before you create an artificial fireplace from cardboard, you need to create a design for the upcoming product. It needs to be created because in the process even the most skillful hands They won’t be able to work only on fantasy; they will need to rely on at least something.
If you don't have a box of the right size, you can use several small boxes and glue them together in the process, giving the assembly an arched shape.

The first step in preparing a plan should be to mark out the parameters of the future fireplace. Everything must be taken into account according to the capabilities of the room.
When calculating parameters, the following conditions must be taken into account:
- The fireplace should be placed under the wall where there is no furniture. This way it can become a key attribute.
- If there is not enough space, but there is empty corner, then a small corner fireplace would be a great option. It can effectively decorate your living space.
Having calculated all the dimensions and determined free place, you can begin organizing the layout of the future fireplace. On a large sheet of paper in a selected scale, you need to display the plan in height and width. Don't forget to indicate the depth of the firebox, as well as its shape. Once all the details have been specified, you can proceed directly to working with the box.
DIY New Year's fireplace: making a frame
Creating a fireplace frame is the most crucial moment in the organization cardboard fireplace. To do this, you need to make markings on the box and use a utility knife to cut out all the components for the future design. The future appearance of the product will depend on how carefully the work is done. Therefore, the work must be done as carefully and clearly as possible.
In order for everything to go perfectly, lay the material on the floor and, using a pencil, mark the location of the future firebox and all the necessary bends.
Marking is best done different colors. This nuance will help when assembling structures.

In order for the cardboard to bend better during assembly, it is recommended to cut it, but only slightly and upper layer, which covers the corrugated interior.
After this, the firebox is cut out. Regardless of what shape the future firebox will have, its formation is always identical. First, a window is cut out, then its lower part is bent, and thus we get the bottom of the firebox. The next thing to do is the side and back walls. They are measured and cut from another piece of cardboard to be identical in shape to the frame. Each of the cut out figures should be 5 centimeters larger. This is done so that the material can be conveniently glued. The entire structure is assembled and glued with assembly adhesive or secured with a stapler. If you want to install additional shelves, then assembly of the structure should be postponed until they are manufactured. The shelves are made in the same way as the fireplace insert.
When everything is ready, you can think about strengthening the structure.
To strengthen you will need:
- You need to put foam or cardboard under the firebox and shelves;
- The material must be dense, light and able to withstand everything that will be placed in the niche;
- If there is a possibility that the structure may bend in certain places, you need to place the rolled tube in cardboard.
To make the structure more durable, experts recommend using cardboard or plywood. But such materials require installation only on a metal frame.
Correcting errors or how to make a fireplace out of boxes correctly
If you have finally created your masterpiece and the false fireplace is ready exactly according to the design that you created, but as a result, several shortcomings were found, they must be eliminated. This is where regular putty can come to the rescue.
Work with putty carefully, in parts and on small areas. Do not forget that cardboard strongly absorbs moisture and a second layer should be applied only after the previous one has dried.

There is a little trick that can help with minimal damage. You can use a standard rough type patch. It adheres perfectly to cardboard and the putty fits perfectly on it. You can find a master class on the Internet that contains step-by-step instructions with photos and videos for correcting all errors.
False fireplace made of cardboard: decor and finishing
A fireplace has not yet been invented that would have no lid. And this fireplace is no exception. It must be made of dense material. It can be polystyrene foam or drywall, or it can be made from plywood. First, you need to make cuts in it so that the panel falls into place without flaws. Check that the notches match and attach the cover with glue to our fireplace. The joints can be masked with putty.

And the last stage - finishing. Initially applied finishing putty using a spatula, and then your imagination comes into play. To begin with, our new homemade fake fireplace pasted over with paper. The decor of our fireplace can be organized with foam borders, which are very often used to decorate the ceiling. You can also create a decorative stone that is painted to look like a decorative stone. The lid will look great if it is tiled or decorated wooden clapboard. You can complete all the splendor with varnish in order to fix and preserve the entire design.
DIY cardboard fireplace (video)
It turns out that it is very easy to make a fireplace with your own hands simply using cardboard boxes. And so that you do not have any difficulties, the most key points have been revealed in this article. Use step-by-step instructions, use your imagination, and you can create a real family hearth in any room, around which all household members can gather.