Make a fireplace out of cardboard with your own hands. Making a fireplace from cardboard boxes: master class with photos
The presence of a fireplace in the interior adds weight and a certain significance and style to the decor. In our imagination, a fireplace is usually associated with warmth and comfort. In addition, a fireplace is one of the decorative elements that indicates a certain level of wealth and well-being of the owners of the house.
Important ! In the practical implementation of the idea of how to make a fireplace from boxes, viewing real buildings with your own hands helps a lot various options, simple and complex. If possible, look at what a real, real structure made from cardboard and boxes looks like, this will make it easier to do it yourself.
Not every owner of a private home can afford a real stove, but about a real fireplace in multi-storey buildings one can only dream. In a city apartment, this is often simply impossible for reasons beyond the desires and capabilities of the owners.
In this case, a fireplace made from boxes, assembled with your own hands, will help out. With just a little effort, you can decorate your house or apartment with your own hands. original design made of cardboard and boxes, which will be a wonderful addition to the festive atmosphere.
You can be sure that making your own fireplace from cardboard and boxes will not require a significant investment of time and money. Not only a person who is well acquainted with the rules of laying a real fireplace, but also an ordinary housewife and even a teenager can figure out how to make a fireplace out of boxes with their own hands. The main thing is the desire to work with cardboard and boxes with your own hands. In this case, it is not a sin to take part in a similar event with friends or acquaintances, receiving a certain master class and feeling like an expert.
What can a master class in making a fireplace from boxes with your own hands give a family?
Despite the “lightness” of the idea of a fireplace made of cardboard and boxes, the manufacturing process gives a chance to:
- Improve the mood of yourself and your household with another interesting idea;
- Refresh the interior of one of the rooms of your house or apartment on the eve of the holiday;
- Teach children to truly set their sights on themselves complex tasks and do them yourself;
When starting work, you need to decide on the place where the cardboard imitation will be located. It could be free space against the wall, or a corner of the room not occupied by furniture. With its help you can hide some construction defects in the corner of the room.
Having decided on the location, we measure it with our own hands with a tape measure and calculate the estimated dimensions of the future cardboard layout, whether it can fit in the space allotted to it. It is important to indicate in advance the dimensions of the cardboard fireplace, down to the smallest detail, so that you do not have to redo the work.
After this, you need to decide which option would be better suited to the decor, to the interior style, look on the Internet for photos of fireplaces made from boxes with your own hands and choose an option that you can make with your own hands from cardboard and boxes.

Make a drawing of the selected option indicating dimensions and drawing external design finished product. Calculate with your own hands the need for cardboard and boxes, their sizes. This will allow you to think in advance about how the appearance of the fireplace will be designed, what and where decorative decorations will be located.
Before you begin, prepare the materials necessary for work:
- Several large ones cardboard boxes, the more cardboard, the easier it is to pick optimal shape and size;
- PVA glue, PVA-M and transparent “Dragon” or “Titan”;
- Construction chalk putty;
- Paints on water based, necessarily - white, red and black;
- A long meter ruler, tape measure, corner and construction knife;
- Brush and paint roller for coloring the finished product.
For your information ! Before starting work, prepare yourself and explain to your assistants, if any, that making a fireplace from boxes with your own hands requires the utmost care and precision.
Making a fireplace from cardboard and boxes
In addition to its decorative function, a wall-mounted fireplace made from boxes can be used as a watch stand, decorative candles or figurines, bookshelf. Often, such a cardboard stove becomes a full-fledged element of the room’s interior as a cabinet or bedside table.
To work, you need to prepare a free space so that you can place large leaf cardboard and the box itself, transfer the necessary markings and draw the contours of the product being manufactured.
If you are lucky enough to pick up or get hold of a large cardboard TV box, washing machine or refrigerator, the task will become much easier. Using a ready-made large cardboard box will allow you to avoid making the supporting frame yourself, which will greatly simplify the work.
Otherwise for wall fireplace from the boxes, you first need to assemble a frame from construction profile or wooden slats, fixing it on the wall at the location of the fireplace. Next, the frame will have to be covered with cut out two or three-layer pieces of thick cardboard, butt-joined with glue and tape.
Advice ! Sometimes you have to glue two sheets of cardboard into one “sandwich” with a layer of tape or corrugated cardboard. The base sheet is laid out on level ground, the PVA layer is glued to the bottom and top sheet and a load is placed on top. Such a sandwich turns out to be durable; any element of the fireplace, including the back wall, can be easily made from it.
The design of the fireplace consists of several main parts:
- The body of the fireplace, or a portal of two cabinets united by a superstructure;
- Fireplace insert - rectangular niche;
- Top shelf or countertop.
For the base of the fireplace we will use a fiberboard slab, cut to the expected size of the fireplace sole with a margin of 7-8cm on each side.
Cutting out the box and gluing the body of the future fireplace
As a basis for forming the future body of the fireplace, we use large boxes from household appliances. The cardboard wall of the box has a three-layer structure with layers of corrugated cardboard.

As indicated in the drawing, use a ruler and a corner to mark the location of the firebox and side tables of the fireplace from the boxes. Along the axis of the firebox opening we carry out T-cut, turn the resulting flaps inward and glue them to the back wall. They will serve to form inner surface opening.
Measure, cut and paste additional elements in a case from boxes:
- Combustion chamber ceiling;
- Internal jumpers in the upper part of the portal and in the side cabinets of the body, this will strengthen the structure and make it more rigid;
We additionally glue all places where cardboard and boxes are glued together with sheets of paper, PVA and tape. At the points of contact of the end surfaces of the jumpers and sheets of cardboard with the body of the boxes, we glue them with our own hands using “Dragon” glue.
If desired, the back wall of the fireplace can be turned into storage for necessary things. It is enough to carefully cut out the windows with a knife, bend the cut out fragment and glue it to the side wall of the box.
The top shelf can be made with your own hands in the form of a sandwich made of two layers of thick cardboard and corrugated tape. Often, plywood or plastic is inserted into the tabletop structure for reinforcement. facing panel, which will allow the fireplace to withstand significant weight of objects, a vase or even a TV.
The finished cardboard body is installed on a prepared fiberboard base and glued with tape from the inside of the structure. The outer joint between the body cardboard and the base cardboard is glued paper tape and PVA.
Assembly and finishing operations
After forming the main part of the fireplace body from the boxes, they proceed to rough covering it with paper. At the same time, burrs and irregularities are leveled and trimmed. In places where joints are glued, excess dried glue is removed and primed.

The next operation will be painting and preparation for finishing. The prepared fireplace body from boxes is primed with two layers of white water-based paint. In places where packaging inscriptions may appear, seal them or apply an additional layer of primer.
The upper part of the portal, especially the place where the top cover and cardboard of the wall are attached, must be covered with decor. Usually bovelacci, friezes or foam are used for these purposes. The sticker is made using the “Dragon”.
The final step is to paint the fireplace, usually white or beige color. The inside of the combustion chamber is sealed with panels imitating embossed red brick. An imitation is laid out on the protruding part of the fireplace base rubble stone or molding bricks.

One of popular types fireplace textures are imitation brick or marble facing material.
As a result, there is reason to be proud of a fireplace made from boxes made by yourself.
The week before New Year is a time of pleasant bustle, when almost every person thinks about gifts, a varied and delicious New Year's menu, friends and relatives with whom he will celebrate this most beloved holiday. And those happy parents and grandparents who have children and grandchildren should not only buy gifts, but also make sure that their faith in Santa Claus is only strengthened.
The best way to achieve such a magical result is to make a New Year's fireplace in an ordinary city apartment. After all, it is through the chimney that the fairy-tale grandfather will enter the house when the kids are sleeping and put gifts under the tree or put them in socks specially prepared for this purpose. Of course, there won’t be a chimney itself, but that won’t make the fairy tale disappear.
We must immediately make a reservation that such a concept as “types of falshakimins” is not an entirely correct concept. How to make a New Year's fireplace and from what; place it near the wall or under the window; Whether it will be rectangular or angular depends on your imagination. We can confidently list only the materials from which it can be made. Although here the choice is practically unlimited. Let's take the most accessible one. The easiest way to make a New Year's fireplace with your own hands is from:
- Cardboard boxes.
- Papers.
- Foam plastic.
- Boards
- Old furniture.
However, simpler does not mean ugly. Quite the contrary. All of the above materials leave so much room for creativity that the result can be a real work of art. And how happy the children will be if you involve them in this exciting process, needless to say.
Wall or corner
And yet, there are two main types of false fireplaces. This:
- Wall-mounted, the size of which in most cases depends only on the available materials.
- Angular. This New Year's fireplace is somewhat limited in width.
The complexity of performing both options differs little and the choice is only how much free space in the apartment. Well, what if with the place where you put the fireplace on New Year, have decided, then take step-by-step instructions, prepared material, tools and the creative process begins.

You bought yourself a new TV with a huge screen for the holiday, or another household appliances, which is usually packed in cardboard boxes? It's time to use this wonderful container for other purposes. Building an almost real fireplace with your own hands for the New Year is quite simple.
- In a large box we carefully mark the place for the firebox.
- Let's do sharp knife cuts along the outlined contours in such a way as to bend the walls of the firebox inward.
- We glue the walls and secure the resulting structure with tape.
- We cut out a mantelpiece from plasterboard or foam plastic, the area of which should be calculated in such a way that the edges that are not adjacent to the wall protrude slightly.
- We glue it.
If a large box that would serve as a base is not available, it doesn’t matter. You can use several small ones.
Attach them with tape and glue so that you get a fireplace, and glue the mantelpiece on top.
A corner fireplace made from one large box is no more difficult to make. You just need to cut off the back wall and fasten the sides at an angle. Cut out the firebox on the front wall, and then everything is the same, only the mantelpiece will also be triangular.
In all three cases, after gluing the mantel onto the New Year's fireplace from boxes, the most creative part comes - giving the fireplace natural look and its decoration. But we'll talk about this a little later.
The lowest budget option based on the “Golden Key” principle. But instead of a canvas, you need to take a sheet of white paper or cardboard and draw a fireplace on it. With all the nuances, chips, cracks and raging flames. And then stick it or attach it in any other way to the wall. It’s good if there is a shelf above your painted fireplace, which also needs to be stylized and decorated.

Enterprising people have long been making false fireplaces from this lightweight material for sale in every sense. Buying such an imitation fireplace is as easy as shelling pears, but there is one caveat. They will bring you a completely white and undecorated version, so in any case you will have to include your creative potential. And from here we can conclude: making a fireplace out of foam plastic with your own hands for the New Year will be both cheaper and more interesting.
- The front and back walls are cut out of a sheet of foam plastic.
- In the front we cut a hole for the firebox. Square or rounded top - your choice.
- You can later stick on the back wall either a photograph of a burning flame or paper with a fire drawn on it.
- We cut it from that sheet or from another side walls.
- You can assemble the fireplace using ordinary toothpicks coated with glue - this will be stronger than simply gluing them to each other.
- On top, as in previous versions, a mantelpiece made of the same foam is glued.
That's it, all that remains is to paste it over matching wallpaper or paper, which will then be painted.
Wooden fireplace
Remaining after renovation parquet boards or laminate can also be used with success and grace to make a fireplace with your own hands for the New Year. In this case, you will have to first build a hard wooden frame and attach it to the wall. And then glue the boards onto it. From above - the length of the entire width of the fireplace. In the center and slightly to the bottom, in the form of two racks, between which there will be a firebox.

An old wardrobe or even a sideboard should not be immediately sent to a landfill either. If you disassemble it and use the walls and shelves, then the New Year’s fireplace can be so durable that you won’t even want to remove it. True, in this case you will have to use a hacksaw and cut the walls, racks and shelves to size yourself, but the result can exceed your wildest expectations.
Appearance
Let’s say right away that these are not fireplace decorations for the New Year. This is giving it appearance. After all, even the most carefully fake fireplace glued together from a box, paper, polystyrene foam or boards will remain fake if you don’t work on it a little more.
- The walls and front part can either be painted yourself or covered with wallpaper. In the vast majority of cases, this will be a brick, stone or marble design.
- Directly in front of the fireplace, you can put a piece of linoleum with a pattern you like and secure it with furniture nails with curly heads.
- The lower perimeter cannot be left without attention either. For its stylization, ordinary skirting boards from adhesive ceilings are well suited.
- They are also suitable for framing shelves, but here it is better to choose wider ones and with some kind of relief.
These are the main positions for styling a false fireplace, but how you make it depends only on you.
How to make a flame?

No matter how beautiful and stylish your faux fireplace is, without a simulated flame there will always be something missing. After all, a fireplace is made for the purpose of sparkling fire inside, creating comfort and warmth in the house. And it doesn’t matter that this light is just an imitation.
There are not as many options for creating a flame as there are options for the fireplace itself, and the first limitation here is Fire safety. Do not forget that all of the above materials from which the false fireplace is made are by no means intended to contain open fire. Quite the contrary. Therefore, you need to use something that glows, but does not heat up. There are options though.
- Heating options include an element made from an electric fireplace. It shines and even heats, and is designed in such a way that it is unlikely that anything will catch fire from it. But it’s still worth taking safety measures.
- Another electrical element, which is used to simulate a flame in a fireplace - this is a common New Year's garland or LED Strip Light. In both options, you need to ensure that there is a electric outlet, and the wires would not get in the way under your feet.
- If you have an electronic photo frame, you can use it by first uploading an image of a burning flame. If placed well and slightly camouflaged, it will perfectly imitate real fire.
- No one forbade using real firewood either. Small logs, neatly laid and illuminated from below, look quite impressive.
- The option with open fire still exists. These are candles. You just need to place them very carefully, strictly in the center, and make sure that by some absurd accident there is nothing flammable nearby.
- Well, the simplest thing is to draw a flame on paper and stick it to the back wall. If you doubt your artistic abilities, you can use a large photo.
There is no limit to experiments. You can use a mirror, a real fireplace grate, or some other accessories related to the stove, fire and holiday. The main thing is not to get too carried away and remember that the fireplace is not real, which means that even if real firewood is beautifully stacked in it, you should not set it on fire.
How can you use a fireplace after the New Year?
If you made every effort and did everything efficiently, the place was chosen in such a way that the false fireplace does not bother anyone, then it can last for several years. Especially if you think a little more and use it not only as an elegant decoration for your apartment. For example, build a minibar in it or put a DVD on the shelf, and hang a TV on top. You never know. But still, we are considering the New Year’s version, which means we will decorate it according to the holiday.
And this moment, no matter how strange it may sound, is the simplest. In the sense that everyone knows how to decorate a Christmas tree and an apartment for the New Year. How is a fireplace different from them? Only in form. So all the same materials will be used. Tinsel, shiny rain, Christmas tree balls, branches, cones, garlands, socks for gifts and so on. You can do this yourself, you can entrust it to your children, but the best thing is if the whole family takes part in this creative activity. And the festive mood will come to your home in advance and everyone else positive emotions won't keep you waiting long.
If you have a great desire, minimal construction skills and creativity, then make a fireplace portal from various materials It won’t be difficult to do it yourself. When there is no need to install classic wood burning fireplace, then decorative will become the most acceptable alternative both materially and aesthetically.
Various materials can be used for artificial hearths:
- drywall;
- tree;
- polyurethane;
- brick;
- plastic;
- carton boxes.
As incredible as it may sound, a decorative fireplace portal can actually be made from cardboard boxes. This will be the most budgetary, but no less nice option. The only drawback of the design is its strength, since raw material has a tendency to sag, bend, and undergo deformation with minor impacts.
A fireplace made of cardboard can be left without imitation fire, and decorative or decorative elements can be placed inside the intended firebox. natural stones, firewood, decorative items, you can put candles, but in this case, while they are burning, do not leave the fireplace unattended.
Also, a gas firebox and a biofuel burner cannot be installed in such a design, since cardboard is a highly flammable material and contact with open fire must be limited. But an electric screen would be the most acceptable option.
Modern models are able to recreate the most realistic picture of fire, in dynamics, that is, the flames will move. The screen is controlled by a remote control, which greatly simplifies its operation. It is clear that the heating effect of such a fireplace is out of the question, due to its low fire safety.
Necessary materials
In order to make decorative fireplaces from cardboard boxes, you need to decide on the location of its installation, make a drawing yourself, or use this master class. The next step is the preparation of materials. In order to make a fireplace out of cardboard with your own hands, you will need boxes. Ideal option there will be a box for a flat-screen TV with a large diagonal, but if there is not one solid box, you can use different pieces of cardboard, only they must first be fastened together.

New Year's fireplace made from boxes
Since this material is not durable, it can be installed according to internal corners metal profiles– stiffening ribs, they will help strengthen the structure of the fireplace made of cardboard.
- stationery knife;
- polymer glue;
- masking tape;
- construction spatula;
- pencil;
- ruler.
And also additional materials:
- polyurethane borders;
- plaster stucco;
- corners;
- moldings;
- putty.
These will be decorative elements, so their choice depends entirely on personal preferences and general style, which is answered by a fireplace portal made of cardboard boxes.
Master class on making a wall-mounted version of a decorative fireplace from boxes
First you need to transfer, using a ruler and pencil, the diagram of the future fireplace onto a cardboard box. Then, armed with a utility knife, cut out the necessary elements - the firebox in the center of the structure. Bend the cut edges inward and glue them to the back wall, thus creating a niche.

In the center of the upper side squares you can place decorative elements from gypsum stucco– flowers, angels, doves, other figures – there is no limit to imagination here.
A fireplace portal made of cardboard boxes can be made with a lid in the form of a shelf; in this case, it is advisable to additionally strengthen the structure with polystyrene foam or several cardboard sheets. They need to be securely fastened together using glue. Glue a wide one on top and on the sides of the future shelf. ceiling plinth.
To ensure that the joints do not stand out (they are usually uneven), it is necessary to cover all corners with mounting tape.
At the next stage, the master class involves decorative finishing. It can be done using water-based paint, but it is still better to first putty the entire surface with drywall solution. After this, wait a day for the putty to dry and begin decorating. You can use water-based paint white or any other, depending on the interior style of the room. The paint should also dry and can be secured with a layer of varnish.

If the room is made in classic style, Provence or Empire style, then the fireplace can be made vintage - by artificially aging the material. This effect can be easily achieved if you apply more thick layer putty, and then dry it with a hairdryer - small cracks will appear. You can use two types of paints: apply a darker one on the bottom, a lighter one on top, and rub it in some places with sandpaper.
It is worth noting that the same procedure for assembling the structure can be used to make a fireplace from foam plastic.
Corner version of a fireplace made from boxes
When the room small area, then you can do corner fireplace from boxes. First you need to decide on the place where it will be installed. If one of the adjacent walls is the side of the cabinet, then it is necessary to calculate the dimensions so that the finished structure is flush with the cabinet and does not stick out.
This master class involves the use of the following materials:
- cardboard;
- glue;
- mounting tape;
- metallic profile;
- There are two types of construction film - brick and wood.
Stages of work

- glue the cardboard in the shape of a triangle according to the required dimensions;
- cut a hole in the center to simulate a firebox rectangular shape, it can be made semicircular on top;
- for strength, install stiffening ribs inside;
- all joints and corners must be covered with mounting tape to hide irregularities;
- cover the fireplace portal with cardboard construction film, which imitates brick or stone;
- Form a lid-shelf from sheets of cardboard; they must be tightly fastened together;
- cover the shelf with a film that imitates wood;
- install a ready-made cardboard fireplace in the room;
- place candles, decorative or real stones, firewood, and other elements in the firebox.
This completes the master class on making a decorative fireplace from cardboard boxes. You can admire the result. But it is worth remembering about safety - if you light candles inside, do not leave them burning unattended.
Video: How to make a fireplace from cardboard
Imitation fireplace, decorative fireplace, a false fireplace or a bio-fireplace, whatever you call it, is a great thing, especially for city dwellers, for whom a fireplace is, at first glance, a pipe dream. Of course, it’s impossible to make a real fireplace in an apartment, but a false fireplace is easy to make, even with your own hands. So, see below how and from what you can make a decorative fireplace with your own hands.
DIY decorative fireplace made of cardboard
You can make a false fireplace from an ordinary cardboard TV box.
For this you will need:
- cardboard box
- foam baseboards and figures
Supporting materials:
- plan drawing
- scissors
- stationery knife
- pen or pencil
- ruler
- construction tape
- special glue (installation time for gluing foam)
To complete:
- putty and spatula (optional - if you decide to putty the fireplace before painting)
- white water-based paint (you can use paint of a different color)
- brush
Having prepared the necessary materials, you can safely start making a false fireplace. First you need to transfer the drawing from the drawing plan to the box: use a pencil and a ruler for this.
Do not use a marker as it will bleed through the paint and even if you don’t want to bother with putty, you will have to putty the box before painting.
At the future location of the fire, we make slits with a stationery knife, it should look like in photo No. 5 - 2 labels that we bend towards the back wall of the box and glue with construction tape (carefully glue them with tape on all sides, including the bottom of the box).
Now we glue the foam parts in accordance with your sketch (we cut the borders at the junction of the corners at an angle of 45 degrees). We glue a wide patterned plinth on top - this will be the basis of the future fireplace shelf.
We place foam plastic supports behind the baseboard (photo No. 10) and place the bed on top foam board- you will have to work hard with the corners to glue them without gaps.
Once we have glued all the parts, we carefully putty our false fireplace. Let the putty dry, then paint the fireplace with water-based paint. That's all, we admire the finished false fireplace. This fireplace will fit perfectly into a photography location.

You can just as easily make a false fireplace out of cardboard in a corner wall (corner fireplace). To make this false fireplace you will need: again a cardboard box, adhesive film or brick wallpaper, scissors, tape and a garland.
We make a triangular base from a cardboard box, as shown in the photo. Next we cover it with wallpaper or film (in fact, in this case you can also use foam parts and paint everything at the end). But the tabletop for the future fireplace can be made not only from polystyrene foam, as is the case in in this case several layers of cardboard were glued together, which were then covered with wood-look film. We place a garland or battery-powered candles into the firebox of the finished fireplace or admire the result.

By the way, if you want to make a false fireplace out of cardboard, but it seems to you that you don’t have a box suitable size, do not forget that you can simply glue several boxes together. Further progress of work according to the principles described above.

By the way, if you are making a fireplace not for a couple of photo shoots or just for Christmas, but plan to leave it in your interior for a long time, it makes sense to use the space in the walls of the fireplace. It could make a great hiding place or just shelves for handicrafts.
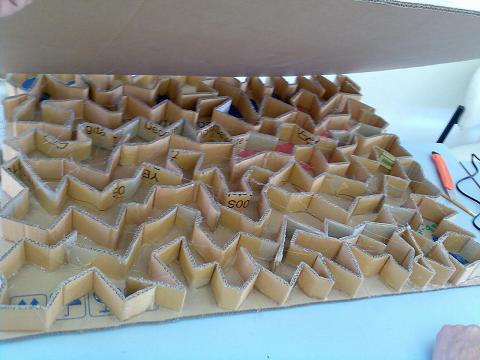
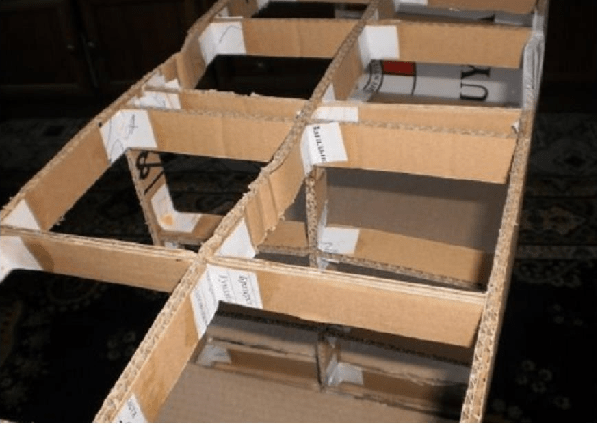
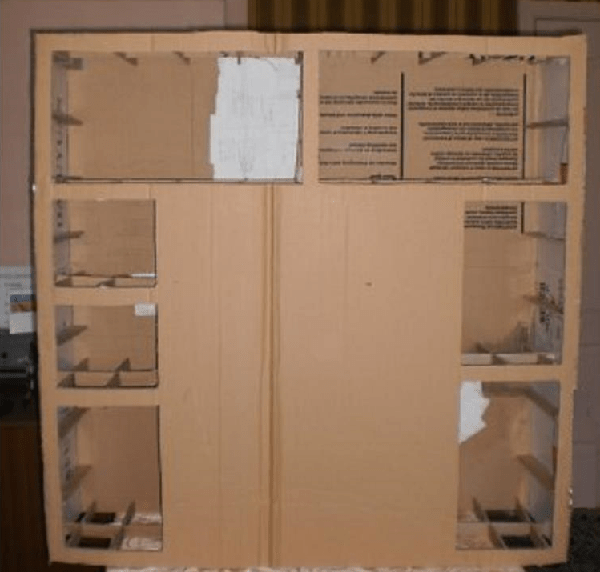
Creating a fireplace with secret shelves begins with the formation of a “skeleton” - its structure is shown in photo below No. 1 (the structure of the skeleton will directly depend on the size of the shelves you want). The finished skeleton is covered on all sides with sheets of cardboard (photo No. 2, 3, 4). Next we make podium No. 5 and table top No. 6 (the bed is made from 6 sheets of cardboard glued together). For reliability, we cover all joints with newspaper and PVA glue.

Now we are finishing the tabletop: we glue the ceiling plinth on top of the fireplace, so that its top is on the same level with the 6 sheets of cardboard that were previously glued. And on top of the cardboard sheets and baseboard we glue the seventh sheet of cardboard - as shown in photo No. 8 (No. 9 - the tabletop from the wrong side, No. 10 - carefully evenly glue the tabletop from the wrong side).
We close all the corners of the fireplace with a special construction corner No. 11. We cut out “bricks” from cardboard and glue them into the firebox, simulating brickwork No. 12. We make an uneven relief on the bricks with putty or ordinary crumpled paper soaked in glue, when the brickwork dries, we paint it in desired color. We cover the shelves with paper or self-adhesive film. We putty No. 13, 14 on all sides of the fireplace.

But that is not all! Decorations will bring the almost finished fireplace to perfection. We glue a plinth around the firebox, we also make it with our own hands: we simply glue together three newspaper tubes No. 15, 16. We cover the top of the tabletop with a sheet of crumpled wallpaper No. 17, 18 - it turns out beautifully. If you still have any unevenness on the fireplace, they can be easily leveled thanks to liquid wallpaper(if all sides are smooth, you can simply paint it with paint). And the final touch is to glue “stones” made of foam plastic No. 20 onto the podium. That’s all, the beautiful false fireplace with hidden shelves is ready.
As you probably guessed, such a fireplace can be made by gluing several boxes together different sizes- each box will serve directly as a shelf.

A false fireplace made of cardboard will be stronger if you first make a reliable U-shaped frame from wooden laminated boards (as shown in photo No. 1). Next, we glue the sheets of cardboard onto liquid nails. finished frame. Then we cover the entire surface with newspaper using PVA glue No. 4, try not to soak it too much - the cardboard will be deformed. In the lower cavity we glue the supporting posts and cardboard on them, then we also glue them with newspaper sheets. Let it dry.

The next step is putty. There will be a lot of puttying and sanding due to the uneven cardboard.
Next, we make the tabletop and bottom: we glue the foam backing for the laminate on top and bottom of the pva, and on top of the backing we again glue newspaper scraps No. 9. After drying, we glue the baseboards No. 10, cut off the excess from the lid No. 11 and putty. We do the same with the bottom; the plinth can be used without a pattern.
Once again we sand the entire fireplace - finishing. We decorate the portal with narrow plinth No. 13. When everything is dry, thoroughly wash the entire fireplace, give it more time to dry. And you can prime it. Then we paint it in the desired color; after the main painting, the stucco molding can be painted white.

The inner surface of the portal can be painted with white paint with the addition of sparkles - everything will flicker from the candles. That's all, the decorative fireplace made of cardboard on a solid base is ready.

How to make a false fireplace from plasterboard with your own hands
A decorative fireplace made of cardboard with your own hands is, of course, beautiful and easy, but still it cannot be compared with its more reliable brother in the form of a false fireplace made of plasterboard. So, how to make a false fireplace from plasterboard with your own hands?
First of all, let's start with what you will need:
Essential elements:
- aluminum profile (the basis of the future fireplace)
- drywall directly (you can use scraps if you have them)
- shelf (you can buy wooden step for stairs)
Decorative:
- tile
- mirror panels (for finishing the walls of the hearth)
Auxiliary:
- screws
- screwdriver
- tile adhesive
- liquid Nails
- grout
- varnish for covering tiles and paint (optional)
First you need to decide on the size of the future fireplace. To do this, it’s better to draw a fireplace - the way you want it, and then in order to decide on the size of a real false fireplace, it’s better to first choose decorative tiles and a shelf and, based on their sizes, modify the dimensions of your fireplace.
Having decided on the dimensions, you need to make a structure from profile No. 1, 2, which is then sheathed with plasterboard No. 3, 4. Moreover, it is better to first draw out the floor and walls, and also transfer the markings from the working drawing to the details of the fireplace.
Next, we attach the shelf with glue or screws No. 5. On the side walls of the fireplace we glue mirrors No. 6 with liquid nails. Before laying the tiles, we plaster the entire structure thin layer tile adhesive and let it dry No. 7 (this will improve the adhesion of the tiles to the surface of the drywall). Well, you can actually start laying tile No. 8. After a day, you can start grouting, and after a while you can start coating the tiles with varnish (if desired).

In addition, using a sponge and acrylic paint you can slightly transform the appearance of your fireplace (the main thing to remember is: after dipping a sponge in paint, you need to blot it on the paper until dry).
That's all, the beautiful false fireplace made of plasterboard is ready! We admire the photos and come up with our own decor.
Fireplace dimensions: height 100 cm, width 90 cm.
Leg width and depth 24 cm;
Shelf: 90*30 cm, tile: 20*6 cm.

A fireplace made of plasterboard can be made of any size, different shapes, and the fireplace can be finished different ways- It all depends on your imagination. You can make an arch in a niche, glue a mirror into it, or make glass shelves on which to place candles. You can also install an electric fireplace or a screen with an image of a flame, however, for this it is worth prudently connecting electricity to the niche. At the same time, if you are attaching the profile to the walls, remember about the electrical cable routes so as not to inadvertently damage the electrical network with screws.

You can make a corner false fireplace with your own hands, and decorate the walls of the fireplace not with tiles, but, for example, with Venetian plaster.
If you decide to install an electric fireplace, pay attention to the convex ears for ventilation - you will need to cut holes opposite the ears for ventilation.


If possible, you can build a cast iron fireplace into a plasterboard base. You will get a very unusual false fireplace.

Another thing that caught my attention was the option of “hiding” the holes for cleaning soot. The false fireplace was made according to the above principle; see the beauty of the idea in the photo below. Great idea for those who have a stove.

In addition, you don’t have to stop solely at creating a decorative fireplace; they go well with a false fireplace various designs: shelves, cabinets, etc. By the way, they are also easy to make, all from the same profiles and drywall.


By the way, it is worth noting that a decorative fireplace made of plasterboard does not have to be screwed to the wall; you can make a completely “independent” piece of furniture that can be easily rearranged.
In this case, the main detail: smooth floors and walls.


DIY wooden fireplace
If you don’t like working with profiles and drywall, you can use timber and plywood. Again, you need to calculate in advance the dimensions of the future false fireplace based on the number and size of tiles (do not forget to take into account the space for grouting). We make a frame from a beam (a beam with a cross section of 40 by 40 mm is taken in the photo). Which is then covered with sheets of plywood. The mouth of the future fireplace is cut out electric jigsaw. The most important stage of work is gluing artificial stone on plywood. Modern adhesives and mastics allow this to be done flawlessly.
note that adhesive solution In no case should it get on the front surface of the stone... It will be almost impossible to clean it...
Used as a table top wooden canvas for window sills. Thickness 4 cm.
Painted with English water-based varnish in mahogany color.

To finish the vent, a smaller stone was taken and painted with water-based paint.
A beautiful fireplace is made from timber.

A fireplace attached to a windowsill looks good.


But in the end, these fireplaces made of timber and plywood are practically no different from a fireplace made of plasterboard and profiles. Another false fireplace made of wood (carved wood fireplace) deserves attention. You can make a fireplace out of wood from blanks for staircases (as an option, beech wood).
In order to make a wood fireplace presented below, it was necessary: 3 steps 140 cm, 3 steps 90 cm, 2 risers 140 and 1 riser 90 cm, 2 stair posts and a Chinese electric insert for the fireplace (photo No. 1, 2).
Quantity necessary materials depends on what kind of fireplace you decide to make (first draw the future fireplace, calculate required amount materials and only then go to the store).
On the existing parts, cut off all excess (No. 3), mill, sand. Next, apply stain to all parts (2 layers with an interval of 6 hours) the next day varnish (also 2 layers with intermediate sanding with 220 and 400 sandpaper, photo No. 8, 9). Afterwards you need to let them dry for two days.

And you can start assembling. A beautiful wooden fireplace is ready.

Of course, in order to create such a decorative fireplace, certain skills and special tools: drawing board, hand-held circular saw, belt sander, milling cutter, jigsaw, drill and delta sander.
You can make a decorative fireplace out of wood in another way - as shown in the photo below. It turns out to be a very nice imitation of a fireplace, and most importantly, such a false fireplace is easy to make with your own hands.


By the way, you can make not just a false fireplace from wood, but original stand for shoes.

Or you can buy a beautiful textured board only for the top, and make the entire base from sheets of plywood, but in the end this version of a false fireplace is not like any of the previous ones. First you need to cut strips 7-8 cm wide from sheets of plywood, sand the edges and paint them in different colors. While they dry, we nail the base boards to the wall. Next, using wood glue, glue the strips of plywood to the base on the wall and glue them together. And so that the structure does not fall apart during drying, you can use a press - you can press the entire structure using railings, boards and sticks from the shower curtain (or a mop). As a result, you will get this unusual decorative fireplace.

For those who cannot afford the above methods for making a false fireplace, or simply do not have enough free time, we can recommend false beams made of polyurethane. In this case, you won’t need a lot of effort, the main thing is to buy a beam (one, if you buy it long enough, or 2 shorter ones), cut it into 3 parts of the required size, and simply glue them together. Such a false fireplace can be supplemented with stucco, paints can create an aged effect, or attach glass shelf and admire the result. In addition, on the wall next to which the fireplace will be located, you can make an imitation brickwork. It turns out to be a spectacular decorative fireplace, and most importantly, making such a fireplace with your own hands is very simple.

Do-it-yourself desktop biofireplace
And for those who definitely want a fireplace with a real fire, whose hands grow where they need them and at the same time have enough free time, we can advise you to make a tabletop bio-fireplace with your own hands.
In order to make a tabletop biofireplace you will need:
- transparent sealant
- 4 glasses
- metal box (ceramic, terracotta)
- metal grid
- pebbles
- metal can with fuel for biofireplaces
Prepare all materials; the glass must match the size of the box. The edges of the glass must be degreased with alcohol (the better the surface is degreased, the more reliable the connection will be). Apply sealant to the edge of the glass and place another glass on top. Press lightly and hold for several minutes. We give the U-shaped structure time to dry and glue the last glass.
Don't worry if the sealant goes beyond the edges; it can be easily cut off with a razor after it has completely dried.
Now the screen needs to be attached to the metal box photo No. 6. We apply sealant to the glass and install it on the base (the metal surface must first be degreased).
We place a can of fuel in the box and cover it with a metal mesh.
If the mesh is small, then you can use several parts: the surface will still be covered with stones.
We lay out the pebbles over the entire area of the grid, leaving a free part above the can of fuel.

That's all, the bio-fireplace is ready to set on fire and admire the fire.
To ignite the fuel, use a long torch. You can make do with spaghetti.

In general, as you can see, there are many ways to make a false fireplace with your own hands. Good luck with your experiments!
Create a romantic atmosphere in the house, good mood winter and comfort all year round A decorative fireplace made from boxes with your own hands will help. Step-by-step instructions will help you avoid doing “dirty” work in the house, diluting cement and dismantling the roof for the chimney. A fireplace can be created in one evening using scrap materials. So, let’s turn on our imagination, involve children in the work and start creating with our own hands.
How to make a fireplace from cardboard boxes
To build such a fireplace we will need:
To prevent the boxes from opening, we tape all the joints together with tape. According to the drawing in the figure, we assemble the base of the future fireplace. We glue the boxes that will make up the parts of the fireplace with tape together. For the side racks we use smaller boxes stacked on top of each other. We make the base of the fireplace and the upper mantelpiece from larger boxes, butt-joined with short sides.

We cover each part of the fireplace with thick paper or old wallpaper. Boxes must be completely covered with paper. We connect the edges of the paper with tape. Now we glue the parts of the fireplace together with PVA glue. The product is ready, all that remains is to design it.

To decorate the fireplace, we use wallpaper with a brick pattern or sheets of thick cardboard. Four “bricks” can be cut from one cardboard sheet. We cover the fireplace with wallpaper, giving the appearance of brickwork. If we use “bricks” cut out of cardboard, we glue them onto the surface of the boxes, creating rows of bricks and leaving gaps between the bricks, so that it is as similar as possible to natural masonry.

To glue the “bricks” we use PVA glue. The back wall of the fireplace, adjacent to the wall, does not need to be covered. If the cardboard is white, paint it with paints of appropriate shades - from sandy yellow to dark red.
Read the article: Wood-burning stove-fireplace for the home
The fireplace is ready, let's install it in a prepared place in the room, against the wall. We will put decor on the mantelpiece, and we can put natural logs or their imitation in the hole for firewood. Here we focus on our imagination.
Exquisite decorative fireplace from a large box
Let's prepare materials to create a fireplace. For this you will need a large cardboard TV box. You can use thick cardboard instead of a large box. But then you need to be prepared for the fact that it will have to be cut and glued.

You will also find it useful for making a decorative fireplace:
We transfer the drawing to the TV box. We cut a hole in the middle of the box according to the drawing. This will be the “hearth”. We fold the cut edges and glue them to the back wall of the box. If cardboard is used, we cut the sheets according to the drawing, taking into account gluing tolerances. We connect them together with glue.
To make the top of the fireplace, take a sheet of foam plastic or plywood, or glue together several sheets of cardboard. Let's glue the resulting mantelpiece to the fireplace itself.

To ensure that the fireplace is stable, it is better to glue an additional sheet of cardboard or plywood to the base. IN hardware store let's buy ceiling cornice made of polystyrene foam and a couple of decorative elements - foam pylons or rosettes. They will add sophistication and grace to our hearth. Let's glue the decor to the fireplace. To do this, use PVA glue or liquid nails.
Spray paint white or other pastel color paint the fireplace in two layers. So as not to spoil flooring, lay old newspapers or paper on the floor. After painting, let the product dry and install the fireplace. The decorative fireplace is ready.

Firewood for the hearth can be made from cardboard, twisted into logs, or natural branches can be used. If the fireplace is planned in one color, we will paint the firewood with the same paint. You can also place candles in tall glass glasses or an electric garland in the recess of the hearth. Decorating the mantelpiece also leaves room for creativity. Photos in beautiful frames, paintings or flower arrangements and memorable gifts in bright packaging will look great on the mantelpiece.

Photo of a decorative fireplace out of a box
It is very easy to create beauty and comfort in your home with your own hands. Imagine and create, then you can make a decorative fireplace out of boxes with your own hands using step by step instructions in the shortest possible time. Your apartment can be decorated with simple decorative items with minimal costs. All it takes is a little time and effort.