How to make slime from paint. How to make slime at home quickly and easily? The simplest recipes and rules for storing toys. What is "Lizun"
Lizun (Slime) is a toy that you don’t want to let go of. The jelly-like mucus-like material not only helps develop fine motor skills in children, but also helps combat stress in adults. Slime was originally made by Matte from guar gum and borax. Over time, the recipe for making slime expanded: some components were replaced by others, making it the most accessible.
Making anti-stress jelly is a creative and interesting process. It does not take much time and does not require large quantities ingredients. If you follow all the rules, creating a slime will not take more than 5 minutes.
- baking soda;
- dishwashing detergent;
- water;
- food coloring or paint (it is advisable to use gouache).
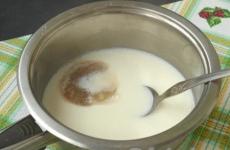
- 1. Pour the detergent into a glass bowl. The dosage is arbitrary. As you add the remaining ingredients, you can focus on the resulting consistency by diluting the future slime with water or dishwashing detergent.
- 2. Add baking soda to the detergent and mix everything thoroughly. If the mixture turns out thick, it can be thinned with other components until the required consistency is obtained.
- 3. When the slime is ready, add bright color You can add dye or gouache to it and mix thoroughly again until completely cooked.
- 1. To make a slime toy, you need to mix two components in equal proportions in a container. It is worth paying attention to the fact that granules and other additives should not be contained in either the gel or the shampoo. Otherwise, the slime will not be transparent.
- 2. All ingredients must be mixed thoroughly, then sent to cool and reach the desired consistency in the refrigerator. After 12-20 hours, the jelly-like slime will be ready for use.
- baking flour;
- cold water;
- hot water;
- food colors or natural colors (beet juice, carrots, etc.).
- 1. Pour 300-400 grams of pre-sifted flour into a small container.
- 2. Pour 50 ml into the flour cold water, then add 50 ml of warm water. Do not pour very hot water. After the water boils, you need to give it time to cool slightly.
- 3. All ingredients must be mixed well to obtain a homogeneous mass without lumps. After this, you can add a little dye to the resulting mixture, mix everything well, and put the resulting sticky consistency in the refrigerator for 5-6 hours.
- 4. After time has passed, you can remove the flour slime from refrigeration chamber and let the children play.
Show all
The easiest way to make slime No. 1
You can prepare a jelly-like toy using baking soda and dishwashing liquid. These ingredients are easy to find in every home. But when working with them, you must remember that children need to play with such slime only in the presence of adults.

Cooking method:

A jelly-like toy can also be made from regular toothpaste.
The easiest way to make slime No. 2
Shampoo and shower gel are just 2 components that are needed to make slime.

This slime should be stored at low temperatures, so after games you need to put it in a container and place it in the refrigerator. Shelf life: 30 days.
Cooking method:

You can make slime not only from detergent for dishes, but also from powder. The manufacturing method can be seen in the video.
The easiest way to make slime No. 3
Slime can also be made from safe ingredients, the basis of which is ordinary baking flour. Even small children can play with a jelly toy made from flour.
Materials for preparation:
Cooking method:


Slime can also be made from salt and shampoo. An easy cooking method can be seen in the video.
The easiest way to make slime No. 4
You can easily make an anti-stress toy from PVA glue and sodium tetraborate powder or solution. This manufacturing method is the most popular, since the slime prepared according to this recipe is very similar to the store-bought version.
Materials for preparation:

Slime is considered the most popular toy these days. You can create your own toy at home with your own hands. Children from all over the world are fond of this unusual hand toy. Making slime with your own hands is very simple. There are many options for making slime from ingredients found in every home.
In this tutorial I will show you 15 ways to make slime at home with unique step by step photos. Depending on the recipe, it will have its own unique properties- you can make transparent, glowing, glamorous or edible slime. When making them, some people add glitter, foam beads, or essential oils to scent the toy.
Today, many people are already fed up with spinners, and their place has been taken by slimes. This anti-stress can calm not only children, but also their parents. A mass that does not stick to your hands is called slime, slime or handgum. It has excellent stretch and can take different shapes, this toy is very popular with children.
The basis of each slime is a non-Newtonian liquid, which has extraordinary properties. Slime can be held for vertical surface, it may spread, but it does not leave marks. It is similar to regular liquid, but can be cut.
Slime without sodium tetraborate from Persil
Persil is a laundry detergent. When making slime, it will act as a thickener. Persil comes in the form of gel, capsules or powder. Gel or capsules are suitable for making slime. The gel bottle has a measuring cap and the capsules are in plastic packaging. This is very convenient when making this slime.

We will need:
- Persil washing gel;
- PVA glue.

Let's take it glassware and pour out PVA glue.

Add Persil.

When stirring, you will clearly see how the mass curls up.

You need to knead the lump for a few minutes.

Our slime without sodium tetraborate from Persil is ready! It turned out to be very soft and pleasant to the touch.


This recipe is perhaps the simplest. The ingredients for making slime can be found in every home. You can use glitter to make a unique toy.
In this way you can make a decent sized toy. The lump will be fluffy and stretchy. This slime is very easy to wrinkle and stretch.
See how to do it here.
This recipe takes minimal time. But keep in mind - if the glue is not fresh, the slime may not work out.
THIS IS THE BEST OPTION FOR MAKING LIZUN!

We will need:
- PVA glue;
- sodium tetraborate.

You need to pour a jar of glue into the bowl.

For beautiful color add a little acrylic paint.


Add tetraborate and mix.

If the mass is not thick enough, you should also add tetraborate.

Gently mix and knead the resulting mass.


Here we have such a wonderful licker!

Transparent slime - DIY slime

To make it, we need only two ingredients: a film mask for the face and sodium tetraborate.

Squeeze the film mask into a bowl.

Add sodium tetraborate and mix until smooth.

After thickening, our transparent slime is ready.


This is our own unique recipe for making edible slime at home.

We need to prepare sweets - soft toffee “Slivki-Lenivki”.

In our case, this is “Slivki-schaslivki”.

Remove the wrappers and place the candies in a glass or porcelain bowl.

Add a little butter.

Microwave until the toffee melts. The time depends on their number. You should get a homogeneous mixture.


Melted candies should be transferred to a plate with powdered sugar. After this, knead thoroughly until the mixture comes off easily from your hands.

The kneading procedure can be turned into a real game. To a small child I will really enjoy this activity.

Now you can play, the main thing is not to miss the moment, because the toffee should soon freeze. It turned out very cool and tasty, and most importantly, this slime is easy to make.

Almost as tasty edible slime can be made from Frutella candies and powdered sugar.

If you realize that you don’t have time to eat it before it hardens, just cut it into small pieces. Enjoy your tea!

We will need:
- tetraborate;
- PVA glue;
- acrylic paints.

Pour the glue into a bowl.

Add some acrylic paint.

Mix.

Add tetraborate to the glue.

Stir until thickened.


We got such a soft and bright slime.


The slime itself is made as shown in the previous lesson. Next, we take glitter for decoration, they are usually sold in nail design stores.

The amount of glitter depends only on your desires.


Toilet paper slime
Most often, children play with slime, so the toy should be as safe as possible. A toy made from flour will be absolutely harmless. Making slime from flour is quick and easy. It is necessary to take any type of flour, it should not be damp.
Before you start making slime, you need to sift the flour through a sieve. If there is no sieve, then you need to pour the flour into the bowl and mix thoroughly with a spoon. Thus, the flour will be saturated with oxygen, the product will become light and airy.
Sifted or beaten flour will make a softer slime. When making slime from wholemeal flour, you will have to knead the resulting lumps for a very long time. This will take a lot of time and effort. The result should be a homogeneous mixture.

We will need:
- flour;
- shower gel;
- green paint for painting.

Pour shower gel into a bowl.

Take the green stuff and add a few drops to the gel.


Add flour and mix.

This recipe is the cheapest and easiest to make slime at home, but it is more like hand gum.


We will make the next beautiful slime from an egg and a film mask for the face.


Separate the egg white and carefully pour into a bowl.

Beat with a fork.

For color, add a little acrylic paint.

And we introduce sodium tetraborate.


Almost immediately we get a real slime!


Many slime recipes use craft glue or PVA. If you don’t have them at home, you can take a glue stick.

Ingredients:
- shampoo;
- sodium tetraborate;
- glue stick.

The glue base needs to be pulled out of the tube and placed in a bowl. It is best to cut the glue with scissors.

Add some water. The bowl of glue needs to be placed in the microwave. It is necessary to heat until the glue becomes viscous, it is better to start with 15 seconds. If you don't have a microwave at home, you can use water bath.

Add shampoo.

Mix everything well.

And add some acrylic paint.


First you need to mix with a spoon, and then you can start kneading with your hands. Crush the slime for about 7 minutes. It should become soft and stretch well.


How to make airy slime from shaving foam

Ingredients:
- shaving foam;
- PVA glue;
- tetraborate

Pour the glue into a bowl.

Add shaving foam.

To make the slime colored, you need to add acrylic paint.


To thicken, add tetraborate.

Mix.

You need to knead the mixture until you get real slime.


Slime must be stored in an airtight container. If it has dried out, it should be placed in water. After lying in the water for some time, the slime will regain its previous appearance.

Another option for shaving foam slime
Instead of a bowl you need to take plastic bag. It should be as dense as possible. Squeeze a third of the bottle with foam, 100 ml of PVA glue and 1 teaspoon of starch into the bag. The contents of the package must be shaken well. The components should mix well and turn into a single mass.
The bag needs to be shaken until the slime turns into a thick mass. You can decorate the slime with colored glitter or foam balls.
All variants of slime containing flour are more like chewing gum for the hands and do not stretch very well.
Keep this in mind before you start making them. But this option is the safest for children.

You need to take flour and shower gel.

Squeeze out required amount gel in a bowl.


Add flour.

And mix. Everything is fast and simple.

Slime made from flour and gel is ready!


Homemade toothpaste slime
The most famous thickener is sodium tetraborate. In order for a children's toy to be safe, it is better to choose a more natural ingredient. This recipe uses flour, toothpaste and liquid soap. With this recipe you can quickly make a fun toy for children. The proposed ingredients can be found in any home.

Ingredients:
- toothpaste;
- flour;
- liquid soap.

Toothpaste (25 g) must be squeezed into a container.

You also need to pour liquid soap (25 g) here. It can be replaced with shower gel or any detergent.

Then add 5 teaspoons of flour to the container. The mixture must be mixed well with a spoon.

When the slime becomes thick, you need to knead it well with your hands.

If the mixture is not very viscous, then add 2 teaspoons of water. Thanks to the paste and soap, the slime will acquire an original shade. You can add paint, glitter or beads to the slime.


Slime made from nail polish and oil
Making slime is a very exciting process. You can set up a small laboratory at home. For the next slime we will need olive oil and nail polish.


Pour some oil.

And pour nail polish in there.

When the varnish has curled, you can pull it out.

This slime turns out to be very soft.

The only drawback is the strong smell. You can remove the unpleasant aroma with perfume or essential oil. This version of slime will turn out very well small size. To correct the situation, you will need several bottles of nail polish.
How to make slime from silicate glue and tetraborate
Thick silicate glue works well with thickeners.

We use tetraborate as a thickener.

Pour the glue into a bowl.

Add tetraborate until it thickens.

It turns out this transparent slime.

For this option, you need to choose the right silicate glue. It must be very thick, otherwise the slime will not work!

Not everyone can make their own slime. To do this you need:
- use quality ingredients;
- keep the proportions exactly;
- Follow the procedure indicated in the recipe.
At the final stage, a homogeneous mixture should emerge that is easy to pull out of the container. This indicates that the slime was made correctly. If a homogeneous mixture does not come out, then active kneading will correct the situation. You need to knead the mass until it becomes homogeneous and viscous.

If it turns out too sticky and sticks to the spoon, then you should add liquid starch or a little water to it. These ingredients will help the mixture become more fluid.
If there is an excess amount of liquid, the slime turns out to be viscous, but too slippery. It will slip off your hands. Can be drained excess liquid or add a viscous substance. This could be glue, flour or borax solution. After this you need to knead again.
A hermetically sealed container is the best house for slime. Some types require special storage, for example in the refrigerator.

Slime should be stored in a closed container. You can pour a little water on the bottom. The container with the toy must be tightly closed and shaken.
For proper care followed by water and salt. Additionally, you can add pieces of eraser. Slime needs 1-5 pinches of salt per day.

The toy must be bathed. For water procedures You will need a bowl of water in which to wash the slime. After bathing, it must be placed in a container. It is not recommended to hold slime in your hands very often. Its special structure helps to collect surrounding dust and dirt.
Rules for safe play with slime
- Don't play with slime for too long. This may be dangerous for the skin. It should not become the child's only toy.
- Should not be given to too young children. The baby can put the toy in his mouth or lick his hands after playing.
- The creation of slime must be controlled at all stages. In the future, it is necessary to monitor the suitability of the toy. If it is made from natural ingredients, then it should be stored in the refrigerator. If mold, plaque or a strong odor appears, you should immediately throw away the toy.
- You cannot play with slime if the skin on your hands is damaged (scratches, abrasions).
- Contact of a child with borax solution is unacceptable.
- Lizuna should be made in a well-ventilated room.
- For safety, you need to wear safety glasses. Wear gloves when adding glue or other solutions.
- It is important to remember that recipes from the Internet are not controlled by the relevant authorities. Parents are responsible for the safety of their children.
Young chemists can conduct various experiments when making slime. Some children do this right in the kitchen. Not only the color of the slime, but also its consistency and physical characteristics depends on the ingredients. Many guys post in in social networks the results of their experiments. On their pages they share recipes with all users. There are slime lovers whose page has millions of subscribers.

The peak of slime's popularity occurred after the release of the feature film "Ghostbusters." The toy was named after one of the ghost movie characters named Lizun. The toy appealed to millions of children from all over the world, and soon large-scale production of slimes began.
In the film, the ghost Lizun was a slimy green creature. The ghost has no legs, but has thin arms. You can make such a funny toy yourself from ingredients available in the house. With the help of our master classes this is easy and simple!
See how to make it yourself here.
Slime (or slime, which means “slime” in English) is a jelly-like mass that does not spread and is easy to assemble with your hands. The product was first released by the American company Mattel, which produces children's products. It was a green guar gum based formulation and was sold in plastic jars. Due to its properties, it has become a popular toy for children.
We have selected best videos Lessons on making slime at home, including slime recipes without sodium tetrobarate.
From shampoo, glue and activator
A review is presented on Yulia Rai's channel self-made slime at home. The video clearly describes the entire process and gives a clear recipe. To work, you need to prepare regular shampoo, shaving foam, water, liquid office glue and an activator, for example, eye drops, boric acid or washing gel. To get color, you can add any dye. You will need a glass or plastic container and a spoon for mixing the components. In just 10-15 minutes the toy will be ready.
Based on tetraborate and glue
IN short video from HelloPolly describes a simple idea self-creation slime. This does not require any special skills or abilities. You will need several tubes liquid glue and sodium tetraborate, which is used as a thickener. It can be purchased at any pharmacy. To make the product bright and colorful, it is recommended to add dye. For mixing regular one will do plastic jar and spoon - in just a few minutes the slime will be ready for use.
Simple and easy
Klementina Loom presented a video on her channel where she shared the most simple option making slime at home. It takes a few minutes of free time and only three components: PVA-k glue, a drop of washing gel and dye to give desired color. After reviewing the instructions, anyone can do this. If you want some toys different color, you can take more of the necessary ingredients and different dyes. At the same time, the lecturer works on mistakes that she made in the processes.
Without tetraborate
An easy way to make slime from available ingredients from the MARFFA channel. You will need regular liquid soap, PVA glue, toothpaste, a little baking soda and dye to add color. The peculiarity of the recipe is that to create slime you do not need to use sodium tetraborate, and all the ingredients can be found in any home. The author draws attention to the fact that for suitable for work not every glue. The whole process takes no more than 10 minutes.
Made from soap
Video blogger Stasya Mar tried several popular ideas at once to make slime with her own hands. But only in two cases was it possible to achieve the desired result, since they used a thickener. In the first case, you will need: liquid soap, moisture, dye and PVA glue, sodium tetraborate. Stasya suggests experimenting and adding glitter to the mass that has not yet thickened, then the product will turn out to be very unusual and interesting. The components of the second option are liquid soap, salt, water and contact lens solution, and the thickener will be glue.
From toothpaste and shampoo without thickener
Lena Zolotova, host of the Miss Melodi channel, demonstrates a way to create slime without adding a thickener. The process is simple, so even a child can handle the procedure. All you need is a small container with a stir stick, shampoo, toothpaste, spray and salt. To make the craft look more interesting, you can add dye of any color. It will take a little time more than an hour, since Lena recommends putting the unhardened mixture in the refrigerator for a while. As a result, the mass will be elastic and will not stick to your hands.
Space
An original idea from video blogger Anna May. She demonstrated how two slimes of different colors can become one if you mix them together. To repeat the experiment, you need to collect two small containers and components - water, baking soda, PVA glue (recommends a certain brand) and eye drops. Anna decided to add sparkles to the resulting mass, as a result of which the composition takes on an unusual galactic coloring. The recipe does not require much time or hassle.
Glass
Anna Chi conducted an experiment to create transparent (glass-like) slime. The recipe is simple, does not require many ingredients, and the work will take no more than 15 minutes. You will need a small container, a stirring spoon, water, liquid colorless glue, contact lens solution and baking soda. The result is an original, transparent slime. The author recommends storing it in a tightly closed jar so that the toy does not dry out and remains soft for a long time.
From paper
We make an unusual toy - from toilet paper. All that needs to be prepared are tools (a container and a spoon for stirring), shampoo, toilet paper, liquid lipstick and tetraborate. The softer the paper, the better. If you don't have lipstick on hand, you can replace it with colorless glue. Stasi Mar asks you to make sure that the paper dissolves completely. It will take about an hour - long and thorough mixing is required here. As a result, slime turns out airy and light.
The second option is with the addition of light plasticine, hot water and thickener. In addition to the usual tools, you will need a strainer. It takes time, since the finished mass for the toy must be left for a day for the moisture to evaporate.
Made from plasticine
Ekaterina Slime is conducting an experiment on making slime from such components as light plasticine, shampoo (or shower gel) and ice water. The tools you will need are a container, a mixing spoon and oilcloth. At the end, Ekaterina decided to add a little tetraborate - this makes the toy more elastic. Please note that you will need very little thickener and it is better to dilute it, otherwise you risk ruining the finished craft. You can mix glitter and choose any color of plasticine.
Four types without glue
The number of ways to make slime has increased significantly since 1976. Most of the ingredients are on hand in every home, you just need to choose suitable idea. You can involve children in this fun activity and diversify the games.
What's happened slime or "handgam"(handgum) what is it also called? The name comes from the words “hand” - hand and “gum” - chewing gum.
There are several ways to make slime at home. They differ mainly in the ingredients that are used to prepare homemade slime.
If you follow all the rules and have a strong desire, handgaming at home is possible do it in 5 minutes.
Click on one of the links below to go to the advice you need.
We need:
PVA glue, white, it is advisable to look at the expiration date and choose one that was made relatively recently.
Borax (sodium tetraborate), 4% solution or Borax powder - can be found at a pharmacy (no prescription needed) or at a chemical store.
Food coloring - you can gouache, beet juice(for red slime) or brilliant green (for green slime).
Container (jar, any plastic dishes) and a stick (spatula) for stirring.
You can use a little water.
You may need a measuring spoon.
Step 1.
Fill a glass (or any container convenient for you) with PVA glue (100g or 200g), after shaking the jar of glue.
* How more glue, the bigger your homemade slime.
Step 2.
Add a little dye to the container with glue (the main thing here is not to overdo it, otherwise your hands will get dirty). Mix thoroughly until a homogeneous mass of the desired color is achieved.
Step 3.
Add borax solution little by little (1-2 bottles). You don’t have to spare the borax, otherwise the slime will turn out liquid and will stick to everything.
If you use 100g of glue, then 1 bottle of sodium tetraborate will be enough. Mix the whole mass thoroughly. The result is a jelly-like, thick mass.
* If you have borax in powder form, take 1 tablespoon and dissolve it in a container with a glass of water room temperature.
Step 4.
Carefully transfer the mixture to a napkin to get rid of excess moisture. By the way, it is better to keep such a toy on paper, so it will collect less lint.
Place the mixture in a bag and knead (like plasticine) for about 5 minutes. We take it out.
Enjoy!
Below is a video on how to make slime at home:
We make homemade slime without boron (sodium tetraborate) - from glue and starch.
Step 1.
Measure 1/3 cup of liquid starch and pour it into a small bag, where we also add a little dye.
Step 2.
Immediately add a quarter cup of glue and mix thoroughly until a thick mass is formed. There may be some liquid left in the bag. Just take the “homemade” slime out of the bag and you can enjoy it.
Of course, such a slime cannot be compared to a store-bought one, since guar gum will be extremely difficult to obtain.
How to make slime from water and starch
This method is the simplest and least expensive, but it does not give the expected result.
By mixing starch and water in equal proportions, you can get homemade slime, which does not have a very pleasant consistency.
You can add more starch to make the slime thicker. Also add dye and mix thoroughly.

- You can experiment with slime colors and even make a whole family of homemade slimes. Also you can use various sparkles, small stars, etc.
- Can be used essential oil to give the handgam an interesting smell.
- If you want the slime to retain its properties and last longer, you need it store in a sealed container and in a cool place. Also, it is desirable do not put slime on the carpet or other surface to which small lint can easily stick.
- If the slime starts to dry out, place it in a container with warm water.
- This toy is NOT toxic or poisonous, although of course you should not eat it and you should wash your hands after playing.
- It is also worth noting that some try to make slime using soda instead of borax or starch, but in this case the result will be a rather solid mass. So don't waste your time on this.
- Remember that the life of such a toy is extremely short (about a week), so stock up on materials for making slime at home, as this activity is contagious!

This toy first appeared in 1976 and was made by Mattel.
The movie brought enormous popularity to the toy. "Ghostbusters"(1984), namely one of its main characters is a ghost named Lizun.
Handgam can play the role of a means for hand massage, as well as for development of fine motor skills.
Slime, which is sold in the store (aka " Smart plasticine"), is the result of a mixture of: 65% dimethylsiloxane, 17% silica, 9% Thixatrol ST (castor oil derivatives), 4% polydimethylsiloxane, 1% decamethylcyclopentasiloxane, 1% glycerin and 1% titanium dioxide.
Reading time: 9 min
4.7 / 5 ( 6 votes)
Today, about this funny toy, probably everyone has heard. For millions of children, interesting colorful chewing gum is one of their favorite toys. As it turns out, making slime at home with your own hands is quite simple.
We need to figure out what slime is and consider a certain number of options on how to make slime at home, with your own hands.
What is "Lizun"
Slime is the original name for Lizun. The creators of the toy are considered to be Mattel. Date of birth of the toy: 1976 They started calling the toy Lizun in the 90s of the twentieth century, when the cartoon “Ghostbusters” was released. One of the cartoon characters was Lizun (ghost).
He was too similar to Slime: just as green, he could easily pass through walls. And on the surface, after it, there remained sticky mucus of a greenish tint.
One to one, just like Slime, slime is a soft jelly-like substance that can easily change shape, but does not melt in your hands. It can be both hard and elastic; if there is a sudden or strong impact, it sticks to the surface of the ceiling, flows down the wall, leaving an unattractive mark behind it. If desired, the toy can take a variety of shapes.
When the child has had enough of playing, the toy is placed in a jar. If stored in accordance with the rules, it can be used for a long time.
According to psychologists, the Lizun toy is a wonderful anti-stress. With its help, the baby can relax. His imagination will be busy. The child will grow up with a good imagination. In addition, with the help of Slime, motor skills and motor activity begin to develop well, and the nervous system is strengthened. Memory, vision, and attention are trained.
Slime is great entertainment for kids.
Children not only have fun playing with slime, but also get relief from stress. Nervous system receives a beneficial effect. The small muscles of the hand develop well during the game, as do motor skills.
The toy has a gel consistency. It cannot melt, but can take the most unexpected form.
In every store that sells toys for children, you can buy slimes. But you can make this toy yourself at home. Why not do this together with your child? It's not difficult at all.
This process will not take much time. Here too expensive materials and tools will not be needed. It is worth considering those options that are affordable and interesting to do this interesting toy.
How to make slime with your own hands at home
The easiest way: starch slime
This recipe is simple and safe. This result is achieved because there is no boric acid, glue or detergents. If you make slime using starch, the steps of the process will be simple. All actions are easy to do for both children and adults.
What you will need (materials):
- potato starch (150 g);
- warm water (75 ml.);
- food coloring (2.5 g);
- You need to prepare a bowl and spoon to mix the ingredients.
Step by step instructions:
- Pour starch into a bowl.
- Add dye. Mix it with starch.
- Slowly add water while stirring the mixture.
At first glance, at first, it will seem that the slime did not work out, and it is just a simple jelly. But when stirring continues for a long time, it will become visible how the liquid has become an elastic slurry.
You can play with slime, which is completely safe. For a child, the resulting toy is usually of interest for the first two days.
Then you will have to do everything again, in accordance with the recipe, to get a new slime.

Sparkling Slime made from PVA glue with glitter
To make slime using glitter, you need to have on hand:
- glue with glitter (100 ml);
- water (250 ml);
- borax (1 tsp);
- water (1 tablespoon)
Pour water into a glass. Stir borax in it. Shiny stationery glue is poured into a bowl. All. Here you will need 1 tablespoon of water. It is poured into a bowl of glue.
Mix thoroughly until the mass becomes flexible and pliable. After this, a borax solution is introduced and mixed to the required consistency to form a Lizun.
Slime without sodium tetraborate and without glue with detergent
If a trip to the pharmacy is not in your plans, but you want to make Lizun right now, this option is more suitable than others.
Manufactured Lizun, in appearance, is almost indistinguishable from purchased one. Since making this type of Lizun requires the use of detergent, you will need to wash your hands thoroughly.
Need to take:
- dishwashing liquid
- bowl for mixing ingredients
- hand cream
- dye.
How to do:
In a ratio of 1:2, you need to combine dishwashing detergent with baking soda. Mix everything well.
Add hand cream. Stir the mass. How much glue is needed will be visible when the ingredients are mixed.
Pour in the dye.
As soon as all these components are mixed, you should pay attention to the mass. It should be slightly runny.
Slime that is not yet 100% ready should be put in a bag. Then, for 4 hours, put it in the refrigerator. As time passes, they pull out the toy and have fun with it.
How to make slime from shampoo
You can get a funny slime if you use ordinary shampoo, add dyes and polymer glue (“Titanium” is great)
Shampoo (100 ml) is poured into the container.
Pour in food coloring (1 tsp).
Stir.
4 tablespoons of glue are combined with colored shampoo.
The resulting liquid mass is poured into a bag and kneaded by hand to obtain the required thickness.
They take out the resulting substance. All! Shampoo slime for children is ready. Place it in a container with a lid to keep the toy there.
The most harmless - made from wheat flour
If you take flour, the fun will be absolutely harmless for children. What to do?
- Sift 2 tablespoons of flour through a sieve.
- Pour 50 ml of cold water on top.
- Then 50 ml hot (boiling water cannot be used).

- Mix the ingredients to obtain a homogeneous consistency.
- Pour in food coloring (3-5 drops).

- If desired, add salt or sugar.
- Stir the dough until the whole mass acquires one shade.
- Place in the refrigerator for 3 hours.

- They take it out.
- Knead with hands.

Slime made from alcohol and sodium tetraborate
Yes, this method cannot be called standard. But how interesting it is to make this toy! Just so that the result does not disappoint, you should not “deviate” from the recipe.
We need to stock up:
- Polyvinyl alcohol;
- Water;
- Sodium tetraborate (brown);
- Dyes (if desired).
It's not a problem to buy borax at the pharmacy. It is sold without requiring a prescription. The price of the product is low. It should be noted that polyvinyl alcohol is sold as a powder, not a liquid. This component is the most important in the recipe. That is why, in this case, neither vodka nor medical alcohol are suitable.
What to do:
Pour polyvinyl alcohol into a bowl (a little). Mix. Put on fire. Cook for 40 minutes. You must stir all the time. To prevent the mass from burning, the fire is kept low. After the bowl is removed from the heat, the mass should cool.
Preferably at room temperature. When the alcohol has been given the opportunity to cool, the other components are mixed at this time. Water is poured into the glass.
Pour in 1 or 2 tablespoons of sodium tetraborate. Mix everything thoroughly until the borax crystals are completely dissolved in the water.
After this, the resulting liquid must be filtered. Add alcohol (it will have cooled down by this time), in a ratio of 1:3. Mix well. If desired, add food coloring. You can use the toy!

Colored slime made from glue and borax with water
This method has gained popularity. A lot of different ways have been invented. And what ingredients are not used! You can consider one of the methods in detail.
Have to take:
- warm water(200 ml);
- a jar of PVA glue (or two);
- food coloring;
- borax (2 bottles).
Before you start working, shake the tube of glue. Then it is poured into a deep bowl. (You can also use ordinary glass jar use.)
You will need another bowl. There they mix water with dye and pour it into a jar of PVA. Mix all components until a homogeneous mass is obtained.
After this, boric acid should “go” into the mass containing the glue. As a result, you will see how the mixture will become viscous and dense in consistency. After viscousness appeared and the mass became thick.
It needs to be kneaded while wearing gloves. If you don’t have them on hand, then mix them in a plastic bag. Place the resulting slime on a leaf for half an hour or an hour. All. The child can play.
How to make from plasticine with gelatin
Plasticine, as a rule, is found in those houses where children live. It is this material that will be useful to make a popular toy. Everyone will be happy with the result!
What you will have to prepare from materials and tools:
- 1 pack of plasticine;
- 1 pack of edible gelatin;
- a spatula to mix the ingredients (or a spoon);
- jar or bowl for mixing;
- iron bowl to heat the gelatin.
How to do:
First, pour gelatin into an iron bowl. Fill cold water. Mix thoroughly. Leave for 60 minutes. How time will pass, you need to heat the gelatin that has been soaked. Bring to a boil, and immediately set the container aside by removing it from the heat.
You need to take a container (preferably plastic). Using a spatula, mix water (50g) with plasticine (100g).
Slowly add gelatin, which has already been prepared, into the resulting mixture. Mix with a spatula to obtain a plastic, homogeneous mass.
Place the bowl with the mixture on the shelf of the refrigerator so that the product completely hardens. After this, you can take it out and give the baby the slime.

Slime made from perfume and hand cream
If you use hand cream, it may turn out to be slime. But there is no 100% guarantee. But why not take a risk?
- Squeeze the cream into a bowl.
- Add dye. Stir.
- Add perfume a little at a time. The resulting mixture is stirred. It should start to thicken.
- Once the desired consistency is achieved, knead the toy with your hands.
Fun transparent slime
There will be no difficulties in making such a toy. To manufacture it you need to prepare the following components and materials:
- Transparent PVA glue (100 ml). It is sold in stationery stores.
- Boric acid, in powder form (1 tbsp);
- A bowl for mixing the ingredients;
- Wooden stick or a spoon.
Step-by-step instructions for making it at home:
- Pour glue into a glass jar.
- Send boron powder there.
- Mix thoroughly to obtain a homogeneous elastic slurry.
All. You can play with slime. Only the child needs to be told that he will need to wash his hands with soap after playing.

Simple toothpaste slime
What you need to have to make this toy:
- A tube of toothpaste.
- Cup.
- Food coloring.
Step-by-step instructions for making slime at home:
Squeeze a tube of toothpaste into a glass. It is advisable to buy either a gel or a thick paste. Send the dye into the glass. If you add more of this component, the shade of the slime will become richer.
To obtain a homogeneous mass, you need to thoroughly knead the mixture. You need to make sure that all the grains of dye dissolve.
As soon as you have a homogeneous mixture, you need to send it to a water bath for 15 minutes. This is quite enough. This needs to be done to remove excess moisture. As a result, the mass will acquire a dense structure.
You need to make sure that the slime does not turn out too dry. To prevent this from happening, it is advisable to smear your hands with oil and stretch the toy. The size of the slime will depend on the amount of toothpaste you use.
Slime made from soap and toothpaste
To make a toy, you need to stock up on:
- toothpaste
- liquid soap;
- dry dye;
- flour.
Step-by-step instruction:
Mix soap and toothpaste.
Mix the dye with flour. When adding flour, it is necessary to stir the mixture without stopping. If you take soap and paste in an amount of 20 g (of each component), then 5 tsp of flour will be enough.
When all the flour is poured out, the whole mass is thoroughly mixed so that the dough does not acquire a homogeneous structure.
It is advisable to pour in a little water. Then the mass is kneaded until the slime becomes viscous.

An easy way to make slime from hydrogen peroxide
Since the cost of making such a toy is low, this method has become very popular. But some people are disappointed because they were hoping for a different result. By this recipe, the toy will be hard, but it will jump well.
You will need:
- 1 glass of water;
- 100 g starch or soda;
- 100 g PVA glue;
- hydrogen peroxide;
- dye.
You need a medium sized container. There you will need to mix water with soda (or starch) in equal proportions. It is necessary for the mass to form a jelly-like state. Then you need to pour in the glue. Mix well.
Hydrogen peroxide must be poured into this mixture. Add dye. Mix again. It should be noted that the slime eventually becomes airy precisely because of hydrogen peroxide. If it becomes clear that the mass is too thick, you need to change the proportions by adding more water.
Slime using washing powder
To make such a slime, you will need to use a liquid analogue washing powder. There is no need to try using gel or liquid soap. The toy will not work, because the consistency will be different.
Before you begin production, you must have:
- PVA glue;
- liquid washing powder;
- food coloring;
- thin rubber gloves;
- container.
Manufacturing stages:
Pour PVA glue (1 cup) into the prepared bowl. You can pour in more or less. This will depend on what size you want to make the slime.
Place 5-6 drops of food coloring in PVA. Stir until the mixture acquires a uniform color.
Take 2 tbsp. liquid washing powder. Pour into mixture. Mix the solution thoroughly. You will see how, over time, it becomes sticky. It is necessary to bring the solution to the state of putty. In the event that the solution is very thick. Drop by drop, you should add liquid powder to dilute the mass.
Wear gloves. Remove the solution from the bowl and start kneading it like dough. You need to get rid of excess drops of powder.
If this is not done, the slime will be similar in consistency to soft rubber.
It is necessary that the toy is stored in a closed container. When it becomes clear that the toy is losing its properties, it needs to be put in the refrigerator for three to four hours.

How to make slime from magnets
Magnetic slime is considered an original toy. He will be able to emit a glow in the dark. You can make this toy yourself at home.
- Neodymium magnets;
- boru;
- water;
- glue;
- iron oxide.
Pour 1 glass of water into a bowl. Add 0.5 tsp. burs. Mix well to completely dissolve the boron in water. A mixture will be needed to activate the second half of the composition.
Pour 1 cup of water into another bowl. Add glue (30g). Mix well. Pour in paint. To make the slime shine in the dark, it is advisable to use phosphor paint.
A boron solution is gradually poured into the glue mixture. At the same time, you need to stir all the time glue mixture. At the moment when the mixture begins to harden and acquires the desired consistency, there is no need to add boron solution. What is left is poured out.
The resulting slime must be leveled on a table or board. Iron oxide (a little) is poured into the center of the toy. Knead the slime until it all turns gray.
The magnetic toy is ready. When the slime comes into contact with the magnet, it will crawl behind it.
DIY shaving foam slime
As is clear from the title, the main component in the manufacture of the toy will be shaving foam. The recipe is popular because it is simple.
You need to prepare materials:
- Shaving foam (150 g);
- 100 ml PVA glue;
- Medium sized bowl;
- Spoon for mixing ingredients;
How to make slime at home from men's shaving foam:
Pour glue into a container.
Gradually pour foam into it. Keyword"gradually".
When the slime has become viscous and elastic, this indicates that enough foam has been added. That's why 150g is a rough guide. The person making the slime must take control of the amount of foam.
The components are mixed until a ball is formed, the structure of which is dense. It shouldn't stick to your hands.
Then they knead the slurry until the structure becomes elastic. If the slime is mixed well, it will not stick to your hands.
If you want the toy to be bright and beautiful, add food coloring during the manufacturing process.

What to do if the slime doesn't work out
In the event that the slime failed to do so. As intended, all errors are easily corrected.
- To give the toy elasticity, you need to add a few drops of vinegar. Then it will stretch better
If you add a few drops of hydrogen peroxide, the mass will turn out more fluffy. This is usually done when making fluffy slime. - To make the slime slippery, you need to use glycerin.
- A glowing toy is made using fluorescent paint.
- When the slime is very soft, put it in a jar and sprinkle a little salt on top. Close with a lid. So the toy should stand all night. The toy will become elastic as the salt absorbs excess moisture.
- When the slime turns out to be hard, you can soften the structure by placing the slime in a jar, adding water, and leaving it overnight, covered.
- To give the toy a pleasant aroma, it is advisable to use essential oil, vanillin or food flavoring.
- By adding tiny sawdust or iron oxide, you get a magnetic slime. The toy must be kneaded thoroughly to distribute the additive evenly. As a result, the toy will be attracted to any magnets.
- An “anti-stress toy” will work if the mucus is in balloon. This is done using a large syringe without a needle.
- In order to make the slime larger in size, place it in a bowl of water for 3 hours. Don't worry if it breaks into several pieces. Everything is according to the rules. You need to add a little body or hand cream and salt. Mix. The slime will become elastic and increase in size.
On a note! You can add foam balls to the toy, different colors. This will not only increase the size of the slime, but also make it bright.
Rules for caring for slime
The toy, which both children and adults are delighted with, sticks to surfaces and leaves no marks behind - this is the famous slime. It can be compared to thick jelly or jelly.
It is made using a jelly-like material. That is why, over time, it ceases to be elastic and attractive.
If you know how to care for your slime, you can extend its lifespan. It is necessary that the toy “be neat.” So that it would be pleasant to play with.

Where to store
For the slime, you need to select a separate container with a lid. Store it on one of the refrigerator shelves. Storage in the freezer is prohibited.
How to care for slime
The main thing to follow is to make sure that the slime is not dirty. Slime has sticky properties, so small particles of debris easily stick to it. It is advisable that the toy should not be in places where there is dust.
For example, dust accumulates under the sofa. Do not allow the slime to come into contact with surfaces covered with lint. If the slime is dirty, remove the debris using alcohol. The second option is to remove it carefully using tweezers or a needle. You can also remove particles of debris with your finger, if possible.
Slime “doesn’t like it” if the air in the room is too dry, or vice versa – very humid. If the room is dry, it may become hard and lose its sticky properties. And if excess humidity– it swells and becomes more moist.
How to act in such a situation? What should I do to prevent the shape of the toy from becoming deformed? If there is not enough moisture, the slime will dry out. We need to save him by pouring a little water (5-7 drops) into his “apartment” (container). The slime will absorb moisture. This will help him recover.
If suddenly the toy becomes liquid due to excess moisture, using regular table salt. Pour a few grains of salt into the container. Cover the top with a lid. The “house” is shaken in the air.
To make the slime grow, pour a few drops of water into the container overnight. Close with a lid. Place it on the refrigerator shelf. You cannot store the toy in the freezer, otherwise the slime will become covered with frost.
When a toy is not played with for a long time, it may become moldy. If mold is found, it is advisable to throw away the slime.
Video: how to properly store Lizun