Instructions for laying paving slabs on sand. Laying paving slabs with your own hands: step-by-step instructions. Preparing to lay paving slabs
Owners summer cottages And country houses in their possessions they want to create an atmosphere that will both please the eye and promote active recreation. Gone are the days when a piece of land was perceived solely for growing agricultural products. The garden beds have made room a little and given way to gazebos, green lawns where children can frolic, as well as beautiful garden paths that are both pleasant and convenient to walk on.
Paving stone paths undoubtedly look the best and are the most functional, but when site owners begin to consider the prices for paving services, all interest often disappears. But in vain. In this article we will try to prove that there is nothing impossible in such a process as laying paving stones with your own hands. Step-by-step instructions will help readers of our portal bring this process to life.
What are paving stones? What is it like?
Paving stones comes from the word whetstone. Granite, basalt or other hard rock was previously split into fragments (bars) of approximately equal size and shape, then a covering was assembled from them - paving stones, which is why it is called chipped stones. Such technologies are still used today. Such coatings look very interesting, although the surface can hardly be called perfectly smooth and installation requires a highly qualified craftsman. Over time due to the passage large quantities people and passing vehicles, the surface wears out, polishes naturally and becomes smoother. It is precisely these paving stones that are loved by tens of millions of tourists visiting the old cities of Europe, paved hundreds of years ago.

The next step in the development of paving stones was the use of sawn stone, when all the bars have the same geometric dimensions. Such paving stones are also called full-sawn paving stones, since all edges were processed. It became easier to lay such stones, roads and sidewalks became smoother, and it became easier to walk on them. And now sawn paving stones from natural stone It is used most widely, even despite its considerable cost.

Another variety of paving stones is split-sawn paving stones, when a stone blank is first sawn into blanks of equal thickness, and then split into pieces the right size. Sidewalks and paths look very advantageous, where full-sawn and split-sawn paving stones are successfully combined.

Also in the 19th century, clinker paving stones began to be produced in Germany, obtained from natural slate clay, from which bars were molded into the desired size and shape, and then fired in a kiln at high temperature. This technology is still simpler than cutting or splitting natural stone, so clinker paving stones began to be produced in large volumes. It is still being produced, as it has proven its worth. Some clinker sidewalks have been successfully used for more than 150 years and are not at all about to “retire.”
Prices for paving stones
paving stones

IN modern world, with development construction technologies, produced good replacement natural materials – concrete paving stones. With a very large interference, it can be called pure concrete, since in addition to high-quality cement and mineral fillers, it contains a lot of polymer additives that increase strength, wear resistance, frost resistance and also allow the paving stones to be painted in any color. This gives unlimited scope for the implementation of any idea for decorating your site. Concrete paving stones can be made into any shape, so all path curves, transitions and various other curved elements can be laid without labor-intensive trimming.

Concrete paving stones can be vibrocast or vibropressed. The second is preferable, since its performance properties are much higher. Manufacturers' statements that concrete paving stones are in no way inferior to natural granite or clinker stones are only partly correct, if only because artificial paving stones have not yet passed the test of time. The authors of the article do not wish to offend any manufacturer or seller of concrete paving stones. If in a ridiculous 150 years we are shown a sidewalk in good condition from artificial stone, which is due today, we will sincerely apologize for our words.
What are the advantages and disadvantages of paving stones?
Residents of cities built not in the 20th century, but much earlier - in the 18th and 19th centuries, have you seen at least once how old paving stones peek through from under the “shabby” asphalt surface. A reasonable question arises: why does the “younger” asphalt “live” so much less? road surface, which our great-grandfathers and great-great-grandfathers did. And this fact is far from uncommon. It turns out that well-laid paving stones can serve as a load-bearing base for other coatings.

If you believe historical sources, then even in ancient times not all cities could afford paving stones, but only with a substantial budget, since this coating was very expensive even then. It is still very expensive. But it’s still too early to write off paving stones. Despite the fact that such covering of roads and sidewalks is very expensive, fortunately, it will delight our eyes for a long time. Why does humanity stubbornly continue to use paving stones, what are its advantages?
- Paving stones are very durable, wear-resistant and frost-resistant.
- Due to the fact that the paving stones are always laid on a drainage pad, water will never accumulate on the paths.
- Paving stones are always easy to repair, because you can partially disassemble them and then reassemble them. You can also change individual elements.

- When the soil moves, no cracks form on paving stones.
- Paving stones do not melt in the heat like asphalt and do not emit vapors of various petroleum products.
- Paving stones look very beautiful. They testify to the good taste and wealth of the owners.
- Laying paving stones does not require the use of special heavy road equipment, that is, all work can be done independently.
If paving stones are such a wonderful covering, then why not pave all roads and sidewalks with it, and then live and rejoice in the fact that there is enough for our lives, and possible problems let the grandchildren or great-grandchildren decide. Paving stones still have disadvantages.
- Paving stones are a very expensive material. Covering roads and sidewalks with asphalt or concrete is much cheaper.
- Work on laying paving stones is also one of the most expensive, as it requires serious preparation of the base and qualified work force. It takes much more time to build a road made from paving stones than from other materials.
- Paving stones require good construction measures, since excess water will simply wash away the base.

- Paving stones have a large mass, so they are prone to subsidence, especially if the laying was carried out in violation of technology.
- Driving a modern car on cobblestones is a dubious pleasure, and in wet or frosty weather the surface can be very slippery.
- For reasons “unknown” to science, for some reason women who wear heels do not like crushed paving stones.

Nevertheless, owners of country houses and summer cottages should very seriously consider the use of paving stones for paving yards or arranging paths in the garden. And if you do it yourself, the money saved will more than cover the cost of purchasing the material. However, you can even make paving stones yourself, which you can read about on our portal.
What is the difference between paving stones and paving slabs?
If you consider various sources, then this issue can become very confusing. When some say that paving stones are just a natural stone, others argue that it’s not about that, but about the size - paving stones are much thicker. We propose to clarify this issue; to do this, we suggest considering the following table.
Prices for paving slabs
paving slabs
 Paving slabs are paving stones that regularly visit a nutritionist
 Horizontal thicknesses are typical paving slabs or paving stones, and the vertical length is the greatest, because tiles or paving stones can be not only square, but also rectangular. If the ratio maximum length to the width will be less than or equal to four, then we can say that this is a paving stone. In the table, such ratios are indicated in red-brown color. If the indicated ratio is greater than four, then such products can be classified as paving slabs; these ratios are highlighted in blue cells.
Paving stones are superior to paving slabs in their load-bearing capacity. Obviously, if you put a 160*100*62 mm paving stone on the sand and run over it with a KAMAZ wheel, then nothing will happen to it - it will simply be pressed deeper into the sand. And if you take a 420*420*62 mm tile and place it in the same conditions, then most likely it will crack. It turns out that with equal thickness, the fracture strength will be higher for paving stones.
Depending on the conditions of further operation, the type of soil and the depth of groundwater, paving stones are used for laying different technologies, the difference of which lies mainly in the structure of the base necessary for preparation.
Required materials and tools
To create a paving stone walkway near your home, you will need the following materials:
- river or washed sand of medium or coarse fraction;
- gravel or crushed stone fraction no more than 40 mm;
- cement grade not lower than PC400;
- paving stones with a thickness of at least 60 mm;
- curbstone;
- or other similar material.
The amount of materials depends on the area of coverage, the chosen technology for preparing the base and how the paving stones will be laid with your own hands.
When performing work you will need next tool:
- and wide capacity for ready-made building mixtures;
- or manual tamping;
- angle grinder (grinder) with a diamond disc;
- bayonet and shovel;
- building level at least 1 meter long;
- plaster rule;
- rubber and metal hammer;
- mason's trowel and spatula;
- cord and stakes;
- soft brush;
- buckets.
In case of device concrete base, you will also need a soft knitting wire and a hook for tying reinforcement.
Work order
Laying paving stones with your own hands consists of several stages, which include:
- planning and layout of the area;
- soil development;
- backfilling the drainage layer;
- installation of a base for paving stones;
- stone laying;
- finishing works.
Purchase necessary materials it is possible only after an accurate plan of the path has been drawn up, its area, the length of the sides have been determined and the laying technology has been selected. Only in this case will you be able to correctly decide how to lay the paving stones with your own hands and the curb stones necessary for arranging the garden area.
Drawing up a diagram and marking the path
Marking and excavation of soil.Before starting work, draw on paper detailed plan plot indicating all buildings and garden trees. After this, apply a diagram of the future paving stone path on it. It should be taken into account that the distance to tree trunks should be at least one and a half meters. This is required to ensure that growing roots do not damage the base or compromise the integrity of the coating in the future. The slope of the surface should be directed away from the buildings.
The width of the path can be arbitrary, but it must be a multiple of the size of the paving stones. This will reduce the need to cut the stone during installation. The recommended width is 0.8-1.2 meters, excluding the size of the curb.
The contours of paving stone paths are laid out on the ground using driven stakes and a cord stretched along them in accordance with the drawn up plan. In this case, the width of the breakdown is made taking into account the size of the curb stone and adding 8-10 cm on each side.
The height of the tensioned cord on both sides should correspond to the upper level of the laid covering and be 5-8 cm above ground level. This can be achieved using a building level.
Soil development work
 Laying geotextiles.
 Before laying paving stones, the first step is to remove the upper layer soil. The depth of the excavation tray depends on the type of top base layer chosen, which can be sand, cement-sand, concrete or gravel.
In each of these cases, the bottom layer is a drainage of compacted crushed stone or gravel 15 cm thick. A leveling layer of sand 3-5 cm is poured onto it and after that an upper load-bearing layer 10-15 cm thick is placed. The top of the paving stones should be 5-7 cm above ground level. Thus, the depth of the earthen tray for garden paths will be 30-35 cm.
Construction of a drainage support layer
 Construction of paths with and without geotextiles.
 After excavating the soil, the bottom of the trench should be compacted well and a geotextile fabric should be spread over it. It is capable of transmitting moisture in only one direction. In addition, it will prevent the possible germination of weeds.
A layer of crushed stone or gravel is poured onto the canvas, the thickness of which depends on the height of the curb stone, the top of which will be level with the garden path. The layer must be compacted well. It is a load-bearing support that transfers loads to the ground, and, additionally, performs a drainage function to remove moisture coming from the surface.
Installation of curb stones
 Installing a curb.
 To mark, remove the stakes from with a stretched cord and install them inside the tray to the width of the paving stones. The height of the cord should correspond to the surface of the track. It will also be a guideline for installing the curb height. As a result, the inner top edge of the border should coincide with the position of the cord.
If it is necessary to lift a stone, sand is poured under it, and landing down is carried out by hitting a heavy hammer through wooden spacer or removing part of the crushed stone. The correct installation of curbs should be checked building level.
Securing the stones in a fixed position is done using concrete mixture, which is poured on both sides. After the concrete has hardened (after 72 hours), you need to add crushed stone, bringing the total layer thickness to 15 cm.
A layer of sand 3-5 cm thick should be poured over the crushed stone and spilled with water so that part of the material fills the voids between the stones. If this is not done, then in the future the sand will still settle under the influence of incoming moisture and subsidence of the base may occur. The sand itself is needed in order to fill the voids in the crushed stone, create a dense monolithic layer and smooth out the sharp edges of the crushed stone on the surface.
Selecting the type of base for installation and its arrangement
The base for laying paving stone paths can be made of:
- clean coarse sand;
- dry cement-sand mixture;
- compacted gravel and cement mortar;
- reinforced concrete.
 Laying paving slabs is carried out using a rubber hammer, checking the required slopes with a building level.
 A sandy base is used in cases of small weight loads on the surface. When paving a yard with a parking lot passenger car or a sidewalk on the street, it is recommended to lay paving stones on a cement-sand or crushed stone base.
Reinforced concrete is used in the case of coating in places where passenger vehicles move, in parking lots, or in the presence of heaving or unstable soils.
When choosing a sand layer as a base, sand is poured into the space between the installed curbs so that its surface is below the top edge of the stone by the thickness of the paving stones minus 1 cm.
Cement-sand base
 Scheme of the concrete foundation.
 A dry mixture of sand and cement brand PC400 is prepared in volume ratio 1:4. For getting quality composition, mixing is recommended to be done in a concrete mixer until a completely homogeneous composition is obtained.
The cement-sand mixture is poured over compacted and sanded crushed stone in a layer of such thickness that it does not reach the top level of the curb, exactly the thickness of the tile. At the same time, the thickness of the layer should be at least 10 cm and no more than 15 cm. If this condition is not met, then you need to add crushed stone, cover it again with sand, spill it with water and compact it.
The paving stones are laid on a constantly poured layer of a mixture of cement and sand and settled for fixation using a rubber hammer.
Gravel base
For this type of base, a layer of gravel is poured over the crushed stone and compacted thoroughly. The thickness of the layer should provide a distance from the top of the curb to its surface equal to the thickness of the paving stones plus 1-2 cm.
Laying of piece material is carried out on cement-sand mortar, prepared in a ratio of 1:4. To ensure better quality masonry, it is recommended to add either liquid detergent.
1 of 3


Reinforced concrete base
This type of base for laying paving stones is the most durable and stable. It is used in cases of large weight loads on the surface or when the soil structure is unstable.
To construct it, steel reinforcement is laid inside the road tray, tying all the rods together with wire, or a ready-made reinforcement mesh is used. For correct location reinforcement inside the structure, it is raised above the crushed stone layer by 4-5 cm, placed on stones or metal stands.
To prepare a concrete mixture, mix cement, sand and crushed stone in a volume ratio of 1:2.5:4. Concrete is poured at a time with a layer thickness of 10-12 cm so that its surface does not reach the top of the curb by the thickness of the paving stones plus 1 cm.
Laying piece materials made after 92 hours using a special tile adhesive with careful filling of the seams with the same material.
Sealing seams
 Sealing seams.
 After finishing the tile laying, it is necessary between the stones. This technological operation necessary in order to compact the tiled structure by creating a single monolith.
The material on which the paving stones were laid should be used as a joint filler. That is, for a sandy base, sand is used, and for a gravel base, cement mortar is used.
Popular layout methods
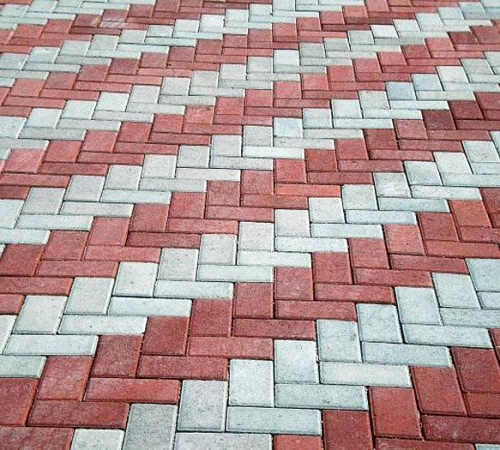
Despite the fact that paving stones have a fairly simple geometric shape with a surface in the form of a square or rectangle, a wide range of colors and various ways of laying it out allow you to create interesting original patterns. The most popular include:
- classic shape, with parallel arrangement of identical elements;
- “braid”, with parallel and perpendicular arrangement of stones;
- “herringbone”, with tiles laid at an angle of 90 degrees to each other;
- “weaving”, in which alternating longitudinal and transverse strips of material are performed;
- "chaos", or random mixture, using paving stones various sizes and flowers arranged randomly;
- radial or circular pattern creating circular compositions;
- a two-color “chess board” laid out like a checkerboard.

When doing work with your own hands, you should not strive to create particularly complex pattern. As a result, the surface of your path may not look too sophisticated, but the quality of the coating will be ensured.
Paving slabs are an ideal option for covering paths and areas in front of country house. It is characterized by increased wear resistance, practicality of operation, and highly aesthetic appearance. Its installation is not too difficult process, while laying paving slabs with your own hands requires compliance certain rules, which are described in our step-by-step instructions.
In our article we will tell you how to properly lay paving slabs with your own hands, what tools and materials you will need for this, and also give useful recommendations in video tutorials.
The main advantage of self-installation is the maximum cost reduction of the process. You have to pay for any work, and specialist services cost a lot today. Moreover, when self-installation You can do everything without haste, following all the recommendations.
At the same time, it is quite difficult to find workers capable of laying the slab efficiently and correctly. The desire of any team is to complete the order quickly in order to receive payment, but quality often suffers as a result. When installing it yourself, the owner will be able to take into account all the features of his site, since only he knows the weak points well.

It is unlikely that a team of hired workers will take these nuances into account so carefully, unless they demand exorbitant payment for their work.
The disadvantage of self-installation is the need to carefully study the rules, additional costs for purchasing special tool for work.
Basic types and selection rules
The composition of the paving slab is a cement mixture with the addition of various dyes, mineral components, and plasticizers. Use of raw materials High Quality guarantees compliance with GOST, therefore, the durability of the coating.
Correct dosage, adherence to technology – quality guarantee, therefore, it is worth purchasing material from trusted manufacturers, and not chasing the cheapness of handicraft production.
It is advisable to give preference to an option that has the addition of granite chips, polymers, and high-quality clay. It is better to refuse the option consisting exclusively of a concrete-sand mixture, since it will not last long.
Modern manufacturers offer consumers two main types of paving slabs:
- . It most often has a rectangular, square or diamond shape, uniform colors.
- . In production manually, therefore differs more color scheme, maximum variety of shapes.

When choosing, the quality of the base is taken into account, functional purpose coverage areas. Experts advise choosing small-sized material, as it is more resistant to cracking. It is important to consider the thickness of the blocks. The minimum is three centimeters, for parking and vehicle driveways – at least 5-6 centimeters.
The color and shape are selected to be in harmony with the decoration of the house building, taking into account your own preferences. Installation of diamond-shaped and rectangular slabs is more complicated and requires the use of some work skills. It’s easier to install a curly one because the flaws are less noticeable.
IMPORTANT. When choosing a stove, you should take into account its environmental friendliness, since heating the surface in summer will cause the release of harmful substances, which will adversely affect the health of the family.
Each slab is carefully examined and its quality assessed. It is worth refusing to purchase material that has the following disadvantages:
- Heterogeneous structure of the outer side.
- The color is too bright.
- Uneven coloring.
- Stains dark color on the other side.
- Clots of material in the structure.
- Smooth, high-gloss surface.
ADVICE. By knocking two copies against each other, you can determine their quality: a dull sound indicates the fragility of the material. A high-quality stove should be loud.

We will tell you everything about it on the pages of our website! You will learn a lot useful tips and recommendations.
Preparatory work
Before starting work, you need to purchase tiles, Consumables, tools.
How to calculate the amount of material needed
The calculation method depends on the drawing that is supposed to be posted. Complex compositions require a special approach and specific recommendations. The quantity is calculated based on the selected pattern, after drawing up a preliminary sketch plan of the entire site.
If selected simple shapes, it’s worth remembering the school geometry course and calculating the area of a specific geometric figure, which is a site or its individual parts.
The area of all parts that need to be covered will be taken as a basis. Number of tiles per one square meter indicated by the manufacturer on the packaging, therefore, by simple mathematical operations it is calculated required amount purchased kits.

Experts advise purchasing material in reserve one square meter for each part of the surface to be coated. This is necessary so that there are fewer joints in oblique corners.
REFERENCE. There are special online calculators, automatically calculating the number of tiles after entering parameters (area of the site, size of blocks). Using it, accurate calculations are made.
Additionally purchased border, which is set to prevent blocks from moving along the edge. Its quantity is calculated according to the length of the perimeter of the covered area.
When purchasing material and planning the size of the covering, you need to try to make calculations in such a way that there is no need to lay cut pieces along the edges. The fewer cut pieces there are in the coating, the more aesthetically pleasing it will look.
What you will need
Installing paving slabs with your own hands requires using special tools:
- Tamping
- Roulette.
- Rubber hammer.
- Line or cord for marking.
- Rule.
- Level.
- Grinder with discs for concrete.
- Master OK.
- Rake.
- Broom.

In addition to tools, consumables are purchased:
- Sand (for a standard area 2-3 tons).
- Cement.
Preparing the base
Careful preparation of the foundation is the key high-quality styling. After making the plan, Marking is done using pegs with a thread stretched over them. Soil quality is preliminarily assessed various parts, the sides of the slope are determined. If it is located towards the house and yard buildings, a drainage system is first thought through.
The sites are carefully leveled, soil 15-20 centimeters high is removed. Then the surface is compacted. At the same time, drainage and sewer pipes are being installed.
After leveling and compacting a crushed stone cushion is poured. For garden paths made of paving slabs with your own hands, the thickness of the layer is 10-15 centimeters; for parking areas and roadways, the thickness of the crushed stone doubles.
The pillow is compacted by a special machine, covered with geotextile, which will prevent sand from penetrating between the crushed stone. In areas with weak, loose soil, geotextiles are additionally laid under crushed stone.

The prepared pillow is filled with cement-sand mixture (1X5), sand is poured on top of such a height so that before compaction the slabs are 1 cm above the surface.
ADVICE. To prepare the base, it is advisable to use guides made of boards along the height of the pillow. The foundation requires especially careful preparation if the site has soft soil. It is compacted after moistening.
The entire further process will depend on the quality of foundation preparation.
Important to avoid mistakes! If you want to know how to lay paving slabs with your own hands, watch this video of a man who decided to lay them incorrectly:
Safety precautions
Organization of work requires compliance with safety measures:
- The workplace is cleared of foreign objects.
- If the slab is laid on a concrete base, the notches are made using safety glasses.
- All work is carried out with rubber gloves so that the skin is not injured or corroded by the cement mortar.
- Sorting the material and processing the edges of the tiles is carried out using thick gloves.
- Knee pads are used to protect the legs.
On our website you will also find out! How to work with such surface paving elements?
Read about the features of laying porcelain stoneware and how to properly prepare the base for this material.
You can learn how to make steps from paving slabs with your own hands by reading our next material: .
How to lay it correctly: technology and procedure
After preparing the base for laying tiles with your own hands, the following steps are necessary:
- Stretch the cord along the edges of the paths and platforms using stakes.
- Install borders along the borders, digging them into the soil on the desired height. For greater stability, the curb is fixed with cement mortar.
- To drain water, arrange drainage. The pipe is wrapped in geotextile and laid in a prepared trench next to the curb.
- Next, starting from the curb, they begin to lay the slabs. The rows can be placed diagonally or in a straight line. The rows are placed away from each other so that the prepared base is not destroyed when workers move along it. The laid paths must be strictly parallel to the stretched cords.
- To ensure uniform gaps between the tiles, special crosses are used.
- The slab is laid on a sand cushion and tapped on top with a hammer to ensure a tight fit to the surface. If any skew is noticeable, the blocks are lifted and a cement-sand mixture is poured under them for leveling. To control the horizontal level, a building level is used.
- If there are corners or obstacles along the laying path, they should be avoided in whole copies. The remaining spaces are then filled with suitable fragments. The tiles of the required shape for these purposes are cut using a grinder with a concrete disc. Filling these areas is done last.
- After laying all the rows in a continuous area, the seams between the tiles are filled with a mixture of sand and cement. Any excess that does not spill into the cracks must be brushed off with a broom.
- After all the gaps are filled with a sand-cement mixture, the surface is watered with water from a hose so that the blocks are fixed together. Be sure to put a diffuser on the hose so that the stream of water does not dislodge the backfill mixture.
You can watch the process of correctly laying paving slabs with your own hands in this installation video tutorial:
Another useful video tutorial on how to correctly lay paving slabs with your own hands - what is needed for this and how to lay them correctly:
IMPORTANT. When laying each section at the end of the day, it is covered with a sand-cement mixture and thoroughly swept. If this is not done, accidentally introduced moisture can ruin the appearance of the coating even before all work is completed.
Coating care
To ensure the durability of the coating and maintain its beautiful appearance It is necessary to follow the rules of caring for it:

In fact, this is a simple process that you can completely handle on your own, but you shouldn’t rush it. The work requires thoroughness and painstakingness; it is better to do the work slowly, carefully following the recommendations of specialists.
In order for paving slabs to serve you for a long time and with high quality, you must strictly follow the technology for laying them. Minor errors during the installation of tiles can cause deformation of the coating after just a few years of its operation. We will consider the technology of laying paving slabs below.
Paving slabs - features and characteristics of the material
Paving slabs are gaining increasing popularity not only in public use, but also in private households. This practical material is used to decorate streets, squares, parks, pavements, garden paths, and areas located in front of the house.
The principle of making paving slabs depends on its type. The vibropressed version of the tile has a dense structure and a rough surface. To make such tiles, you need a brick press. Next to the vibration pressing mechanism there is a matrix, inside of which there are forms for concrete composition. Most often, standard concrete mortar with the addition of various additives that improve its quality. It is quite possible to make such tiles at home, if you have a homemade or purchased brick press. Thus, the cost of the material is reduced several times.

Tiles made by vibration casting method involve the use of plastic compounds for its production. With the help of these substances it is possible to imitate a brick or wooden surface. Appearance This type of tile is nicer than vibro-pressed tiles; it is quite popular in private housing construction.
Paving slabs most often have the shape of a parallelepiped. This is due to the fact that the thickness of the coating ensures the strength of the paving slabs. In relation to the method of manufacturing the material, they are distinguished:
- chipped version of paving slabs - they are cheaper, but driving on such roads by vehicle is almost impossible and inconvenient;
- sawn version of the tile - the material has smooth edges and forms an even coating during installation.
Paving slabs are an excellent paving material that has many advantages, namely:
- resistance to temperature changes and frost - average term the service life of the material at 10 freezing cycles in one winter is 45 years;
- moisture absorption is ensured by the presence of gaps between the tiles, since they contain sand, water gradually drains from the tiles during rain and does not linger on it;
- high level of strength to compression, bending and abrasion;
- variety of tile shapes and sizes, as well as color solutions in which it was performed.
In relation to the material from which the tile is made, it can be:
1. Concrete - the most popular option, for the production of which concrete mortar and a brick press are used. The material manufacturing process is as follows:
- preparation of solution;
- pouring it into molds;
- drying in a thermal oven;
- cutting elements.
This method makes it possible to obtain a material of different colors and shapes with high performance characteristics.
2. The clinker version of paving slabs is somewhat similar to brick. To make the material, a clay solution is used, which is fired in special ovens under high temperature. These tiles are highly durable and come in a variety of shapes and colors.
3. The granite version of paving stones is the most expensive and strongest. Natural stone is used to make such tiles.

Before proceeding with laying the material, we recommend that you familiarize yourself with the tips for choosing paving slabs. First of all, it is necessary to determine its purpose, since the thickness of the material on a regular garden path and on a car lot will be different.
Before purchasing a material, consider its surface. If there are small chips, pay attention to the porosity of the tile. High quality material will not contain a large number of pores and small inclusions.
Tap one tile against another; if the product has already dried well, the sound will be loud and not dull. Otherwise, the paving stones contain moisture inside, which will reduce its quality during operation.
Rub one tile against another, if they wear out quickly, then the manufacturer has gone too far with water and operation of this material will be short. The presence of excessive amounts of dye in paving slabs also negatively affects its quality. Therefore, give preference to less saturated and more natural colors.
Ask the seller for documents confirming product certification, since tiles are quite expensive material and there is a high probability of running into a low-quality manufacturer.

How to lay paving slabs on sand yourself
Before you start laying paving slabs, you need to prepare the tools to perform installation work as:
- construction trowel;
- rubber hammer;
- the hose from which water is supplied, it is desirable that it has a divider;
- ropes, with the help of which the boundaries of the area for laying paving slabs are determined;
- measuring level;
- rakes, shovels;
- broom;
- peg for marking;
- equipment that allows you to perform high-quality sand compaction.

Before laying paving slabs on the sand yourself, you need to prepare:
- tiles directly;
- high quality cement option;
- coarse sand, in which there are no additional inclusions;
- medium-fraction crushed stone;
- dry tile adhesive;
- geotextile materials;
- channel;
- water level;
- brush;
- border tile options;
- pipes for drainage if the site has marshy areas or soil with high content clay.

There are three methods for installing paving slabs:
- on a sand base;
- on a crushed stone surface;
- on a concrete base.
Initially, you should draw up a drawing of the area where the work is being carried out. The scaffold diagram for installing tiles is also shown in the drawing. Next, using pegs with a cord, mark the area. Walk along the previously constructed path and check it for ease of use.
After this, work should begin to prepare the foundation for work. In order to prevent grass from growing on the tile during use, it is necessary to get rid of the fertile layer of soil, about 18-20 cm thick. Get rid of the root parts and seeds of vegetation, as well as stones.
If there are groundwater located too high on the site, it is necessary to organize drainage system. For this purpose, special pipes are installed to a depth of about 85 cm from the ground.
After removing the fertile layer of soil, it is necessary to level the area as accurately as possible. Next, it is thoroughly compacted. If you do not have special equipment for tamping, then use a regular block on which the handles are fixed.

After this, a cushion of sand and crushed stone is laid on the base. Next, the soil is watered, thoroughly compacted and leveled. Install stones along the perimeter of the site to create a border. To fix them, you should prepare a solution of sand and cement. The thickness of the sand layer for laying paving slabs on sand with your own hands is about 15-20 cm.
To level the cushion, use a tamping agent and water from a hose. Next, the process of laying paving slabs with your own hands begins. The interval between two tiles is several centimeters. At the same time, the tiles should form a flat surface. To knock down the tiles, use a rubber hammer, and they should be positioned strictly horizontally. To check the evenness of the tiles, use a building level. Further laying of the tiles consists of installing it in the same position as the previous one. Use sifted sand to fill the gaps between tiles, and a brush will help compact it inside the gaps. To remove any remaining sand from the tiles, pour water over them.
Please note that the main rule for long-term use of the material is that before laying the tiles on the sand, the base is carefully leveled and compacted. Otherwise, there may be a risk of site subsidence.

Do-it-yourself technology for laying paving slabs on a crushed stone base
The initial stage of surface preparation is the same as when installing tiles on a sand base. Initially, the area is cleared of debris, topsoil, plant roots, etc.
After this, install the curbs using a solution of sand and cement. Next, you should prepare a composition of sand and cement, in a ratio of one to three. Pour this composition 10 cm thick onto the base. After laying the paving slabs, level them with a rubber hammer. After laying the tiles, pour water over them and wait a few days until they are completely dry. Next, fill the seams between the tiles with sand and compact it with a brush. Wash off any remaining sand from the tiles with water. The operation of the tile begins several days after its installation.

Laying paving slabs with your own hands on a concrete base
In order to lay paving slabs thoroughly and permanently, use concrete mortar to fix them. The preparation of the base is the same as in the previous two methods of installing paving slabs.
After obtaining a level base, crushed stone should be poured, the layer thickness of which is about 15 cm and compacted.
Next, according to the shape of the site, formwork is formed. For its manufacture, wood is most often used. edged board. To strengthen the wooden sides, use pegs in the form of supports. They are formed at intervals of half a meter.
To carry out the installation of tiles, you will need a concrete mixer. Using it, prepare a solution of sand and cement in a ratio of one to three. Next, you should fill a small part of the base and install the tiles on it. The thickness of the layer is about 5 cm. At the same time, be sure to observe the slope of the surface on which the tiles are laid. Since the concrete solution will not allow water on the tiles to pass through during rain.

If there is too large area When laying tiles while a car will be on it, care should be taken to provide additional reinforcement to the area. Small gaps are left between the concrete pads, which will help compensate for the expansion of the material during seasonal deformations.
Any solution with high elasticity is suitable for filling joints. The slope of the site should be arranged from the center to the edges.
To fix the curb stones, use the same mortar that you use to lay the tiles. To further fill the joints between the tiles, also use sand. Please note that the absence of a stove has a negative impact on the further use of the tile, since it is the stove that allows you to hold it in the desired position. Periodically, during the operation of the tiles, pour sand into the joints.
When laying tiles, you should take into account the fact that its front surface should be flush with the ground. To check the tiles for evenness, use a water level. If it is not possible to level the tiles using a rubber hammer, they should be lifted and laid again. To cut tiles, use a grinder and a special attachment for cutting stone products. If there is a special and uneven terrain on the site, you should initially level it with a concrete base, and then lay a sand cushion on it.
The sand used to fill the cracks between the tiles must be cleared of foreign impurities in the form of plant seeds and their roots. To prevent the development of vegetation under the tiles, a layer of geotextile is laid before laying the sand layer.
If there is no vehicle on the site, then it is enough to lay the tiles on sand, without using cement. If there is soil on the site with high level heaving, the installation of a sand cushion is mandatory. Lay the tiles only away from you, without moving on the previously laid covering. Initially install the whole tile, and then its cut pieces. In order to install the curb stone evenly, pull the cord over the place where it is laid.
Paving slabs in the courtyard of a private house or in a country house perform two functions - aesthetic and utilitarian. The key to high-quality implementation of both is the correct laying of paving slabs.
Many people trust this to professionals, trusting that they know their job. Is this so? Will a hired worker always perform the installation better than the owner himself?
The main thing is to know how to lay paving slabs with your own hands.
It will be a good help step-by-step instruction, in which, in addition to the order of work, all the nuances of this rather simple and fascinating process will be revealed. Where the result appears with the first tile laid.
Preparing to lay paving slabs
Planning is the key to ensuring that your homemade path will not fail for a long time.
- Site layout. Few people decide to cover the entire space on the site with tiles, and it is also difficult to do without paths, at least from the gate to the cottage and outbuildings. Perfect option- think over the paths to the house and from it to the main buildings on the site. This way the lawn is preserved, and there is no need to knead the dirt when it rains. In addition, you will not have to uproot trees and other perennial plantings.
- Material selection. Paving slabs are gradually gaining ground over other types of paving. The main advantages: ease of operation, the ability to dismantle the coating, does not “float” like asphalt when heated, does not burst from the cold (frost-resistant), and does not require maintenance. A path lined with paving slabs allows moisture to pass through, thereby not harming the soil (environmentally friendly).
- Tile. When choosing a tile, you need to know that according to the manufacturing method, it can be vibrocast (possibly self-production) and vibration-pressed (made in industrial conditions). Varies in color, thickness and shape. Requires a base of different composition. All these factors determine the technology for laying paving slabs.
Tile covering of paths and platforms - parameters
A comparative analysis of tiled paving is provided in the table
The type of soil also influences the choice of base for paving slabs. Movable soil requires the construction of a concrete foundation even under pedestrian path, and dense allows you to get by with a sand-cement cushion under the car.
Laying paving slabs with your own hands - step-by-step instructions
General tips and rules on how to lay paving slabs correctly:
- provide drains for water drainage. If paving slabs are laid on sand, then water will go into the gaps between the tiles, and if on a concrete base, then a transverse, longitudinal or transverse-longitudinal slope is required. Thus, water, rain or melt, will not collect between the concrete and the tiles. Consequently, the possibility of swelling of sections of the track is eliminated. Optimal slope paving slabs 1 cm by 1 meter. Please note: the gap for water drainage should be located between the curb and the tile surface;
- correlate the size of the tiles with the dimensions allocated for the path. The wider the path, the larger the tiled elements should be (subjective opinion), or vice versa, from small tiles. It would seem that large tiles will make the layout quicker and simpler, but in reality, it may turn out differently. The large dimensions of the tiles are directly reflected in the weight; the weight of paving slabs 40x40 cm is 15-16 kg (depending on thickness). As a result, such slabs are difficult to lift, move, or level. While you adjust the height, you will have to lift the weight several times to add sand;
- lay (bring up) communications before laying paving slabs. Otherwise, it will need to be dismantled and reassembled. If there is no need for communications yet, then conditions can be created for their installation later. To do this, under the path in the most probable places the passage of future communications is recommended to be laid plastic pipes diameter 50 mm;

- Installation of paving slabs is not carried out during rain or immediately after precipitation. The soil and the laid cushion must dry out. Optimal humidity the base is the guarantee that the tile will not spread over time;
- the base for laying paving slabs must be perfectly level. The sand used for backfilling should not contain clay or other impurities;
- choose optimal size tracks. It is reasonable to select the width of the path based on the size of the paving slabs, plus the size equal to the sum gaps between it. In this way, it will be possible to avoid labor-intensive and not always beautiful cutting of tiles. The same applies to patterned layout. However, this approach is only possible when laying tiles with the correct geometry. The use of imitation natural stone, a circular pattern, and complex geometry does not always make it possible to do without cutting. In this case, you need to think about the exact location of individual whole and trimmed elements.
Stage 1 - Layout of paving slabs - diagrams, patterns, drawings
For creating beautiful path you need to make the correct sketch from the tiles. A drawing or diagram of laying paving slabs will help not only to visualize the project, but also to calculate the required amount of material.
The choice of laying scheme is influenced by the shape (geometry) of the tiles (see photo) and the planned layout design.


Considerable room for maneuver is created by the use of paving slabs rectangular shape, with standard sizes 100x200 mm, “paving stones” or “brick” type. They give greatest number styling options.
Traditional options for laying paving slabs:
1. Geometric styling. Can be represented by colored canvases or illusions.


By playing with colors and tile layout you can create unique design garden paths. Examples in the photo (rhombus, square, circle, new and Old city, parquet, checkerboard, fan, coil, butterfly, wedge sheet, hexagon or honeycomb).


2. 3D illusions - paving slabs with a 3D effect. Laying tiles with a pattern that creates a three-dimensional stereoscopic (three-dimensional) image is a clever technology for deceiving the eye.


An example of which is provided below, does not have a diagram in the classical sense. Involves laying out tiles in artistic disorder. If the tiles are monochromatic, then the size of the tiles varies during laying; if they are multi-colored, the colors vary.


4. Artistic laying of paving slabs, the photo of which is provided below, gives an idea of the diversity various options styling The complexity of the design is determined by the skill or perseverance of the artist.


Stage 2 - Preparation of material and tools for laying paving slabs
For work you will need: sand, cement, tiles, curb. The following tools will be useful: nylon thread, pegs, rubber hammer, long rule, level, tamper, trowel, broom. In case of trimming, you need a grinder with a disc for cutting concrete. Knee pads are a handy thing, because work takes a lot of time focusing on these parts of the body.


Stage 3 - Marking for laying paving slabs
Marking the site consists of determining the contour of the future path. The area around the entire perimeter is marked with pegs, between which a nylon thread is stretched. Due to the fact that it serves as a guide for laying out the tiles, it must be pulled strictly according to the level.


Stage 4 - preparing the base for paving slabs
To install the base, you need to remove the top layer of turf, level the bed, pour water and compact it using a tamper. Dense soil does not require such work. There are stones, roots of trees and shrubs in the soil - all this should be removed.


Note. You can leave the soil, but then the path will be much higher than the rest of the cover on the site, which can lead to it being washed away by melt or rain water.
The resulting bed is covered with a drainage bearing layer, for example, crushed stone or gravel 150-200 mm high. For a car path (platform), the layer thickness increases to 400 mm. Many people place geotextiles under the gravel and on top of it to eliminate the possibility of the cushion being washed out. groundwater. 20 mm is poured on top of crushed stone. sand to level the base.


Stage 5 - Technology for laying paving slabs
Step-by-step instruction
1. Installing a curb for paving slabs or a curb
The purpose of the curb stone is to mark the path and protect the tiles from spreading. But there are examples of laying paving slabs without a border.


The curb is installed on a leveled base. For greater reliability, it is laid on a concrete base (concrete castle).


You can install a plastic border for tiles


The border can be installed flush with the tiles or protrude a few cm. It is recommended to lay the tiles just above the curb (curb) by 5 mm, this is a gap for shrinkage.


There are three types of base:
 Laying paving slabs on sand.
In this case, the distance between the curbs (or the tensioned thread if they are absent) is filled with sand. The height of the sand layer is 50-60 mm. Before work, the sand is watered with water using a spray bottle and left to dry a little. Next, it is leveled and compacted. The laying is done on damp, but not wet sand.
 .
.
On the base prepared at the fifth stage, a second layer of sand (30-40 mm) is laid, on which the reinforcing mesh is laid. The mesh is covered on top with a mixture of sand and cement in a ratio of 1:4.
 Laying paving slabs on a concrete base.
The composition of the “pie” is shown in the diagram.
Note. Laying tiles on concrete is not the best option. This is due to the fact that the concrete base does not allow moisture to pass through. Water gets trapped between concrete and tiles and at sub-zero temperatures leads to deformation of the path.
3. Laying tiles
Simple rules for high-quality and efficient work.
How to lay paving slabs correctly:
- the tiles are laid from the lowest point upward;
- The masonry is carried out using the manual method. That is, when performing work, the master moves along an already laid path so as not to damage the compacted and leveled base;
- Installation of tiles in a circular manner begins from the center of the pattern.


- the beginning of installation occurs at the optically visible boundary, i.e. to the place where the eye first falls: Entrance door, porch, veranda, gazebo, etc.
- The tiles are not laid out in even rows, but diagonally. This makes it easier to align horizontally.
When starting to lay, the first thing to do is pull the cord across the width of the path, and level the first row of tiles along it. The horizontal line should be checked with a level every 2-3 rows.
 "Planting" paving slabs The tile is placed in its intended place and installed accurately by lightly tapping it rubber mallet. If the tile falls under it, add sand or a mixture.
The gap between paving slabs is usually 2-3 mm (enough for water to escape). Exact gaps are maintained using crosses (but, this is a theory, it does not occur in practice).
 Some manufacturers have provided limiters (distance locks) on the tiles, allowing them to be laid at the same distance from each other without the use of additional devices.
Material prepared for the website www.site
Appeared new technology- paving slabs that glow in the dark. Installing such tiles will mark the boundaries and secure traffic along the path in dark time days. Glowing paint is applied over the tiles and is absolutely safe for users and the soil.


Another option for decorative path lighting is LED paving slabs. In this case, during the laying process, brick blocks are installed - LED lights powered by electricity or solar panels.


Stage 6 - Grouting the joints of paving slabs
In addition to understanding how to lay paving slabs, you need to know how to seal the seams. Filling the seams between paving slabs is done in two approaches. To begin with, pour out onto the laid tiles thin layer clean, sifted, dry sand. Using a broom or brush, the backfill is swept between the seams. Then a layer of sand (if the base is sandy) or a sand-cement mixture in a 1:1 ratio (for a cement-sand or concrete base) is poured onto the path and the seams are also filled (spilled) using a broom.


You can purchase a ready-made dry mixture for filling the seams of paving slabs: M150 (120 rubles/25 kg) and Quick-mix PFN (1650 rubles/25 kg).
At the end of the work, the path is watered with water using a sprayer. Watering is carried out until puddles form on the path.
Important. The distance between the curb and the tiles is not concreted, and is also filled with dry mixture.
Note. Professionals advise vibrating the seams with a special board, but users argue that in private construction this is unnecessary.
Caring for paving slabs
It is not enough to know how to lay paving slabs; you also need to provide them with constant care so that they last the estimated period. Simple maintenance consists of periodically sweeping and washing the paving slab path (to ensure that the colored tiles remain as beautiful). IN winter time Do not use metal shovels to clear snow, and do not use crowbars or ice axes to remove ice, and also sprinkle the path with anti-ice compounds containing salt.
Water repellent for paving slabs
The porous structure of concrete acts like a sponge - it absorbs water. Hygroscopicity plays its detrimental role precisely in winter, when water penetrates the pores of concrete, freezes, expands and destroys the structure of the concrete base. As a result, the appearance of microcracks, dents, cavities, and color changes.
 To prevent this, use protective impregnations - water repellents for paving slabs
Water-repellent compounds (materials, additives, liquids) do not protect the tiles from fading in the sun and abrasion, but only saturate the surface of the concrete and thereby prevent “saturation” with water (provide water-repellent properties).


