Sewage options in a private house. How and what type of sewer system to install in a private house. Cesspool and septic tank for wastewater treatment
In order to understand how to make sewerage in a private home efficient and convenient to use, it is necessary to understand the classification of systems. Features of their design and maintenance, installation nuances and cost of equipment largely determine the choice. Great importance It also has precision in performing work at all stages.
Types of sewer systems
Sewer systems can be classified according to various parameters, primarily by:
- method of transporting wastewater through communications,
- type of waste disposal.
Depending on where the wastewater is sent, sewers are distinguished:
- diagrams with insertion into centralized systems,
- Autonomous systems with individual storage devices or recyclers.
Depending on the method of transporting wastewater, systems are distinguished:
- gravity sewers (movement through pipelines is carried out due to their inclined position),
- pressure sewers (transportation of wastewater using pumping equipment),
- combined sewers, combining the features of pressure and gravity systems.
It is cheapest to install a sewer system in which wastewater moves by gravity, however, in some cases the layout of the site is such that the sewer horizon is higher than the place where the house is located. It is impossible to lay pipes with the required slope in such a situation, just as in the presence of rocky soil, which does not allow significant deepening of the pipeline.
In such cases, fecal or drainage pumps are used, however, it is not practical to ensure the movement of wastewater using pumping equipment throughout the entire sewer system in a private house. More often optimal solution is a combination of pressure and gravity sections in one sewer system.
Types of recyclers
Before you begin installing and laying a sewer system with your own hands in a private house, the system is designed and, first of all, a disposal method is chosen.
All possible options in this regard can be divided into two types:
- (cesspools),
- treatment facilities (depending on the type of device, cleaning can be carried out completely or partially; in the second case, periodic pumping of the remaining waste will be required).

Note: There is another sewage option - in which part of the wastewater is drained into the soil. But this design can only be used for small volumes Wastewater, less than 1 cubic meter per day, and is most often located in dachas or country houses with periodic residence and low level groundwater.
Various designs can be chosen as a treatment facility for a private home.
- Septic tanks cost less and perform partial wastewater treatment. They may require additional ground treatment (reducing the content of impurities in the water during its drainage) and pumping out the sludge component after partial decomposition of the impurities and settling of the wastewater.
- Biorefinery stations- These are expensive and quite large structures with complex technical equipment and the need to connect to power. After the purification cycle, sewage is converted into safe water suitable for watering plants (up to 98% removal of impurities) and fertile sludge (it can be used as fertilizer).

Important: The volume of a sewage treatment plant is calculated using the formula: the number of residents is multiplied by 200 liters and all this is multiplied by 3.
Interior of the sewer system
Installation local sewerage in a private house with your own hands involves not only the selection and construction (installation) of a waste disposal unit and the communications drains leading to it, but also the installation internal wiring with installation of the necessary equipment.
The main elements of the internal part of the sewerage system are:
- plumbing equipment,
- household water-consuming units (including dishwashers and washing machines),
- pipes (in most cases, products of 32-50 mm are used, and for a toilet - 110 mm).

Reception, collection and transportation of wastewater from household appliances and plumbing equipment is carried out using pipes. Their installation can be done in various ways.
- At open installation communications are fixed to floors, walls and ceilings using.
- When laying pipes in a closed way pipes are installed inside walls, as well as in ceilings under the floor.
The installation method is selected depending on the design of the building, the requirements of the connected units (in some cases, hidden supply is unacceptable), as well as taking into account aesthetic considerations and ease of maintenance.
To ensure free flow of sewer contents and prevent blockages, it is necessary to install pipes with a certain slope. This value depends on the diameter of the pipes.
- For diameter 50 mm optimal slope is 3.0 cm per meter of highway.
- For a diameter of 110 mm these values are 2.0 cm, respectively.
- For 125 mm – 1.5 cm.
There are certain rules that must be followed when installing internal sewage systems.
- When connecting plumbing equipment to risers, the outlet of the unit should always be located above the point where the outlet is inserted into the riser.
- Pipelines no longer than 10 meters are laid in the ceiling, otherwise it will be difficult to detect and eliminate defects (leaks, blockages).
- The connections to the risers are made using fittings (crosses or tees).
- Connections to straight sections of pipelines are always carried out at oblique angles; turns at right angles are made with two 45° fittings, which minimizes the possibility of blockages.
Used vertically as a riser installed pipe, the diameter of which is more than 110 mm (should not be less than the largest outlet, which is usually a 110 mm outlet from the toilet). Boner in mandatory equipped inspection hatch, which is located at a height of 1 m from the floor level. The distance from the toilet to the riser is a maximum of 1 meter.
The connection of the internal part with external communications is carried out using an outlet, which is contained in a protective sleeve and a section of pipe passing through the foundation, the diameter of which corresponds to the diameter of the riser.
 The diameter of the sleeve should be about 150 mm, and its edges should extend beyond the foundation on both sides by 100-150 mm
 Sewer ventilation system
Ventilation internal system sewerage ensures the removal of generated gases and the flow of air to fill the system. With intensive drainage (large volume or flow rate), low pressure zones are formed in the pipelines. If there is effective ventilation, such a space is quickly filled with air, and the pressure balance is restored. Otherwise, the system will “suck” air through the siphons of nearby plumbing fixtures. As a result, the system operation will be accompanied by loud sounds and the appearance of unpleasant odors in room.
Ventilation of internal sewerage is carried out using a drain pipe, which is structurally a continuation of the riser (with large area at home and separately, at different ends, installed plumbing, it is advisable to install several risers and, accordingly, several drain pipes).
Exited to the roof through a heated inner space so that its edge is located above the pipes heating devices and general output ventilation system Houses.
 The drain (ventilation) pipe is a continuation of the sewer riser and goes to the roof
 For those who are interested in how to properly make a sewer system in a private house with their own hands, it is useful to know that the presence of a drain pipe for one-story buildings is not necessary according to established Rules, however, such an addition significantly increases the efficiency and ease of use of the system.
External communications
For the external part of the sewer system, it is important to choose the right pipes.
Do-it-yourself sewerage construction in a private house is usually carried out using PVC pipes, regular or corrugated products. Despite their light weight, they are quite durable and can withstand temperature changes. Besides, polymer materials absolutely immune to corrosion.
The depth of the trenches for laying external sewer pipes must be greater than the freezing level of the soil. If it is impossible to fulfill this condition, you should think about how to insulate the sewer system in a private house with your own hands. Typically used for these purposes thermal insulation materials, for example, Energoflex or extruded polystyrene foam. A more expensive option is to lay a heating electric cable next to the pipeline.
As in the case of internal communications, the efficiency and reliability of the external part of the sewer depends on ensuring the required slope towards the storage tank or disposal unit. If the diameter of the tubes is 110 mm, optimal angle the slope will be 2 cm for each meter of communications length.
 When choosing a location for a treatment plant on a site, you must adhere to certain rules regarding the distance of the sewerage system from various objects
 Unpleasant odor and its elimination
The appearance of a sewer smell in the room indicates a malfunction of the system.
In order to protect your home from such phenomena, it is not enough to know how to make a sewer system country house, it is necessary to ensure high-quality maintenance of the system, to be able to identify and eliminate defects in a timely manner.
The appearance of sewerage smell in the house is most often caused by increased pressure in the sewer lines. Under its action, gases are forced into the space of the rooms. As elimination measures, it is recommended to carry out a set of measures:
- install siphons with water seals on devices,
- clean the pipes (plugs blocking the lumen are one of the most common causes of malfunctions, and if the blockage is incomplete, such a plug may not reveal its presence in anything other than an odor).
The smell can also appear as a result of a leak in the sewer system. Check all connections thoroughly and eliminate even small leaks.
In order for living in a country house to be as comfortable as possible, main communications in the form of sewerage and water supply must be installed.
Of course, sewerage in a private house with your own hands is possible without any problems.

If you do not live in a house outside the city on a permanent basis, then there is no need to purchase expensive equipment. You can easily get by with a septic tank.

Importance of sewerage
Very often in practice, the function of collecting waste is assigned to a cesspool. In the event that there is no plumbing system, application this option quite logical, however, in the case of a large volume of drained water and the installation of various plumbing fixtures, this will certainly not be enough.
In principle, absolutely anyone can install sewerage into a house, and it is only important to follow at all stages the project, which was developed in advance and included various schemes internal and external piping.

DIY sewerage diagram inside a country house
First of all, these are all the places where plumbing fixtures are connected, such as a sink, toilet, as well as a bathtub or shower.
The external network is all the pipes that drain wastewater from the house and the storage or treatment plant. Of course, the device proper sewerage– this is the correct execution of a huge number of different nuances.

After the project has been prepared, you can proceed to calculating the size of the pipes, the number required material which may be needed for work, as well as the choice of sewer collector.

As soon as you have a diagram of how each point from the system will be located, you can purchase the material that will be needed in the future and proceed to installation.
First of all, if you do not know how to make a sewer, then the main riser must be installed. To ensure that all gases are removed, a small part from above is slightly noticeable above the existing level near the roof, or the second option is to be removed to the top at the end of the work.

Types of pipes
Made from PVC material. The main advantage of this type of pipe is that the material is absolutely not susceptible to overgrowing or unwanted corrosion.

Their internal surface is quite smooth, which allows the unhindered passage of waste. Installation is most often performed using the socket method. The price of such pipes allows everyone to buy them.

Cast iron pipes are a durable and always reliable option, however, due to their fairly large weight, their installation is quite difficult. Also, the price for such pipes is much higher than for ordinary plastic ones, to which everyone is almost accustomed.

You can look at a photo of a sewer system in a dacha, and you will see that, in principle, there is practically no external difference between these two options. Then why overpay?

Ceramic pipes stand out from the rest with their amazing characteristics, but not everyone can afford their cost, so they are chosen less and less every year.
After the installation of the main riser is completed, the next stage is the laying of horizontal pipelines. During installation, it is very important to avoid various 90-degree turns, as this will only interfere with the movement of drains.
If you are interested in sewerage from concrete rings, then keep in mind that this is not only a fairly expensive option, but also extremely difficult to install directly.

It will be enough that all plumbing fixtures include siphons with an additional water seal. This will act as an obstacle to the penetration of various unwanted odors into the room.
Note!

An important condition when connecting the pipe from the toilet is that the diameter of the pipe should not be less than 10 cm.

A septic tank made from reinforced concrete rings has many different advantages. For example, this option is one of the most affordable, but at the same time completely unpretentious during use.

However, speaking of the disadvantages, one cannot fail to note the mandatory cleaning of the chamber from solid waste using sewage disposal equipment.

DIY sewer photo


Note!


Specialization: master of internal and exterior decoration(plaster, putty, tiles, drywall, lining, laminate and so on). In addition, plumbing, heating, electrical, conventional cladding and balcony extensions. That is, renovations in an apartment or house were done on a turnkey basis with all necessary types works
Of course, it is best if the sewerage installation in a private house is done with your own hands simultaneously with laying the foundation, even before the construction of the building frame. Of course, this requires preliminary design and planning, but this way you can avoid difficult passages through the foundation strip and dismantling the floor covering.
But, despite such features, there are certain requirements for laying the pipeline, which I want to talk about in more detail and invite you to watch the video in this article.
Installation of sewerage pipeline
Five important requirements

First, I want to list you five basic requirements, without which no wiring can do sewer pipes in a private house. But I will do this briefly in order to concentrate your attention on further installation instructions.
- In any case, no matter where you lay the sewer pipeline - in a house, in an apartment, in a basement, by air or underground, you will have to maintain a certain slope, and different for each diameter. Of particular importance are the main pipes leading to a storage or flow tank - the quality of the drain depends on the correct slope. If you make it more than necessary, then the water will wash the feces without washing them away, and if it is less, then again the preconditions for clogging will be created due to the low intensity of fluid movement.
- If this is a sewerage installation in an apartment, then there are short sections of pipeline, but in a private house they increase significantly, which requires inserting revisions. In addition, in cases where the length of the route on a site exceeds 10 m, inspection wells should be installed there.
- When laying a sewer system in a private house (underground installation is meant), certain distances to objects and structures must be observed, which are discussed in SNiP 2.04.03-85 and SNiP 2.04.01-85.
- To avoid freezing the system in winter period The pipeline must be laid at or below the zero freezing point of the soil. But since in some regions of Russia this limit is deeper than two meters, in such cases they often resort to installing thermal insulation.
- Pipes should be laid only on a sand cushion and covered with it., as shown in the photo in the subtitle. This protects PVC from deformation and damage from sharp stones and metal objects.
Indoor sewerage

First of all, you should firmly understand that the sewerage layout in a private house or apartment, that is, indoors, remains the same in principle. In 99% of cases, the most extreme point will always be the toilet flush - this is a 110 mm pipe, into which all other bathrooms are inserted - an example of such a device is shown in the top diagram.
In any case, at the exit from the room, be it a riser or a sun lounger, a 110 pipe is used, although on the street or in the basement the diameter may increase if other waste systems are connected there.

Of course, the slope in the room is also important - this does not apply except to the automatic washing machine, where the drainage is forced - a counter-slope is even possible there if the characteristics of the room require it.
In addition, the room may have risers between floors or leading to the main drainage line - here, too, a diameter of 110 mm is used for polyvinyl chloride. But for the correct distribution of slopes, you better use the table that I give below.
Table of optimal and minimum slope for sewer pipes

To connect pipes to each other, to make turns and to change to another diameter, special fittings and rubber reductions are used - with their help, all, even the most complex, connections are made. Basically, the sewerage is installed in the bathroom and toilet, that is, where most of the plumbing is located, but a tie-in from the sink and dishwasher is also added there.

An automatic washing machine can be installed both in the bathroom and in the kitchen and it is not at all necessary to make a separate drain for it. Currently, siphons with a special outlet are produced, as shown in the top photo.
By and large, a dishwasher can also be connected to such an outlet, but I personally prefer to make the drain for this with a 32 mm pipe, cutting it into a 50 mm one through a tee and a rubber reduction - it’s more reliable.

The pipeline to the wall or floor must be fixed with metal or plastic brackets - they are sold in stores for any diameter you need. But such consoles occupy a certain place, and if the wiring is done in the basement or other technical room, which does not need to be decorated, then this is exactly the fastener.
If you need to hide the pipes, then certain inconveniences arise. Personally, in such cases, I resort to perforated metal strip hangers - I simply pull the pipe to the plane with them, like a clamp - this saves space.
It happens that during assembly, one pipe fits very tightly into the socket of another, crushing the rubber sealing ring - this usually happens when elements are connected from different manufacturers.
In such cases, I lubricate the rubber ring with liquid dishwashing detergent, and all problems are left behind.
Underground pipeline installation on the street
| City and surrounding areas | Depth in cm |
| Khanty-Mansiysk | 240 |
| Novosibirsk, Omsk | 220 |
| Ukhta, Tobolsk, Petropavlovsk | 210 |
| Orsk, Kurgan | 200 |
| Magnitogorsk, Chelyabinsk, Ekaterinburg, Perm | 190 |
| Orenburg, Ufa, Syktyvkar | 180 |
| Kazan, Kirov, Izhevsk | 170 |
| Samara, Ulyanovsk | 160 |
| Saratov, Penza, Nizhny Novgorod, Kostroma, Vologda | 150 |
| Tver, Moscow, Ryazan | 140 |
| St. Petersburg, Voronezh, Volgograd | 120 |
| Kursk, Smolensk, Pskov | 110 |
| Astrakhan, Belgorod | 100 |
| Rostov-on-Don | 90 |
| Stavropol | 80 |
| Kaliningrad | 70 |
| Khanty-Mansiysk | 240 |
| Novosibirsk, Omsk | 220 |
Table of soil freezing to 0⁰C in Russia
As you can see from the table above, the depth of soil freezing in different regions Russia is very different from each other. Moreover, this indicator may differ in the same area - this change is determined by the height of the area above sea level and the condition or type of soil.
Therefore, I recommend that you use existing experience to determine the freezing depth. That is, simply find out from neighbors or friends at what depth their water supply is laid and whether it freezes - this is the best guide.

As I already said, instructions for deepening a pipeline can sometimes be too difficult to follow due to the level of soil freezing in some regions. Therefore, if the route is installed at a depth accessible to negative temperatures, you will need thermal insulation - for this you can use extruded polystyrene foam, polyethylene foam or mineral wool.
There are also special insulation materials that are produced in the form of a shell (with or without a foil coating) - they can be made of two halves, or in the form of the same pipe, but with a longitudinal cut for installation.

I resort to shells only if the owner of the object wants it, since they are quite expensive, although High Quality. It is much cheaper to do this with mineral wool - wrap the pipeline, fix the wool with nylon thread, and then cover the whole thing with roofing felt, like a bandage - it is better to fix it with tape or wire.
Only here you need either basalt or glass wool - slag wool has iron particles that rust, causing the insulation to sag.

You will nullify everything if, having insulated the route, you leave inspection wells, storage tanks and septic tanks without insulation - you will end up with bare areas that will... You can also use them to insulate them. mineral wool or polystyrene foam, but it is much cheaper to do this with expanded clay, but it also requires waterproofing - just cover the hole with roofing felt.
Table of required distances between various objects and sewerage
In the third paragraph of the title about important requirements I mentioned the norms of distances that must be maintained between the sewer system and various objects and structures - these norms are indicated in the table above. But, unfortunately, it is not always possible to strictly adhere to such provisions, or your “well-wishing” neighbors may unreasonably claim this.
Therefore, you can formalize all this by inviting representatives of the BTI and signing an act of acceptance of the system and internal sewerage outlets - this will solve such problems.

Laying stages: 1 - pour a pillow; 2 - lay the pipe; 3 - cover it with sand
And now I will tell you how the process of laying a pipeline in a trench with your own hands to a storage or flow tank occurs - the essence of the process is shown in the photographs above. After you have dug a trench, you need to pour a sand cushion with a thickness of at least 29 mm into it and level it in accordance with the required slope (18-20 mm/m linear for the 110th pipe).
Then you lay the pipeline itself, check the slope again and again fill it with sand so that the thickness of the layer above the upper wall reaches 5-6 cm - this will prevent sharp stones and metal objects from breaking through the pipe under soil pressure.
Before filling the trench with soil, you need to compact the sand, but due to the instability of the material, this is quite difficult to do.
I do it differently - I water the sand generously, and it immediately sags to the desired state, after which you can immediately pour in the soil.
Conclusion
In conclusion, I would like to add that you may need pipeline insulation not only underground, but also in the house if the walls are not thick enough. In addition, thermal insulation does not replace the sand cushion. But if you still have questions about this topic, ask them in the comments.
July 7, 2016If you want to express gratitude, add a clarification or objection, or ask the author something - add a comment or say thank you!
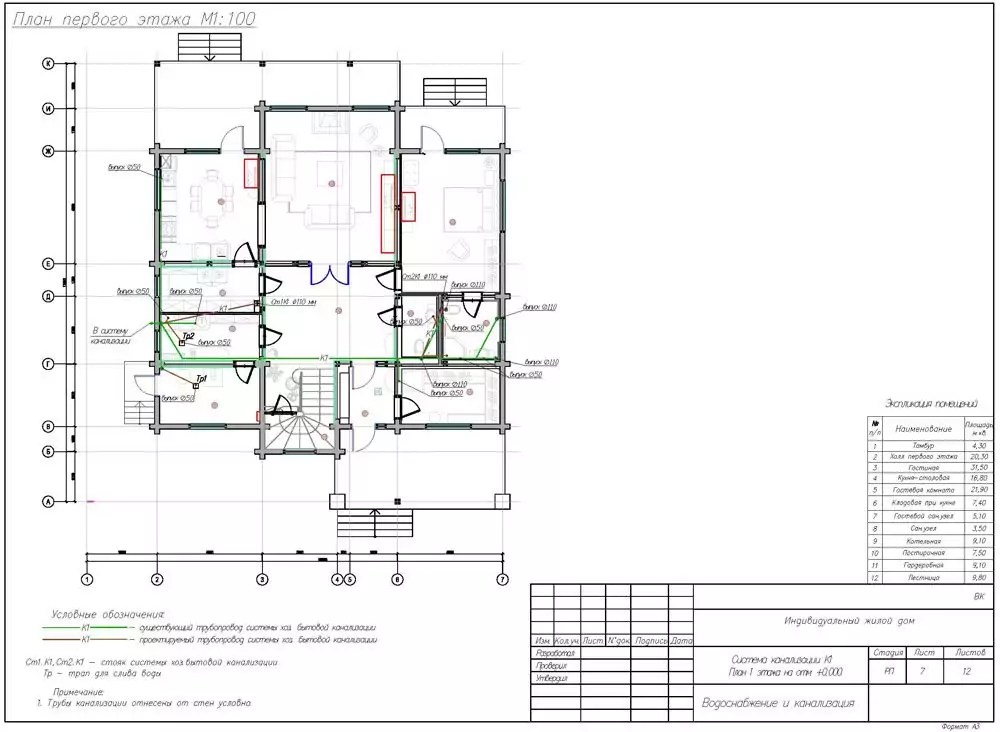
The installation of a sewer system in a private house begins with the layout and installation scheme. This allows you to arrange all the plumbing fixtures as conveniently as possible, make the correct slope, and accurately calculate all consumables.
As a result, the system will work uninterruptedly, and if one of the elements breaks or becomes clogged, everything can be quickly and easily repaired. In this article we will tell you how to correctly draw up plans for internal and external (external) sewage systems for a private house or country house, what optimal depth laying sewer pipes and what consumables should be used when constructing and installing an autonomous system with your own hands in the house and outside.
Drawing up a diagram starts from the farthest plumbing fixture in the attic or top floor . All horizontal lines must be reduced to one riser. To save money and Supplies bathrooms on different tiers are located along the same vertical line.
The sewage system in the house consists of:
- Water seals that prevent odors from entering the room;
- Drains from all plumbing;
- Pipes leading wastewater into the external sewer system;
- Elbows and tees connecting pipes into a single system;
- Clamps in walls that support pipes and give them direction and angle of inclination.
- Central riser.
It is important that there is no transition in the house from a larger sewer diameter to a smaller one. Therefore, in the diagram, the toilet should be located as close as possible to the riser.
Accurate drawing of the internal system depends on the number of floors of the building, the presence of a basement, the amount of plumbing used and the number of users. The depth of the septic tank and connection to additional equipment also matters ( pumping station or separately for each device).
On the diagram All elements should be displayed to scale so that in the event of a planned repair or emergency, you can quickly understand the wiring and find the breakdown.
External line
External sewerage starts with the pipeline from the foundation. The wastewater is discharged to a septic tank, cesspool or filter structure. At each turn of the pipe, revisions are installed (adapters with covers, with which you can quickly clear the blockage). There is also an inspection well and a ventilation hood located outside.

Ventilation is removed from the riser through fan pipe. Due to strong foreign odors, it cannot be installed near windows, with access to the yard or near smokers. Categorically it is prohibited to connect it with a regular ventilation shaft . Instead of an umbrella, you can use a special one vacuum valve at the top of the riser (not to be confused with a check valve!).
Advantages and disadvantages of different types of tanks
The final element of the system is a storage and cleaning tank. In the absence of a central collector for collecting drains, autonomous installations are used.
- cesspool . It is easy to organize on site and is the most cheap option. But it cannot cope with large volumes of wastewater. There is a possibility of dirt getting into groundwater and causing an unpleasant odor.
- Do-it-yourself septic tank made of brick filled with concrete or ready-made reinforced concrete stakes c. It performs its functions well, is durable and strong. The disadvantages include for a long time installation and significant construction costs.
- Industrial off-grid installation. Such a septic tank is more expensive, but the costs are covered due to the speed of construction, high quality and long-term operation of the equipment.
- Station biological treatment . The most expensive option, requiring constant electricity. It features the highest degree of purification and high productivity.
Consumables, calculation and prices
 You definitely need to decide on the volume of the septic tank. The calculation is carried out taking into account that Each resident of the house uses 200 liters of water per day. The wastewater in the septic tank settles for 3 days. Based on these data, we obtain Exact size waste tank.
So, a family of 4 consumes 800 liters. In three days, 2400 liters are accumulated. Means, you need to select a septic tank of exactly this volume. If desired, you can make a small reserve in case the tank is maximally loaded. Septic tanks with such parameters cost from 20 thousand rubles.
Main fittings:
- Crosses for connecting 4 sections at an angle (80-100 rubles).
- Tees with a side section at 45 or 90 degrees.
- Elbow for connecting pipes with different heights (RUB 450/piece).
- Straight-line double-sided coupling with rubber cuffs in sockets (from 30 rubles).
- Revision (60 rub.)
- reduction different parameters(from 40 rub/piece)
- Hood hood (from 50 RUR)
 Before you begin to equip a sewer system, you must carefully familiarize yourself with the basic requirements put forward for it. As we will tell you in a special review.
Water can be not only beneficial, but also harmful to the human body. What kind of coarse filter would be better suited for a summer residence, find out from this.
Optimal slope and depth during construction
According to the recommendations of SNiP for pipes with a diameter of 50 mm, a stable 3 cm is made for each meter of installation. With a cross-section of 100 mm, this value can be reduced to 2 cm. In order to avoid blockages and “greasy” sewage in the kitchen, it is advisable to increase the slope by 0.5-1 cm for each meter of wiring.
When installing on a plot of land, the same angle of inclination is maintained. The sleeve (a pipe with a larger diameter than the main pipeline, protruding 15 cm from each end) is installed in a hole made in the foundation. It provides a transition to external sewerage, And located 30 cm above the soil freezing level.
Burying pipes below the freezing level (on average it is 1.6 m) is unprofitable– you will have to make a very deep septic tank. If a constant slope is maintained, this will be 4-5 m, where groundwater may already appear. The cost increases due to additional concrete rings and more durable (corrugated) pipes that can withstand both the pressure of the drain and the weight of the soil.
The drain temperature is usually above room temperature, which prevents freezing, and if desired, thermal insulation or insulation with a heating cable can be used.
Selection of pipes and diameters
Pipes are used to drain wastewater from plumbing fixtures diameter 5 cm. The pipe from the toilet should have a cross-section of 10-11 cm, which will help avoid blockages.
To organize a sewer system in a private house, pipes can be used cast iron, reinforced concrete or plastic. The latter are more acceptable due to their strength, durability, corrosion resistance and smooth surface.
External (PVC)
Designed for external networks. They are distinguished by their characteristic orange or yellow-brown color. Despite their relative cheapness, these pipes have sufficient strength, which allows their use for both external and hidden installation. For them, cold welding is recommended. All turns are made using fittings and bends.
Internal (polypropylene)
For internal communications they have light gray color and have different technical parameters, depending on the manufacturer and model. Their common features:
- Single or multi-layer.
- Foam propylene is protected by an aluminum coating and a polymer layer.
- The connection is made by welding or using special fittings.
Rules for the design and installation of an external system

Brief instructions on how to make local autonomous system do-it-yourself sewer system in a private country house (dacha) looks like this:
- Mechanical or manual excavation of a trench.
- Formation of a sand cushion.
- Layout of all component elements (pipeline, trays, fittings).
- Connection of fragments, starting from the exit from the internal sewer. For greater reliability The fastening points are treated with silicone sealant.
- Testing the tightness of connections at maximum load.
- Backfill the trench, trying to compact sand or soil only on the sides of the pipe, avoiding sudden loads at right angles. Thickness of sand backfill - not less than 15 cm.
For pipeline turns, shaped parts for external utility networks. If the distance from the foundation to the septic tank is more than 10-12 m, it makes sense to equip the area with an intermediate inspection well.
This video shows how to properly make a sewer system for a private home, as well as how to lay pipes yourself:
How to properly install a sewer system in a private house, do everything according to the diagram yourself and lay the pipes for the system without errors? Installation of the sewer system will be of better quality if follow several instructions:

When installing sewerage it is important to take into account every nuance: placement of plumbing fixtures, topography of the site, location of the intake manifold or septic tank, depth of pipe laying and angle of inclination.
Only with careful charting, careful planning and order By installing a sewerage system in a private house or country house with your own hands, you can guarantee that the system will not freeze in the middle of winter and will drain waste well without creating additional problems in the house and on the property.
The system is one of the most important and expensive engineering communications private residential building. The efficiency of operation, the complexity of installation, the number and cost of elements of this system depend on the elaboration of the project. The grafical part project documentation, according to which a sewer system is installed in a private house with your own hands - a diagram of the location of plumbing fixtures, connections and revisions. This article provides information about regulatory requirements and the main problems in drawing up layout diagrams, criteria for selecting sewerage equipment and features of its installation.
Read in the article
Rules for drawing up a sewerage diagram with your own hands in a private house
When drawing up a sewerage diagram, it is necessary to take into account regulatory requirements, both sanitary and construction:
- TKP 45-4.01-51-2007“Water supply and sewerage systems for residential estates”;
- SanPiN 42-128-4690-88 « Sanitary rules maintenance of territories of populated areas";
- SanPiN 4630“Sanitary rules and standards of protection surface waters from pollution";
- SNiP 30-02-97“Planning and development of territories of gardening associations of citizens, buildings and structures.”
When determining the volume and bandwidth sewer pipelines must be guided by the average water consumption per person. Septic tanks and cesspools should not be located closer than 4 m to the border of the neighboring property and 15 m to the drinking water.

The diagram must describe the mechanism for connecting the internal and external sewerage, type and structure of the septic tank, what products and equipment will be used, its technical parameters. Based on the list of materials used, the cost is calculated. The graphic part must be linked to the plan of the house and garden plot, where the places for laying pipelines and installing plumbing products will be indicated.
Key Factors Influencing Layout and Design
In addition to calculating the average daily water flow, the following factors influence the design of the sewerage scheme:
- Volume of salvo release— peak load on the sewerage system (as a rule, occurs in the morning and evening hours), which depends on the number of plumbing fixtures installed in the house;
- Wastewater treatment plant performance. Depending on this indicator, one of three options for removing treated wastewater is selected:
- up to 5 m 3 /day – discharge into the soil. Provided that the soil filtration coefficient has comparable indicators, and the discharge point is 1 m above the groundwater level;
- up to 0.3 m 3 /day – periodic removal by special vehicle is allowed;
- The discharge of wastewater into a reservoir is regulated not only by its quantity, but also by the degree of purification in accordance with the requirements of SanPiN 4630.
- M material for the manufacture of treatment facilities: , fiberglass, metal, various polymers ( , polyethylene). From technical characteristics material depends design structures, installation method, further maintenance and operation;
- Providing power supply. Modern highly efficient treatment plants are equipped with various types of compressors and aerators. They are based on electronic control units to which temperature and liquid level detectors are connected;
- Topology construction site – terrain, slope direction, proximity of water bodies and the presence of potential places for discharge of treated sewage water;
- Geodesy of the construction site– the type and structure of the soil, the depth of its freezing, as well as the depth of groundwater are determined. The complexity and cost depend on these factors. installation work, the need for additional or purchase of a sealed septic tank with a closed cleaning cycle.

Types of sewerage structures and features of their functioning
In accordance with TKP 45-4.01-51-2007, the following types of treatment structures are allowed to be used for the installation and installation of sewerage in a private house:
- septic tank;
- filter well;
- underground filtration field;
- filter trench;
Important! In most cases, the listed structures should be used in conjunction with a septic tank, which carries out primary rough cleaning.
Septic tank
The most common when arranging a sewer system for a private home with your own hands are two types of septic tanks:
Cumulative - are sealed plastic containers. They are affordable, do not require connection to the power supply network, and can be installed in close proximity to sources/wells drinking water. A significant drawback is the need for constant pumping of wastewater, therefore, constant payment for sewerage services.

With soil purification. Primary treatment of sewage water is carried out in sealed containers, where large fecal fractions settle to the bottom and are exposed to anaerobic bacteria. “Clarified” wastewater, the degree of purification of which does not exceed 40%, is pumped forcibly or flows by gravity into filtration structures, from which, after the final stage of cleaning, it seeps into the ground.
Filter well
The wastewater entering the tank passes through a gravel filter and through it seeps to the bottom and perforated walls, and from there into the ground.

- pipe;
- Plate bumper;
- Pipe for the flow of wastewater.
For the arrangement, solid or perforated reinforced concrete rings with a height of 0.9 m, an internal diameter of at least 1.0 m and a wall thickness of 8 cm are used. The filter layer is gravel of medium fractions, which must be periodically removed, washed and returned to the container again, in order to avoid excessive soil pollution. The material used for making walls is often large-diameter plastic (with holes in the masonry) or car tires. Such options are much cheaper, but significantly reduce the life of the structure.

Underground filtration field
The site is laid with perforated walls. Through them, wastewater is distributed to significant area drainage and are absorbed into the soil, passing more evenly and in small quantities through the gravel filter. This method involves a significant amount of excavation work. When determining the depth of the pit, it is necessary to take into account:
- The thickness of the gravel filter is 20÷50 cm;
- The diameter of perforated pipes is 20÷50 cm;
- The distance from the ground surface to the upper edge of the filtration pipeline is 50 cm.

In addition, when forming the bottom of the pit, it is necessary to provide a slope from the septic tank along the flow direction of 2 cm for each linear meter. The distance between the pipes depends on the type of soil. For sand with a filtration coefficient of 5÷25 m/day, 2.5 m. For coarse sand filler with a filtration coefficient of 25÷100 m/day and a gravel filter with a filtration coefficient of 75÷300 m/day, the distance can be reduced to 2 m.
At the ends of filtration pipelines, it is imperative to install them with a diameter of 100 mm and a height of at least 70 cm above the ground surface.

Filter trench
A filter trench performs the same functions as an underground filtration field: collection of wastewater after a septic tank, its additional purification and discharge into the ground. A significant difference is the vertical arrangement of the pipes. This method is no less effective and can be implemented on a much smaller area. Allowed only in areas with a deep groundwater table, since the trench must also have significant depth.

The total length of the pipeline and the number of pipes and trench depth are calculated using the same methodology that is used for underground filtration fields. The width of the trench is assumed to be 0.5 m, the distance between the upper and lower pipes is 0.8÷1 m, the maximum length of the pipeline is 30 m. If it is necessary to construct 2 or more trenches, the distance between them must be at least 3 m.

Components of the WWTP scheme
The most effective for a private home are sewer systems related to deep biological treatment plants. They are sealed containers divided into several functional compartments. As a rule, they have a vertical orientation, can be installed with your own hands and do not take up much space. The principle of operation of such installations is the interaction of fecal matter and organic pollutants with anaerobic bacteria in an environment saturated with air using aeration installations.
Important! Biological treatment plants require some maintenance. First of all, it is necessary to maintain an optimal population of anaerobic bacteria by periodically adding a special concentrate to the appropriate compartment. Do not use overly aggressive products in everyday life chemical substances which can destroy bacteria. The installation must be connected to the power supply.
The cleaning process is carried out in stages:
- In the first section, which occupies the largest volume, pollutants are separated into fractions. Heavy and insoluble substances sink to the bottom. This chamber must be periodically cleaned using a vacuum cleaner;
- In the second section (aeration tank), wastewater is enriched with atmospheric oxygen using the aeration method. Here, the active phase of cleaning occurs using biological decomposition using bacteria;
- In the third section, the settling tank, activated sludge is settled;
- From the fourth section, where water is supplied by a jet pump from the secondary settling tank, completely purified water is discharged from the treatment device through an overflow pipe or drain pump.
Installation of internal sewerage in a private house - diagram and recommendations
The internal sewage system includes the following elements;
- Plumbing fixtures: , ;
- Sewer riser and ventilation pipe attached to it;
- Branch lines;
- Check valve.

Horizontal pipelines are installed with a slope. When installing sewerage in a private house standard indicators the slope is often neglected, doing it “by eye”, significantly exceeding the recommended coefficient. As a result, sewage solids do not have time to be washed out of the pipes along with water and accumulate inside, creating traffic jams.
Table of the dependence of the slope on the diameter of sewer pipes for a private house pipes
| Diameter, mm | Optimal slope | Minimum permissible slope |
| 50 | 0,035 | 0,025 |
| 100 | 0,02 | 0,012 |
| 150 | 0,01 | 0,007 |
| 200 | 0,008 | 0,003 |

The connection of branch pipelines to the riser is carried out using oblique tees and crosses. Installation of sewer pipes, utility and technical rooms may be carried out in an open way. Fastening is carried out with special couplings with dowels, or the pipes are placed on supports. In residential premises, as a rule, they perform hidden installation. Sewage pipelines are located in technical niches and shafts, boxes, under the floor. To carry out maintenance - periodic cleaning, the main riser and sewer drain lines are equipped with inspections in accordance with the standards:
- Sewer riser on the lower and upper floors of a private house;
- Branch lines to which three or more plumbing fixtures are connected;
- At pipeline bends (this is where solid insoluble waste residues most often accumulate);
- On lepers horizontal sections every 8 m.
Video of installing a sewer system in a private house with your own hands, correct styling sloped pipes:
Which pipes to choose
The optimal pipe material for sewerage in a private home is polymers. Products made from them are light in weight and can be installed by hand without the assistance of assistants. The industry produces a large number of adapters, tees, crosses and couplings across the entire range of diameters used. Installation is carried out without the use of specialized equipment and does not require long training or special skills. The approximate material is not subject to corrosion and aggressive influences household chemicals, is different long term operation. The following polymers are most often used for sewerage in a private home:
- PVP (polyethylene high density) - affordable, but sensitive to temperature changes. The maximum operating temperature should not exceed +40°C;
- PP()– has good performance characteristics, maximum operating temperature is +100°C, withstands aggressive chemicals and significant mechanical stress, and has a fairly high cost;
- PVC (polyvinyl chloride)- a material with an optimal combination of cost and quality. Can be used for both external and internal sewerage. Resistant to ultraviolet radiation, mechanical influences of medium intensity, temperatures up to +70°C. However, during long-term use, plaque may appear on the walls, which leads to clogging.

Pipe connection
The most common method of installing a plastic pipeline is a socket connection. It is performed if the pipe or fitting has a corresponding structural element - a socket. The connection process is as follows:
- The bell and smooth end are cleaned of dirt;
- It is inserted into a special recess inside the bell rubber compressor ensuring tightness of joints;
- Lubricate the smooth end of the other pipe with silicone grease or regular liquid soap, after which it can be easily inserted into the socket until it stops;
Important! It is necessary to provide for the possibility of thermal expansion. To do this, a mark is made on the smooth part of the pipe with a marker, after which it is pulled 1 cm out of the socket.

Stages of work on installing a sewer system in a private house with your own hands
The sequence of arranging the sewer system of a private house can be divided into several stages:
- Determination of the amount of wastewater, volume and productivity of the septic tank;
- Determining the location of the septic tank on personal plot in accordance with sanitary standards;
- Internal device sewer network;
- Installation of external treatment facilities;
- Laying pipelines and connections for external treatment facilities and internal sewerage.
Calculation of septic tank volume
Table of water consumption standards for a private residential building.
| Type of housing and type of life activity | Consumption, l/day per person | |
| Residential building equipped with water supply and sewerage system without bathtub | 125÷160 | |
| A residential building equipped with a water supply and sewerage system with a bathroom and a local one looks like this: V = n × Q × 3 / 1000 , Where V – volume of the septic tank in m3; n – number of permanent residents; Q – average water consumption per person in m3; 3 – number of days of a complete cleaning cycle (according to SNiP). For example, with an average consumption of 0.2 m 3 / person / day, taking into account a three-day reservation, for a family of 4 people you will need a septic tank with a volume of 2.4 m 3. To make calculations easier, we have developed a convenient calculator especially for our readers. Calculator for calculating the required volume of a septic tank based on the number of residents |
||
| For year-round use of a private residential building | During seasonal use of a country house | |
| Gravel, crushed stone | 0.15÷0.20 | 0.18÷0.24 |
| Coarse sand | 0.10÷0.15 | 0.12÷0.18 |
| 0.05÷0.10 | 0.06÷0.12 |
Table of the volume of household waste per 1 linear meter of underground filtration field pipeline:
| Composition of the filtrate | Maximum volume of treated sewage, m 3 /day per 1 linear meter of drainage pipeline | ||
| Up to 500 | 500÷600 | More than 600 | |
| Gravel, crushed stone, coarse sand | 0.012÷0.025 | 0.0096÷0.0225 | 0.0084÷0.02 |
| Fine sand, sandy loam | 0.006÷0.020 | 0.0048÷0.18 | 0.0042÷0.016 |
Table of the volume of domestic waste per 1 linear meter of filtration trench pipeline.
Do-it-yourself internal sewerage wiring in a private house
The efficiency of the sewer system of a private house, as well as the ease of arranging it with your own hands, depends on the layout of the entire structure. It is considered optimal if the kitchen and bathroom are located as close to each other as possible; this minimizes the length of the sewer pipeline and allows you to connect all plumbing fixtures to one riser. When installing the internal sewage system of a private house with your own hands, you must consider the following factors:
- it is necessary to connect directly to the main riser of the sewer system at the minimum possible distance from the pipe, this will reduce the likelihood of blockage of the plumbing fixture;
- It is recommended to connect other plumbing fixtures to the sewer network above the level of the toilet connection, this will eliminate the possibility of fecal matter getting into the drain lines;
- The pipeline must be rotated using several angle bends. For example, two at 45° or three at 30°, this will provide a smoother turn and avoid clogging;
- The sewer riser must be led to the roof, where a fan hood is mounted on it, providing a sewer system inside; Methods for connecting a toilet to sewer riser
Installation and equipment of a sewerage tank
To install a septic tank, regardless of its model, a pit is dug with dimensions slightly larger than the dimensions of the tank. A sand cushion about 10 cm thick is placed at the bottom of the pit. It is compacted and leveled as much as possible. To install septic tanks in a pit, it is recommended to use lifting construction equipment, since some models have quite a significant weight. In most cases, fastening elements are provided on the housing. After installation, the container must be leveled. Depending on the design, it may be necessary to install neck extensions.
Article