How to make frames for a balcony with your own hands. Glazing a balcony with your own hands. Preparing the window frame
Proper glazing of a balcony with your own hands will not only provide your home with additional thermal insulation and sound insulation characteristics. But thanks to the fact that the balcony will be glazed correctly, corresponding to all its main characteristics, you will also have an additional, albeit small area. It can also serve as an additional place for personal relaxation or a place to store things (warehouse).
Most companies offer their own services for glazing balconies and loggias, most of them are those that manufacture plastic PVC structures with their further installation. But many people think that the company’s services are expensive, so you can read the presented article and do full glazing of the balcony yourself.
To glaze a balcony, a permit is required, which must be agreed with the relevant authorities, they must also give you permission and indicate the characteristics of the house and review your balcony slab. If you do not complete this procedure completely, your balcony will be considered illegal. But before glazing the balcony,...
Do-it-yourself glazing of balconies and loggias
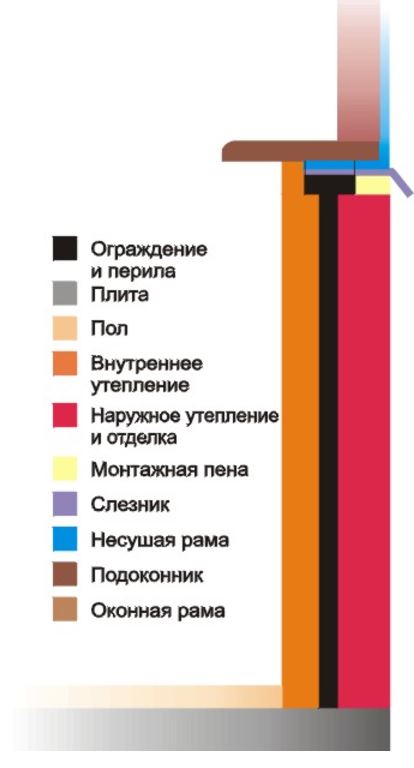
Each type of balcony glazing presents its own special category of complexity and requires certain skills, due to which certain difficulties may arise. Depending on the type of glazing you choose for your balcony, you will need to adapt to its structure and do it in a certain sequence. Thanks to the presented article, you will be able to fully overcome all the difficulties and take into account all the factors that you will need to self-glazing balcony or loggia. First, you should familiarize yourself with a small diagram of the arrangement of glazing elements:
Measurements and ordering of designs
After you have chosen which profile your balcony or loggia will be made of, you need to order the structure from the manufacturer. But, to do this, you must first take all measurements from your balcony and perform the appropriate calculations. To do this, it is necessary to completely dismantle the old glazing, if any. The previous glazing must be completely removed. You need to remove all the frames and all the fastenings until you go through the entire area from the ceiling to the parapet.
The next step will be taking measurements from the resulting balcony after cleaning. To do this, you need to use a tape measure to accurately measure all the distances from the base of the parapet to ceiling slab, and then, from one wall to another.
All measurements must be as accurate as possible, because sometimes this can lead to huge problems. Initially, this will not have any effect and will not be noticeable, but during direct installation, even a few millimeters can ruin the installation and cause a huge amount of damage. various problems. It is worth noting the fact that when placing an order with a company, people are not completely trusted and they send their own measurer to check the correctness of the measurements.

In addition to the fact that the person sent from the company will independently take all the measurements again, he will also look at the general picture of the balcony. Further, he may say that your loggia does not meet all standards. This may be due to the fact that the parapet has been standing for quite a long time and may not support the entire weight plastic construction.
In the presented case, you can fix this problem, fake the parapet to the desired condition, or even pour a new parapet. Another option is to install not a plastic structure, but an aluminum one, which is much lighter.
There is an option with impossibility balcony slab support the weight of the structure. This moment it will be quite difficult to fix, but still, perhaps with the help of additional reinforcement of the floor covering.

In order for the company expert to make final decision, he needs to take all the dimensions from your balcony and carry out the appropriate calculations.
If everything is fine and your balcony is completely ready for full glazing. You and a company employee draw up an order for the structure, calculating its approximate cost.
Preparatory work
After the specialist has made his satisfactory decision, you need to move on to the stage of preparing the premises for further reconstruction. First, you need to completely check the parapet and detect the presence of all cracks on it, even very small ones. Next, you should purchase galvanized metal and completely seal them.
You need to clearly measure the gap, cut the required piece from the galvanized sheet and seal the crack. It will need to be inserted from the outside under the railing, and then finally secured using self-tapping screws. This process is quite difficult to complete on your own, so you will need a little help.
If your parapet is not approved by a specialist, then you need to build a new one. To do this, you need to completely demolish the old parapet and build a new one from scratch. A standard parapet is laid out one brick wide. Its installation takes place on sand-cement mortar, one after another.

During the construction of the parapet, you need to constantly monitor its level, because in the end, it should be completely horizontal design. The clearly horizontal design will help you easily install the glazing.
After completing the manufacture of the parapet, you need to purchase metal strip, or a corner with a section of 5 mm. One of the selected materials will serve as a frame to which the structure frame will be attached.
The manufactured frame, using dowels and self-tapping screws, is attached along the entire perimeter of the balcony opening.
Additional preparation for glazing installation
So, let's proceed to the actual installation of the glazing of your balcony with your own hands.
- The company has delivered a manufactured structure to you and your balcony is fully prepared for installation.
- First, you need to remove the glass units from the frame. This process is quite important before installation, because the weight of the complete structure is quite large, and it will complicate the installation process.
- Usually, in companies that manufacture double-glazed windows, initially, the glazing beads are not hammered in completely; this is done to easily detach the double-glazed windows from the frame.
- To remove a double-glazed window, you need to pry off the beads that hold it in place with a spatula, and then remove them. It is necessary to pry starting from the middle and moving to the edges. This must be done in the following order, first the side beads, then the bottom, and lastly the top. Next, hold the glass and carefully remove it.
- Removed double-glazed windows must be placed on a clean and level floor, free of debris and other things.
- Next, you need to remove the sashes from the frame. There is a rod in the upper loop that must be pushed down and then pulled out completely using pliers or pliers.
- Next, you need to remove the sashes from the frame. To do this, you need to remove the latch, which is located in the upper hinge of the sash. After which the sash itself should be slightly tilted towards itself, then lifted and removed from the lower hinge.


Frame installation
- The frame comes with a stand profile that needs to be installed. It is a plastic strip that should be attached to the bottom of the structure. Turn over the already lightweight frame and, using a mallet, insert the bar into the grooves. Turn the frame over to its standard position.
- Now it’s time to install the frame fastenings. From each edge window frame you need to retreat 15 centimeters on each side and secure the plate tightly in this place. A special hole must be drilled for each fastener. The part of the fastening that will protrude must be bent at a right angle; this part will be attached to the concrete surface.
- Installing a frame in a window opening. This stage requires additional help, it is almost impossible to do it yourself. It is advisable to have three people. The three of us install the frame in the designated place, after which it must be completely leveled in both vertical and horizontal positions.
- After complete alignment, using wooden stands, we fix the frame in its place.
- We attach the frame to the parapet. This must be done using anchors, which will need to be driven into brick or concrete at least 6 centimeters.
 Frame fastenings when installing glazing
  Installing a frame in a window opening
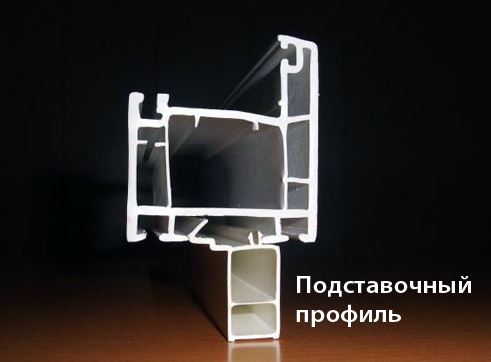
Installation of ebb tides
After the frame is installed, there are only a few details left that are also important to consider:
- Once the frame is completely secured in place, you need to install the canopy. It will serve as a drainage basin. Installation should take place in the upper, outer part, installation is carried out using self-tapping screws.
- The cracks are being blown in. This is done using polyurethane foam.
- Insulating glass is installed into the installed and secured frame.
- Next, installation is carried out on the hinges of the tilt and turn sashes.
- We secure the folding mechanism to the sash and frame.
- The last stage is a complete check of the tightness of the fit and full operation of the valves.
 Installation of ebb tides
  Installation of low tide on upper floors
  Sealing cracks with foam
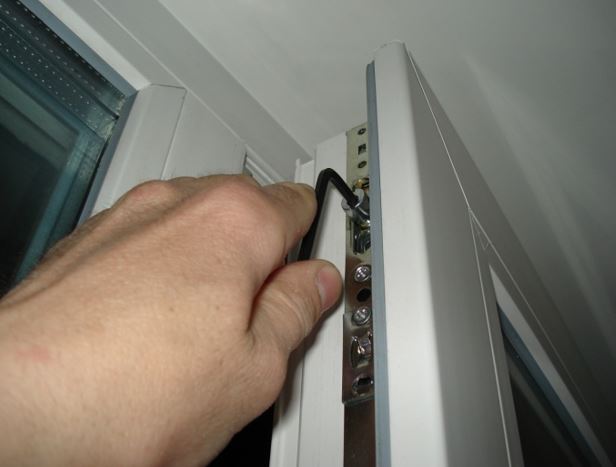
If the doors move with extra effort or are difficult to open/close, then they need to be adjusted as in the photo.
Self-installation of PVC structures for balcony glazing
This process is quite simple, although they charge a lot of money for its work, which is why we recommend that you install the windows yourself. This will not only save your finances, but will also help you buy for them additional fittings or something else entirely. The company you contact to order windows will have to send you a measurer who will independently take all the dimensions and transfer them to the company so that the direct craftsmen can make you a window structure. After the order is completed and delivered to your home, the immediate work begins related to the full, independent, and most importantly correct glazing of your balcony or loggia.
Full PVC installation window structure is described above, here we can note only some individual characteristics and interesting points when installing a window structure from PVC profiles with your own hands.

Glazing of a loggia using an aluminum profile
Glazing using an aluminum profile is not a more complicated installation system compared to plastic, but each has its own nuances. By giving preference to the presented type of profile, you can also easily perform a full and complete correct installation, saving the same money that can be used for other items of clothing and the like. So, let's get started, all the work coincides with the general glazing options except:
- If your parapet is initially made in the form of standard metal handrails, then you will need to install an “apron” on top, preferably made of galvanized steel. If a concrete barrier is installed, no additional actions are required. The profile will be installed directly on it.
- For a complete correct installation frames, first need to be installed anchor plates. Next, the structure is secured using special anchor bolts. This point needs to be addressed Special attention, because it differs from installing a plastic profile.

After all the above steps have been completed, the doors should slide apart smoothly and not create noise when closing. If these factors are normal, then you have done everything correctly and can continue to arrange your loggia (balcony).
Wooden window structures
In order to glaze a balcony or loggia yourself with wooden window structures, you will need some carpentry skills. If you understand this, then this installation option will not only be easier, but also cheaper. In order to install wooden window structures yourself, you need to assemble the sashes correctly and as accurately as possible.
For a carpenter, this does not require much time or expense. He will be able to assemble the sashes himself using timber, ordinary glass with a thickness of 4 millimeters and glazing beads. But if this talent is not present, then you will have to order the presented product from a separate workshop. And only then begin the glazing of the balcony.
An important point, also, sch
There is also the fact that a large structure can “sail” a little. No matter how beautiful and attractive a large or wide space looks, you should never forget that if you do not pay due attention to its features, serious problems may arise.
Glazing of a balcony using a wooden profile
- Using metal mounting plates and self-tapping screws, you need to make full installation frame of the structure and secure it.
- All fittings are fully adjusted and checked.

Enough for a long time for glazing in Khrushchev-era houses, this was the only possible variant. Such designs do not look very prestigious, and the neighbors will not envy him.

But even this glazing option allows you to protect your balcony or loggia from unwanted dust and dirt, water and falling leaves, and much more. And in the housing itself, the temperature will rise by several degrees, due to which heating costs will be reduced.
Frameless window designs
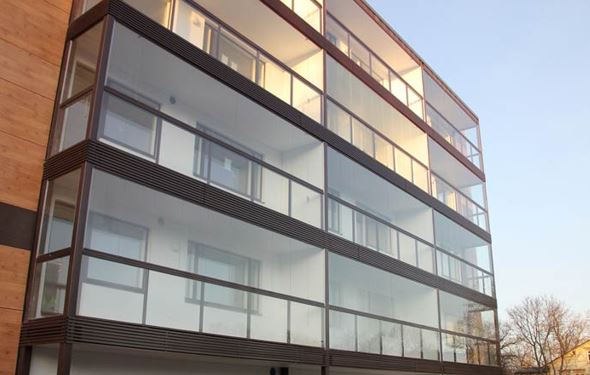
The presented type of glazing looks as impressive as possible and is very beautiful. But in order to do it, appropriate efforts are needed. Also, it is important to take into account the fact that this option is not the safest, especially in those moments when children are playing on the balcony. Since the windows will be full height, it is often suggested to make or purchase additional removable design, for example, a meter high. At such moments, as indicated above, you can install it and no longer worry about the further actions of the children. Usually, this design, made from metal pipes with a small diameter.
Another point that is worth paying attention to when glazing a balcony is that not only from the apartment you will be able to see as much as possible everything that happens on the street. But even from there one can see one’s entire personal life. All housing will be especially visible in the evening when the lights are on. In order to avoid the “reality show” effect at home, there are several options:
- You can think about it separate system curtains and blinds. This option is quite common, but here it is worth considering the fact that the blinds will become quite expensive pleasure. And when choosing a fabric, it should be completely opaque, even in the light.
- The second, more popular solution this issue, the choice of design with glass of one-sided transparency appears. In the summer, they will be as beautiful and efficient as possible, but in other seasons, they will be a little dim and there will not be enough light. As another small variation, we can say that such glasses are combined with ordinary ones, that is, you can make some single-sided and some ordinary double-glazed windows.
Interesting facts about frameless glazing
When considering frameless glazing, more high floors, and without the presence of nearby houses, the above-described incidents do not occur. An important point is the fact that for installation frameless glazing the parapet will need to be demolished. This small factor can have a unique impact on the overall structure of the house, so it is advisable to contact the appropriate service and find out all the details.

Beauty is beauty, but it is worth paying a lot of attention to the insulation of this balcony, because the glass itself will not be able to protect the home as much as possible from the winter cold. An unpleasant aspect may also be that the balcony opens directly onto another house or a nearby factory.
The aluminum panoramic profile does not have high thermal insulation characteristics, due to which it is also worth thinking about before choosing it.
Features of glazing with and without extension
You should also consider some features of installing remote glazing along with standard glazing. Of course, there are not many of them, but you should know them..
- First of all, for carrying out glazing with removal, especially when working in old houses, you will need to strengthen the parapet, since this type glazing has a slightly greater load than standard options.
- In addition, we further suggest looking at the diagram of the remote version of the balcony, to understand some of the differences in the structure compared to conventional balconies.
- In addition, it can be noted that additional arrangement of the visor will be needed here. large sizes and more durable.

Conclusion
Glazing a balcony yourself is not a difficult task. With its help, you can save your finances well and buy something else. Now, having studied the installation of each of the various structures, you can easily glaze the balcony yourself. We also suggest watching a short video tutorial on how to glaze a balcony yourself:
Reading time ≈ 3 minutes
An unglazed balcony does not fully perform its functions. It seems that you can perform some actions on it, but there is always a fear that bad weather, or neighbors on the upper floors will make some adjustments to your plans. It cannot be used as a place to store things either. In order to protect a piece of your space, it’s right by decision There is balcony glazing.
There are a huge number of options for glazing balconies, you can see this by looking photo in the article, but the most interesting thing is to carry out such repair work yourself.
Preliminary measurements and calculations
Before you perform plastic glazing balcony, you need to clearly understand what dimensions windows are needed. To do this, we remove the previous glazing, if there was any, of course, and dismantle the frame and fastenings. We remove everything completely so that the ceiling from above and the base of the parapet are visible.

The next step is to directly measure all the required dimensions: from the ceiling to the parapet, and between two walls. It is also important to make sure that the parapet is horizontal using a level. After all, if there is a misalignment of more than 15 mm, the frame may simply not fit into the slot.
Preparatory work
At DIY balcony glazing preliminary work boils down to preparing the parapet for the future installation of the window frame. Carefully inspect the parapet; if you have any doubts about the strength and stability of its base, it is better to make a new one. To do this, we remove the old one, and in its place we put a new one in one brick, everything is strictly level.

After this, we make a frame to install the frame around the entire perimeter of the parapet. For this purpose, a metal corner with a cross section of 0.5 cm, which is screwed to the parapet using dowels, is perfect.

If you are satisfied with the old parapet, then if there is a gap, you need to seal it using a galvanized sheet. To do this, we measure the size of the gap, after which we insert a pre-cut piece of galvanized steel with external sides s under the railing and fix it with self-tapping screws. This type of work is best done with a partner.

The process of glazing a balcony with your own hands

- We take the glass unit out of the frame to lighten the weight by 25-30 kg. To do this, pull the glazing bead that is directed along the window, pull out the glass and place it next to it on the cleaned floor. The opening doors can be left with double-glazed windows.
- We remove the sash from the frame: push the rod in the upper hinge towards the bottom, then tilt the sash and lift it 3-5 cm, finally removing the sash from the lower hinge.
- We attach a plastic stand profile for the bottom of the frame.
- We install fasteners for the frame. Step back 150 mm from everyone extreme positions frame and, using silver self-tapping screws and a drill at least 3 cm long, secure the fasteners.
- We mount the frame into the opening. To do this, we secure the mounting plates with self-tapping screws.
- We assemble the frames into one whole using self-tapping screws. Check verticality and horizontality.
- We attach the frame to the parapet with anchors.
- We foam the cracks and install the canopy.
- We insert double-glazed windows and hang the sashes.
- After checking the tight fit of the closed sashes and the full functionality of all elements, we install the ebb and window sill.
Photo
Glazing and insulating a loggia is best solution for increase usable area. The question of how to glaze a balcony yourself is solved by several most accessible ways: equip the room with sliding wooden or metal-plastic doors, install double-glazed windows, which will perfectly retain heat in the room.
The choice of double-glazed windows must be taken responsibly, because... Approximately 80% of the heat loss of the glazed loggia space occurs through them.
The most popular types of glazing
The most common methods of protecting a loggia from wind, dust and precipitation are:
- wooden structure;
- metal-plastic installation;
- frameless design.
Glazing a balcony with your own hands using a wooden structure will isolate the room from noise and increase the temperature in the glazed room.
If the choice fell on an environmentally friendly wooden structure, then you need to prepare tools and materials:

Only high-quality wood, treated with a special protective agent, is used for frames
- glass required quantity 3 mm thick;
- small nails;
- hammer;
- brush:
- platbands;
- polished triangular profile slats with a side of 7 mm;
- timber 50x50mm;
- protective compounds for wooden structures (varnish, pinotex or others).
To make better and reliable design, then it is better to install an additional galvanized canopy on the loggia of the required size, which will protect the windows from moisture leakage and add attractive external aesthetics.
Stages of design and glazing of a wooden structure
Initially, it is recommended to remove all external coatings down to the concrete itself. The surface should be cleaned of dust and other contaminants. After preparatory work The first step to further action is accurate measurement of the opening, manufacturing and installation with a minimum gap wooden box, which will serve as the basis for the frames. This structure is made of timber, which is fixed at the level of the balcony railing and the top beam, which is mounted to the ceiling and side beams using brackets. The side bars, in turn, are mounted with brackets to the side surface.

Scheme high-quality installation window designs(according to DSTU B V.2.6-79:2009)
The next step is to install the sheathing of the entire room for cladding with the selected material. Only after the ceiling, walls and floor are covered with their structure (wooden frames will fit wooden panels or lining), you should begin installing frames with glass. IN in this case The glazing method itself can be divided into several types:
- euroglazing;
- simple;
- combined.
Each method has its own characteristics. The most common glazing is suitable for installing wooden frames. It is important to remember that before glazing the balcony, glass must already be installed in the frames. Balcony frames can be purchased at finished form standard sizes, order by custom sizes or make it yourself from profiled wooden beam, into the grooves of which glass is inserted and pressed by nailing with triangular slats.
The final stage will be thoroughly filling the cracks with tow or other insulating materials. Then the platbands are installed. To protect wooden structures loggias from exposure to moisture, a protective layer should be applied 5-6 times.
Installation of metal-plastic structure
Metal-plastic frames appearance resemble a layer cake: plastic, metal, air chambers. Water flows through the drainage holes, so freezing of the structure itself and the room as a whole is excluded. Glazing a balcony using this method is very simple. Will be needed following tools and materials:

Metal carcass - reliable option for any frames
- hammer drill or drill (with a carbide drill, 8 mm in diameter);
- construction gun (preferably);
- hammer;
- screwdriver;
- putty knife;
- foam gun;
- polyurethane foam;
- dowels or screws.
For self-installation and glazing profiles, must be based on the instructions. When are measurements taken? balcony frame, then you should not make large tolerances. The first step is to determine the accuracy of the proportions. In order to check the symmetry of the opening, both diagonals are measured, and the difference should not exceed 5 mm. If it was possible to achieve this ratio of diagonals, therefore, the angles should be exactly 90 degrees. Then the measurements take into account the technological gap (15 mm on both sides).
Please remember that it is not recommended to lift the frame top floor already with installed double-glazed windows, to avoid distortions and damage. During installation, you cannot leave the embedded wedges protruding, since later you have to cut off the protruding ends, which is extremely inconvenient. When installing, spacer wedges are made to fit the width of the frame.
The metal-plastic frame is mounted on spacer wedges, screws with dowels, polyurethane foam, additional fastening of windows with metal brackets is also provided. Additional fasteners will help you fix the frame with maximum precision until it is completely level. After the structure is blown in with foam, it must be left closed for 8 hours until completely dry to avoid deformation of the frame.
Frameless method of glazing loggias
This new way, which in a short period of time received wide use among the consumer. Strained glass, this is very durable material, capable of withstanding heavy loads. The thickness of the glass directly depends on the size. If the height exceeds 2 m, then 8 mm thick glass is used. The width of the sash varies from 60 to 80 cm. If desired, you can order tinted glass.
The opening process is very simple. First, the outermost sash is opened with the upper lock (it resembles a floor lamp switch); by pulling it, the sash moves out of the upper and lower frames. The doors are open, then the lower lock, or rather the plastic handle, comes into use.

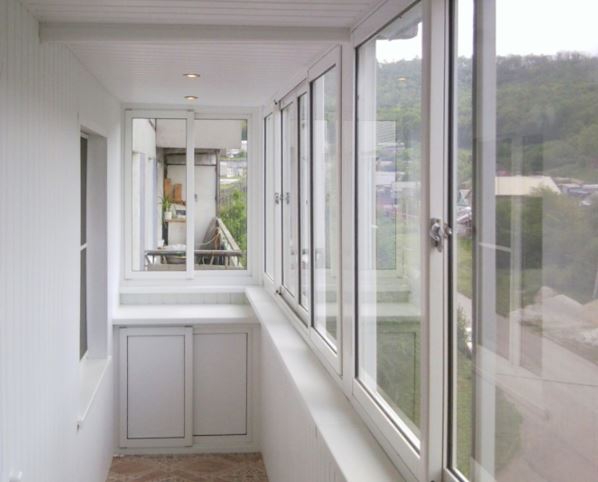
Finnish glazing of balconies is impressive and fashionable: the design is visually airy and weightless
What does frameless glazing consist of:
- glass;
- upper and lower profile;
- upper and lower glass trim;
- floor lamp lock;
- handle-lock;
- retainer;
- rubber compressor;
- fixing tape.
The fixing tape is necessary to secure the sashes so that they do not swing or hit each other. It is mounted on the outer sash of the lower aluminum profile. The structure is mounted (assembled) extremely simply. Aluminum linings are glued to the glass sashes at the top and bottom. Load-bearing wheels (hinges with rollers) are installed on them. These loops cling the glass to the guide profiles (upper and lower). This type The design is very similar to a wardrobe and consists of the following elements:
- glass, 6-8 mm thick;
- bearing wheels with a ball bearing device;
- upper and lower aluminum profile;
- clypeus;
- sliding device and latch;
- pad;
- bottom latch;
- ebb with plastic coating.
As with other designs, upon completion installation work It is necessary to seal the cracks between the sashes. Acrylic seals are placed on the edge of the glass, like a cover for skates. They are easily dismantled, then it turns out ventilation gaps up to 3 mm. Rubber seals laid outside between the glass sashes and aluminum profile, reliably protect the structure from moisture penetration. The gaps between the doors and the walls of the balcony are filled with sealant matching the color of the profile. The structure itself is fastened together special glue, no nails or screws. And the most attractive thing is the hidden fittings.


Work on preparing to glaze a balcony with your own hands begins with assessing the condition of the balcony itself. It is necessary to make sure that the slab and the fence are not seriously damaged, the reinforcement is not exposed, and there are no cracks or chips. If any of this is present, you will have to first repair the balcony.

If we are thinking about a warm balcony, then we need to decide on double or triple glass, or install two or three chamber double glazing. Future view glazed fencing will tell you what materials and details we will still need. In most cases, decisions are made in favor of double-glazed windows; although this will be more expensive than homemade glazed wooden frames, installation and fitting will be simpler and more reliable.

We must not forget about the main component of the glazing process - the glass itself. To avoid the harmful effects of ultraviolet rays, glass with sun protection is used. They are covered with film using a special technology.

If you decide to turn your balcony into a greenhouse, then you must remember that simple glass can become “magnifying” for plants and then burn delicate flowers will be inevitable. To protect them from the scorching rays of the sun, you need to use tinted protection.

There are many ideas for turning a balcony from the inside and outside into an object of festive mood. This is the installation of stained glass, glass of different colors, painting interior walls balcony, outer skin, including installation of siding.
To maintain heat inside the balcony, energy-saving windows are used. On inner surface applied according to special technology in factory conditions the thinnest layer metal that reflects heat rays back into the balcony.

So, all decisions have been made, you just need to remind about the legal part when changing the structures or details of the apartment. It is best to go to a specialized government agency and clarify the legal provisions necessary in such cases, as well as obtain permission to change the design of the balcony. Such permission is issued without problems, because glazing of balconies is generally welcomed.

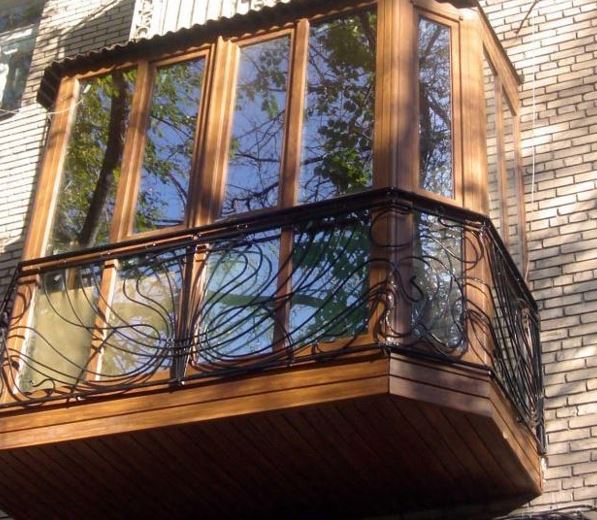
Glazing a balcony is more difficult than similar work on a loggia.
The balcony opening is three-sided, so you need to make three blocks. Two side blocks adjacent to the wall can be more securely fastened; the central block is the largest in size and is more difficult to fasten. It must be connected to the side blocks and to the base of the upper balcony, while taking into account the large weight and windage of the structure.

photos
Frame material
If before the plastic window era everything was decided in favor of wood, and then in favor of plastic, now the assessment of the quality of the two materials is beginning to level out. Processing using new technologies wooden parts allows you to give them durability and beauty.

When choosing wood, you need to remember the properties that ensure its durability. These are strength and density, resistance to cracking, high antiseptic properties, minimal or complete absence of knots, and wear resistance. Bioprotection using antipiseptics and fire retardants. Now the most powerful drug that combines properties against rotting and against insects and wood-boring beetles is “WOOD DOCTOR” DL-3.

It is very important to carry out fire retardant treatment.

Best to spend deep impregnation fire retardants that do not create protective film on the surface of wooden parts, but changes the material itself, making its structure resistant to temperature influences.

But even having received the necessary prepared wood blanks, for self-made frames and supports require tools for precise preparation of frame parts, good tool and the room, because you can’t do such work on the balcony.
Therefore, when deciding on choosing a wooden frame, it is better to order it from a company that specializes in woodworking, and install it yourself, following the step-by-step instructions. Of course, you can still do everything yourself, but it’s unlikely that you’ll be able to do everything aesthetically flawlessly and cause the envy of your neighbors. But for country house such a solution may be quite successful.

Let's go back to the balcony.
There are currently three types of glazing for balconies:
- French - glazing around the entire perimeter and height of the balcony
- Warm - supportive room temperature all year round, isolated from external cold
- Cold - externally similar to warm, but there is no good thermal protection; simpler and cheaper materials are used

The warm version needs to be discussed separately due to the complexity of installation, so we will focus on the simpler, cold version. We're leaving out the options. wooden window and aluminum profiles, but let’s focus on PVC windows.
Before glazing, you need to take care of installing the visor so that this does not become a problem later.

Step-by-step instruction
It is necessary to accurately determine the dimensions of the side and front windows. To do this, we measure the distance from the parapet to the ceiling, the length of the front part of the parapet and the length of the side parts of the parapet. We check the diagonals, make sure that their difference is within 1.5-2.5 cm. We decide which part will have sashes, which part will remain stationary, and place an order for the production of windows and support frames.

- We remove the double-glazed windows from the fixed windows and remove the sashes from their hinges. This will protect the glass from damage and greatly reduce the weight of the window.
- We fix the support profile along the perimeter of the fence, wall, ceiling.
- Stepping back 15 cm from each edge, install frame fastenings.
- Next you need to glaze - install the frame in the opening and secure it with self-tapping screws. Using a level, we control the horizontal and vertical positions of the frame parts.
- We install the remaining frames.
- After alignment, all frames are secured with anchors.
- We fill all the cracks with polyurethane foam.
- We install a double-glazed window into the frame and hang the flaps on the hinges.
Glazing and insulating the loggia is the best solution for increasing the usable area. The question of how to glaze a balcony yourself can be solved in several of the most accessible ways: equipping the room with sliding wooden or metal-plastic doors, installing double-glazed windows, which will perfectly retain heat in the room.
The choice of double-glazed windows must be taken responsibly, because... Approximately 80% of the heat loss of the glazed loggia space occurs through them.
The most common methods of protecting a loggia from wind, dust and precipitation are:
- wooden structure;
- metal-plastic installation;
- frameless design.
Glazing a balcony with your own hands using a wooden structure will isolate the room from noise and increase the temperature in the glazed room.
If the choice fell on an environmentally friendly wooden structure, then you need to prepare tools and materials:
- glass of the required amount with a thickness of 3 mm;
- small nails;
- hammer;
- brush:
- platbands;
- polished triangular profile slats with a side of 7 mm;
- timber 50x50mm;
- protective compounds for wooden structures (varnish, pinotex or others).
To make a better and more reliable design, it is better to install an additional galvanized canopy on the loggia of the required size, which will protect the windows from moisture leakage and add attractive external aesthetics.
Stages of design and glazing of a wooden structure
Initially, it is recommended to remove all external coatings down to the concrete itself. The surface should be cleaned of dust and other contaminants. After the preparatory work, the first next step is to accurately measure the opening, manufacture and install, with minimal clearance, a wooden box that will serve as the base for the frames. This structure is made of timber, which is fixed at the level of the balcony railing and the top beam, which is mounted to the ceiling and side beams using brackets. The side bars, in turn, are mounted with brackets to the side surface.
The next step is to install the sheathing of the entire room for cladding with the selected material. Only after the ceiling, walls and floor are covered with their structure (wooden panels or lining are suitable for wooden frames), should you begin installing frames with glass. In this case, the glazing method itself can be divided into several types:
- euroglazing;
- simple;
- combined.
Each method has its own characteristics. The most common glazing is suitable for installing wooden frames. It is important to remember that before glazing the balcony, glass must already be installed in the frames. Balcony frames can be purchased ready-made in standard sizes, ordered in individual sizes, or made independently from profiled wooden beams, into the grooves of which glass is inserted and pressed by nailing with triangular slats.
The final step will be to carefully fill the cracks with tow or other insulating materials. Then the platbands are installed. To protect the wooden structures of the loggia from moisture, apply a protective layer 5-6 times.
Installation of metal-plastic structure
Metal-plastic frames resemble a layer cake in appearance: plastic, metal, air chambers. Water flows through the drainage holes, so freezing of the structure itself and the room as a whole is excluded. Glazing a balcony using this method is very simple. You will need the following tools and materials:
- hammer drill or drill (with a carbide drill, 8 mm in diameter);
- construction gun (preferably);
- hammer;
- screwdriver;
- putty knife;
- foam gun;
- polyurethane foam;
- dowels or screws.
For independent installation and glazing with a profile, you must follow the instructions. When measuring a balcony frame, you should not make large tolerances. The first step is to determine the accuracy of the proportions. In order to check the symmetry of the opening, both diagonals are measured, and the difference should not exceed 5 mm. If it was possible to achieve this ratio of diagonals, therefore, the angles should be exactly 90 degrees. Then the measurements take into account the technological gap (15 mm on both sides).
It should be remembered that it is not recommended to lift the frame to the upper floor with double-glazed windows already installed, in order to avoid distortions and damage. During installation, you cannot leave the embedded wedges protruding, since later you have to cut off the protruding ends, which is extremely inconvenient. When installing, spacer wedges are made to fit the width of the frame.
https://youtu.be/xuQrjJXqx_g
The metal-plastic frame is mounted on spacer wedges, screws with dowels, mounting foam, and additional fastening of windows with metal brackets is also provided. Additional fasteners will help you fix the frame with maximum precision until it is completely level. After the structure is blown in with foam, it must be left closed for 8 hours until completely dry to avoid deformation of the frame.
Frameless method of glazing loggias
This is a new method that has become widespread among consumers in a short period of time. Tempered glass is a very durable material that can withstand heavy loads. The thickness of the glass directly depends on the size. If the height exceeds 2 m, then 8 mm thick glass is used. The width of the sash varies from 60 to 80 cm. If desired, you can order tinted glass.
The opening process is very simple. First, the outermost sash is opened with the upper lock (it resembles a floor lamp switch); by pulling it, the sash moves out of the upper and lower frames. The doors are open, then the lower lock, or rather the plastic handle, comes into use.
What does frameless glazing consist of:
- glass;
- upper and lower profile;
- upper and lower glass trim;
- floor lamp lock;
- handle-lock;
- retainer;
- rubber compressor;
- fixing tape.
The fixing tape is necessary to secure the sashes so that they do not swing or hit each other. It is mounted on the outer sash of the lower aluminum profile. The structure is mounted (assembled) extremely simply. Aluminum linings are glued to the glass sashes at the top and bottom. Load-bearing wheels (hinges with rollers) are installed on them. These loops cling the glass to the guide profiles (upper and lower). This type of design is very similar to a wardrobe and consists of the following elements:
- glass, 6-8 mm thick;
- bearing wheels with a ball bearing device;
- upper and lower aluminum profile;
- clypeus;
- sliding device and latch;
- pad;
- bottom latch;
- ebb with plastic coating.
As in other structures, upon completion of installation work it is necessary to seal the gaps between the sashes. Acrylic seals are placed on the edge of the glass, like a cover for skates. They are easily dismantled, then ventilation gaps of up to 3 mm are obtained. Rubber seals are laid on the outside between the glass doors and the aluminum profile, reliably protecting the structure from moisture penetration. The gaps between the doors and the walls of the balcony are filled with sealant matching the color of the profile. The structure itself is fastened together with special glue, without nails or screws. And the most attractive thing is the hidden fittings.


