What is depth of field? Shallow and large depth of field. What is the depth of field of the depicted space (grips) in photography?
Controlling sharp and blurred areas in a photograph is one of the keys to success in photography. Understanding depth of field (DOF) has traditionally been a source of confusion for many photographers. Before starting a semantic discussion, let's come to a general understanding of such a concept as depth of field:
Depth of field is the range of distances at which the subject is depicted acceptably sharp.

There are other formulations of IPGR, but they explain the same meaning. They all emphasize that it is a numerical value, measured in units of length, that highlights the part of the shot that looks quite sharp. There is no clear relationship between depth of field and the strength of foreground or background blur. One thing you need to understand is that the concept of depth of field is also subjective. Details at a certain distance from the focal plane may appear sharp to one person, but blurry to another.
DOF concept
DOF is usually viewed in a relatively simple framework geometric optics. and this article is no exception. Let us assume that the lenses do not have , and also that there is no diffraction. The film or matrix of the camera has infinite resolution, so you can enlarge the image without any restrictions without losing clarity. Such an ideal depth of field is far from reality, but still provides visual insight.
Circle of Scattering
In order to quantify depth of field, there must be sharpness criteria. These criteria are based on the circle of scattering. Its value corresponds to the diameter of the blur spot, fixed on the camera matrix, like an out-of-focus point in object space.

In depth of field calculations, it is customary to use the designation of a blur disk for the most permissible scattering circle. The diameter of the blur disk is zero at the point of sharpest sharpness and gradually increases as we move forward or backward from that plane in object space. As long as the diameter of the blur disk is smaller than the specified scattering circle, it is considered sharp enough and falls within the depth of field range.
The appropriate value for an acceptable scatter circle depends on a variety of factors, including camera sensor size, photo size, viewing distance, etc. But in practice, a specific scatter circle is considered for a certain size. Lens manufacturers cannot know the viewing conditions of their customers' photographs and adhere to a certain standard.
For example, the depth of field scale that is applied to the lens frame for the 35 mm format is based on circle of dispersion values from 25 to 35 µm. Comparing such scales, one can assume that lenses with a 25 µm scale have a smaller depth of field than lenses with a 25 µm scale, but this, of course, is not the case. The scales differ only because the sharpness criteria differ.
The depth of field depends on the focusing distance, focal length and aperture F.
DOF and focusing distance
The shorter the focusing distance, the shallower the depth of field. And vice versa, the greater the focusing distance, the greater the depth of field.
In this regard, the size of the matrix sensor matters. By composing a frame with the same composition using the same lens, but on cameras with different sizes sensor (with different ones), we will have different depth of field, because than larger size matrix, the closer we get to the subject, and accordingly, the shallower the depth of sharply depicted space will be.
DOF and lens focal length
How does the depth of field depend on the focal length of the lens, for a certain image scale and aperture number f? For example, we photograph a product for a catalog, and we compose the frame identically with two different lenses. Will the depth of field be different in these images? The answer, unfortunately, will not be simple. The shorter the lens, the greater the depth of field behind the focal plane. than in front of her.
For example, for a frame size of 24x36 mm, with an aperture of f/ 2.8, for a lens with a focal length of 100 mm, the depth of field in front will be 10 m, and at the back - 20 m. While for a lens with a focal length of 35 mm, the depth of field in front will be 10 m, and behind several hundred meters.
When comparing two lenses with the same subject scale and the same aperture, two cases should be distinguished. When in both lenses the distance to the object is much less than , then the depth of field is almost the same. And when the distance to the subject of one or both lenses is large relative to the hyperfocal distance, the lens with the shorter focal length has a larger depth of field.
One way to effectively increase your hyperfocal distance is to look at the photo more meticulously. This is expressed in the use of a smaller permissible scattering circle, for example, 10 µm instead of 30 µm. Where the circle of dispersion is 10 microns, the depth of field depends significantly less on the focal length than when the circle of dispersion is 30 microns.
DOF and background blur
A common source of confusion in DOF discussions is the issue of background blur. To illustrate the relationship between depth of field and background blur, or rather lack of blur, let's look at the two photographs in Fig. 3

Rice. 3. The toy was photographed with two lenses with different focal lengths at the same aperture f/ 4, 100 mm (A) and 28 mm (B). The depth of field remains the same.
In the photo you see a toy that was photographed with 100 mm and 28 mm lenses at the same f/4 aperture. The scale of the toy is almost the same. Even though the toy in the frame is the same size, the two photographs are very different.
Firstly, the perspective in photographs is different, because in order to take a photo with a 28mm lens, the photographer needs to get closer to the subject. Secondly, the 28mm lens captures more background in the frame due to its wider viewing angle. Thirdly, a 100mm lens blurs the background more (or not more?).
Let's discuss DOF first and then background blur. In order to understand what depth of field is in a photograph, you need to ask the question: “What is shown in sharpness in the photograph?” The answer is that the toy is completely in sharp focus from the right leg in front to the knot in the back. Apart from the toy, there is nothing else clear in the photo. Everything in the background is blurred and therefore goes out of the depth of field zone. What can we say about the depth of field in both photographs? At both 100 mm and 28 mm, we cannot say that the toy has differences, since there are practically no visible signs.
At first glance, the background in a photo with a 100mm lens appears blurrier than the background in a photo with a 28mm lens. This is true when we talk about absolute blur. Absolute blur is determined by the diameter of the blur disk of a point in the background (light highlights from cars on the street).
However, if we are talking about relative blur, we must match the size of the blur disk to the scale of the background image. The image from a 100 mm lens has a larger scale. Rice. 4 shows background details taken from both photographs and enlarged to the same size on screen. It looks like the blur power of the red and white parts of the car is the same. And to the question what aperture we need in order to read the license plate on a car, the answer will be the same for both lenses.

Rice. 4. Background fragments from two photographs: A - taken with a 100 mm lens, B - 28 mm
Although in Fig. 3 and Fig. Figure 4 shows an example of two photographs with the same DOF and the same relative background blur, but this is not always the case. The relative blur of the distant background is the same (with the same frame composition and aperture), but the depth of field will differ if the distance to the object is greater than the hyperfocal distance.
Neither absolute nor relative background blur can be used as criteria for evaluating depth of field. The misunderstanding of depth of field occurs because people base their judgments on the out-of-focus parts of an image.
DOF at the same approach
If we were to reduce the size of the photographs in Fig. 3 or increase the viewing distance, then there will be a point where the photo from 28 mm begins to show a greater depth of field than the photo from 100 mm. The same thing happens with increasing f-number. As the display size decreases, the permissible circle of blur increases, which in turn reduces the hyperfocal distance, which can no longer be greater in comparison with the distance to the subject.
In fact, when the screen size is small enough, or the F-number is large enough, there is a point where a 28mm photo will be completely in sharp focus with infinite DOF, while a 100mm photo will still show noticeable blurred background. In Fig. 5 this is shown. Here again are two photos of the toy, taken at f/22 and zoomed out on the screen. The background is still a little blurry in the 100mm photo, but looks sharp in the 28mm photo.
Obviously, the depth of field at 28 mm is greater than at 100 mm, because at 28 mm the cars still enter its zone. We could zoom in on the red car to make sure the relative blur is still the same (and the license plate is still legible), but what matters for DOF is that the car is acceptably sharp at 28mm, thus falling within depth of field zone.

Rice. 5. A - photo taken with a 100 mm lens at f. 22, B - 29 mm at f/ 22. Photo B shows a large DOF that includes the background
Conversely, any changes from Fig. 3, which increase the hyperfocal distance leads to closer depth of field values.
The smaller the f-number, or the larger the size of the photographs, or the closer the viewing distance, the more similar depth of field differences differ. In other words, the more critically we look at our photographs, the more obvious it becomes that there is only one shot that is truly sharp.
However, in general, the concept of depth of field in terms of the area of acceptable sharpness works great. As we just saw, print size and viewing distance have great importance in any of the evaluation criteria; these parameters must be taken into account using suitable choice circle of scattering.
The scattering circle should be larger for Fig. 5 than for Fig. 3, since the image size is smaller, while the viewing distance remains the same. I hope the idea is clear: in Fig. 3 DOF is almost the same, but in Fig. 5 does not, while the relative background blur does not depend on the focal length in both cases.
Foreground blur follows the same rules as background blur. It increases with decreasing aperture number f and if the distance to the object is the same, it also increases with increasing focal length. Conversely, with the same image magnification and aperture, wide angle lens will give more (absolute) blur in the foreground.
When there is clutter in the foreground near the lens, such as a wire mesh, blurring the foreground can make the mesh completely invisible in the photo.
This is shown in Fig. 6, which shows two photographs taken with a 50mm f/ 1.4 lens. The lens is pressed against a thick wire mesh. Photo A was set to f/16, while photo B was taken at f/1.4. In this case, the grid is completely invisible, although in reality the wire is located there, in front of the lens. The uniform darkening of the corners that appears at f/1.4 was not due to the reticle, but due to the .

Rice. 6. Photos taken through a fence grid with a 50 mm lens: A - at f/ 16, B - at f/ 1.4
If desired, you can determine what the minimum distance should be from the lens to the reticle. to achieve this kind of blur. For the current case, we see that at f/16 the reticle is projected onto the camera sensor as a blurred line 3mm thick. Obviously, such a blur is not enough for the wire to disappear.
And with an aperture of f/ 1.4, the grid wire is blurred by a width of 35 mm, i.e. across the entire frame width is 24x36 mm, so it is not visible. So, at f/1.4, the wire is no longer visible in the photo, but since it still blocks some of the light entering the lens, it acts as a neutral density filter.
Also, the blur of the wire from the example will increase as the focal length of the lens increases. It is also worth noting that small scratches or dust particles on the front lens are less of a concern than the thick wire in Fig. 5.
In the world of macro photography, the depth of field is small, and although the subjects are also small, in macro photography it is very difficult to achieve a large depth of field. If we use lenses with the same (standard) optical design, the depth of field will not depend on their focal length, with the same zoom and aperture, but the background blur will be different, it will be stronger as the focal length increases.
Picture in fig. 8 illustrates a small depth of field during close-up shooting. When focusing on the toy's left eye, his backpack and hands are no longer in focus, since the depth of field in this scene is only a few millimeters.

Rice. 8. Toy taken down close-up 100mm lens at f/8 (scale 1:2)
DOF at the same zoom (continuation of topic)
The further, the more interesting. As mentioned in previous section, during macro photography, the focal length of the lens does not affect the depth of field. This is partly true, but there is an exception for lenses with a symmetrical optical design. When shooting at a scale starting from about 1:10, symmetrical lenses need to be taken into account.
This can be checked using the pupil magnification factor P (puppil magnification) (the ratio of the exit pupil diameter to the entrance pupil diameter). According to this, the coefficient P will be equal to one in lenses with symmetrical designs, more than one in retrofocal lens designs and less than one in telephoto lenses.
The idea that a lens with a longer focal length produces greater depth of field than a lens with a shorter focal length may seem controversial, but this effect does occur, and it is due to the optical design and not the focal length.
There are macro lenses with a focal length of 200mm and it is believed that their pupil magnification factor P is even less than 0.7. But, under the conditions of the same frame composition, a macro telephoto lens has advantages over a lens with a symmetrical design with a shorter focal length. This is an increase in focusing distance, and with this an increase in depth of field, as well as a narrower viewing angle, which gives less details against the background and greater relative background blur. Of course, if macro photography requires a smaller depth of field and larger angle review, then would be better suited lens with a shorter focal length.
Let's summarize the above:
1. If for both lenses with different focal lengths the distance to the focusing object is much less than the hyperfocal distance, the depth of field is essentially the same.
2. If the distance to the subject is greater than the hyperfocal distance, a lens with a shorter focal length will produce a larger depth of field.
3. If the optical designs of the lenses are the same, then the third point can not be considered. But if the lens designs are different (different P coefficients), then the second point will still be relevant, but the first is subject to revision. Depending on the optical design, the depth of field at close distances may differ.
The depth of field of the image space (DOF) is the range of distances in the image in which objects are perceived as sharp. Depth of field varies depending on camera type, aperture size, and focusing distance, although print size and viewing distance can change our perception of depth of field. This chapter aims to provide a better intuitive and technical understanding of photography and provides a way to demonstrate how it depends on your camera's settings.
The sharpness of the image does not change suddenly, it decreases gradually. Essentially, everything that is closer or further from the focusing distance gradually loses sharpness - even if it is imperceptible to the eye or to the camera's resolution.
Circle of confusion

Since there is no clearly defined boundary, a more precise term called " circle of confusion" When a circle of confusion becomes perceptible to our eyes, that area is considered to be outside the depth of field and is not “acceptably sharp.” The circle of confusion above has been enlarged for simplicity; in reality it is a tiny fraction of the camera's sensor area.
When does the circle of confusion become visible to the eye? An acceptable sharp circle of confusion is defined as one that will not be noticeable when enlarged for printing on standard size 20x25 cm and when observed from a standard distance of about 30 cm.
At this viewing distance and print size, camera manufacturers consider the circle of confusion to be indistinguishable if it has a diameter of no more than 0.025 mm (after enlargement). As a result, camera manufacturers use this standard when marking depth of field on lenses (using f/22 for a 50mm lens as an example). In reality, a person with perfect vision can see 1/3 of this size or even less, so the circle of confusion must be even smaller to provide acceptable clarity.
For each combination of print size and viewing distance, the circles of confusion will be different. In the earlier example of blurry dots, the circle of confusion is actually smaller than the resolution of your screen for the two dots on either side of the focusing distance, and therefore they are in depth of field. In other words, depth of field can be based on the point at which the circle of confusion exceeds the pixel size of your digital camera.
Note that depth of field only specifies the maximum size of the circle of confusion and does not describe what happens to areas that are out of focus. These areas are called "boke" (a word of Japanese origin). Two images with the same depth of field can have significantly different bokeh, depending on the shape of the lens aperture. In reality, the shape of the circle of confusion is usually different from round, but approaches it as long as it remains negligibly small. When zoomed in for most lenses, it will be a polygon with 5-8 edges.
Depth of field control
Although the printed size and viewing distance are important factors, which affect how large the circle of confusion is Seems To our eyes, the main factors that determine how large the circle of confusion will appear on your camera's sensor are aperture opening and focusing distance. A larger aperture (smaller f-stop number) and shorter focusing distances will create a shallower depth of field. The following depth of field test was performed at an identical focusing distance with a 200 mm lens (320 mm field of view on a 35 mm camera), at different apertures:
 |
 |
 |
| f/8.0 | f/5.6 | f/2.8 |
Explanation: Focal length and depth of field
Notice that I didn't mention focal length as a factor in depth of field. Even though telephoto lenses seem to create a much shallower depth of field, this is primarily because they are often used to zoom in on a subject that you can't get closer to. If the subject takes up the same area in the viewfinder (constant magnification) on both the wide-angle and telephoto lenses, depth of field will be practically independent of focal length ! Of course, this would require you to get much closer for a wide-angle lens, or noticeably further away for a telephoto lens, as demonstrated in the following depth of field chart:
Note: Depth of field calculations are based on f/4.0 aperture on Canon EOS 30D
(crop factor 1.6) using a circle of confusion with a diameter of 0.0206 mm.
Note that for minimum focal lengths there is indeed a slight change, however this effect is negligible compared to both aperture and focusing distance. Even though the overall depth of field is essentially the same, the proportion of depth of field in front and behind the focusing distance varies with focal length, as shown below:
This shows the limitations of the traditional concept of depth of field: it only takes into account the range itself and does not take into account the distribution of depth relative to the focal plane, despite the fact that both factors can affect the perception of sharpness. Wide-angle lenses provide greater depth of field behind the focal plane than in front of it, which is essential for traditional landscape and landscape photography.
On the other hand, if the shooting point and focusing distance are constant, a lens with a longer focal length will produce a shallower depth of field (even despite significant differences in the final image). This is more obvious in everyday use, but this is due to the degree of magnification, and not to the focusing distance. Seems, that for long focal lengths the depth of field is reduced - because they compress the perspective. This brings the background much closer to the foreground - even if the details are not sharper. Depth of field also appears shallower on DSLRs than on compact digital cameras because DSLRs require a longer focal length to achieve a similar angle of view.
*Note: We describe depth of field as practically constant, since there are a number of cases in which this ceases to be true. For focusing distances that result in significant magnification, or in the area near the hyperfocal distance, wide-angle lenses can provide greater depth of field than telephoto lenses. On the other hand, for high magnification situations, the traditional calculation of depth of field becomes inaccurate for another reason: . This actually causes the depth of field to shift on most wide-angle lenses and increases it for telephoto and macro lenses. In another particular case, near the hyperfocal distance, the increase in depth of field appears because wide-angle lenses have a large rear depth of field and therefore more easily achieve acceptable sharpness at infinity for any given focusing distance.
DOF calculation
To calculate the depth of field, you first need to determine the maximum allowable circle of confusion. It depends on the camera type (sensor or film size) and the combination of print size and viewing distance.
Depth of field is the range of distance, the area in which objects appear sharp. It varies depending on camera type, aperture and focusing distance, although print size and viewing distance can also affect our perception of depth of field. This article will give you an intuitive and technical understanding of depth of field and how to calculate it using a calculator, and show you how it changes depending on your settings.
Depth of field (DOF) is not a dramatic change from blur to sharp focus, it is a smooth transition. In fact, anything immediately in front or behind the focusing distance begins to lose sharpness - even if it is not perceived by our eyes or the camera's decision.
Scattering spot
To define the blurring of a point, after which it is perceived as blurry, there is a term “ circle of confusion or spot of scattering”. If a circle of confusion becomes visible to us, that area is considered to be outside the depth of field and is not “acceptably sharp.”
When does the circle of confusion become visible to our eyes? A clear scattering spot is acceptable, which will remain invisible when enlarged for printing at a standard size of 20x25 cm and when observed from a standard distance of 30 cm.

With this viewing distance and this print size, manufacturers The circle of confusion is considered indistinguishable (if its diameter is no more than 0.025 mm after magnification). As a result, this has become the standard for marking depth of field on lenses (eg f/22 for a 50mm lens). In reality, a person with perfect vision can distinguish 1/3 of this size, so the circle of confusion must be even smaller to ensure acceptable clarity.
For a given combination of print size and viewing distance, the circles of confusion will be different. In the blurry dots example below, the circle of confusion is actually smaller than your screen resolution for the two dots on either side of the focusing distance, and therefore they are in depth of field.
By the way, depth of field only specifies the maximum size of the circle of confusion and does not describe what happens to the areas that are not in focus - those areas that we call “bokeh”. Two images with the same depth of field can have significantly different bokeh, depending on the shape of the lens aperture. In fact, the scattering spot has the shape of a circle until it is enlarged, so when enlarged for most lenses it will be a polygon with 5-8 edges.

Controlling depth of field
While print size and viewing distance are very influential factors in determining whether the scatter spot will be visible, two more important element– this is the aperture and focal length. They determine the size of this very circle of blur and its visibility on your camera sensor. A wide open aperture and long focal length produce shallow depth of field. The three photos below have the same focal length, but different meanings diaphragm. Pictures were taken with a 200mm lens (320mm field of view on a 35mm camera).


f/2.8 f/8.0 f/5.6
EXPLANATION: Focal Length and Depth of Field
Note that I didn't mention focal length as a factor that determines depth of field. Even though telephoto lenses seem to create a much shallower depth of field, this is because they are often used to zoom in on a subject that you can't get closer to. If the subject takes up the same area in the viewfinder on both the wide-angle and telephoto lenses, the depth of field will be almost independent of the focal length! Of course, you would need to get closer to the subject if you have a wide-angle lens, and further away if you have a telephoto lens. The relationship between distance and settings readings is below:

Important! There is some variation at minimum focal lengths, although the effect is minor compared to aperture and focusing distance. Although the overall depth of field is essentially constant, the proportion of depth of field in front and behind the focusing distance varies with focal length, as shown below:

This is the limitation of the traditional concept of depth of field: it only takes into account the range itself and does not take into account the distribution of depth relative to the focal plane, despite the fact that both factors can affect the perception of sharpness. Wide-angle lenses provide greater depth of field behind the focal plane than in front of it, which is essential for traditional landscape and landscape photography.
At the same shooting point and focusing distance, a lens with a larger focal length will produce a smaller depth of field. You may notice this in everyday use, and the reason is the magnification ratio, not the focusing distance. We see that for long focal lengths the depth of field decreases, the point is that they compress the perspective. This makes the background much closer to the foreground - even if the details aren't sharper. Depth of field also appears shallower on DSLRs than on compact digital cameras because DSLR cameras a longer focal length is needed to obtain a similar viewing angle.
DOF calculation
To calculate the depth of field, you first need to determine the maximum permissible circle of confusion. It depends on the camera type (sensor or film size) and the combination of print size and viewing distance.
Depth of field calculations generally imply that for acceptable sharpness the circle of confusion should be no larger than 0.025mm (we discussed this above), but people with perfect vision can see 1/3 of this size. If you use 0.025mm as the human perception standard, be aware that the depth of field may not be sharp enough. The depth of field calculator shown here is based on this standard.

Depth of focus and aperture visualization
Another interrelated element with the circle of confusion is the concept of depth of focus, the so-called “focus space”. It differs from depth of field in that it describes the range of light that is focused on the camera sensor, as opposed to the amount in focus. This is important because it defines the limits of how horizontal or vertical the film or digital sensor must be to achieve the required focus on all parts of the image.

The figure shows how the depth of focus depends on the aperture. The purple lines represent the maximum angles at which light can enter the aperture. Region purple shows all possible angles. A picture can also be used to illustrate depth of field, but in this case the lens elements must be moved instead of the sensor.
Essence: When an object is in focus, rays of light from one point converge to another on the camera sensor. If the rays reach the sensor in other positions (forming a circle instead of a point), the object will be out of focus and the defocus will increase with distance.
The lens is able to focus only at a certain distance. Objects located at a large or small distance from the subject can be quite sharp. This zone of visual sharpness can be so small that it is barely noticeable, or it can become so large that you can see a clear image all the way to the horizon. Depth of field can be called the zone of visual sharpness
Only perfect focus at a certain distance can create a perfectly clear image made up of small dots. However, objects closer or further away will still appear sharp, and their blur will be too minimal to be noticeable to humans.
When photographing landscapes, we strive to achieve maximum sharpness throughout the entire image, from the grass next to the tripod to the most distant hills, but this is not a rule or law, but a personal choice of the photographer. In portraits and when shooting sports scenes, on the contrary, a blurred background and objects located next to the subject will help focus attention on the main subject.
We keep the situation under control
Depth of field can vary greatly and is determined mainly by three factors.
The first is opening the aperture. The wider the aperture is open, the shallower the depth of field. Remember that, for example, f/16 represents a smaller aperture (the lens opening is closed), and f/4 is a larger aperture number (the lens opening is open). DSLRs with preset programs use smaller apertures when shooting landscapes to increase depth of field, and opener ones when shooting sports or portraits.
To control the opening of the aperture, set the aperture priority mode and the camera will automatically select the shutter speed to set the exact exposure. Shooting in aperture priority mode by adjusting only the aperture number is quite simple, but it does not always achieve the desired results. Fortunately, depth of field can also be adjusted using focal length. The longer the focal length, the shallower the depth of field.
For example, by setting the focal length to 18mm, you can create a completely clear image. So if you want to blur the background, use a longer focal length.

The third factor is the distance between the camera and the subject.
The shorter this distance, the shallower the depth of field. An example is macro photography, in which there is no depth of field at all and all the individual details of the subject will be in focus. To achieve the best depth of field when shooting at a long distance, it is not always enough to simply focus on the most distant subject.

Unfortunately, the three depth of field control factors mentioned don't always work well together. For example, if you decide to install a wide-angle lens for better depth of field, the subject will be too small and you decide to reduce the distance to the subject to increase its size... but this will lead to a decrease in depth of field.
Three ways to change depth of field
How can aperture, focal length, and subject distance change the sharpness of an image?
Let's highlight in red the places where the subject will be in focus.
1. Changing the aperture
The wider the aperture is open, the shallower the depth of field will be. This is not a problem, but an opportunity when photographing to place out of focus less important details photos.

2.Change the distance to the subject of shooting
The closer the subject is, the shallower the depth of field.

3. Changing the focal length
Zoom or lens settings affect depth of field. The shorter the focal length, the greater the depth of field.

What happens when some parts of the image are out of focus?
Only some parts of the image photographed with correct distance, will be perceived by the camera sensors as points and objects, while other objects located at a different distance will appear outside the focus area, and then each light point will become a disk, the so-called blur disk


Blur discs are very important in photography.
Depth of field does not only apply to out-of-focus objects. Various parts of the image may be slightly out of focus (small discs of blur) and completely out of focus.
Objects that are close to the maximum depth of field are still visible and may therefore interfere with the image. To reduce this effect, you need to further blur some parts of the image (usually the background) so that they become completely unrecognizable. That is, everything must be done to reduce the depth of field. This explains why professional photographers choose lenses with the largest possible open aperture.


Looking through the viewfinder, it is impossible to assess what effect opening the aperture will have on the depth of field, since at the moment of focusing the aperture is always maximally open and closes only when the shutter button is pressed. Many SLR Cameras, for example, Nikon, have a preview button that allows you to see the result of shooting with the aperture parameters we selected. This function allows you to evaluate the depth of field, but does not allow you to fully evaluate the quality of the image, since the image will be darkened.
Many cameras do not have a preview function and then you can use Live View mode. Be careful as Live View does not display changed aperture settings. Therefore, to see how changing the aperture settings will affect the image, you need to exit Live View and enter again. If your camera does not have a Live View mode or a preview function, the only option is to look at the captured image, zooming in on the details.

How to predict depth of field?
You can make objects sharp and in focus even if they are not in the center of the image.
Using the viewfinder
Using the viewfinder, you can see the scene with the aperture wide open. In doing so you will see minimum depth sharpness, no matter what aperture value is set

Preview
Many DSLR cameras have a preview button that, when pressed, sets the aperture value you specify.

Don't mind the brightness
When you use the preview button, the image will appear darker, however, this will help you imagine what the depth of field will be in the image.

Use live view
If your camera does not have a preview function, use Live View mode. To see the effect that will be achieved by changing the aperture settings, exit and re-enter Live View mode

View the image up close
To assess sharpness in Live View, you can use zoom to enlarge any part of the image.

Check the photo
After you press the shutter button, you can view the photo in all its details by enlarging the image with the zoom button

Exercises in practice
This exercise will help you apply your knowledge of depth of field estimation.
The result of your work will be more clear when using a small table space, since the depth of field is limited by a small distance. We used the game Monopoly, but you can take pictures of bottles, cans, cups, and any objects you find in the kitchen. If possible, use a tripod to avoid the effect of moving while shooting and then any lack of sharpness will depend only on the depth of field.
If you don't have a tripod, shoot in a bright room and use a high ISO, such as 1000, to keep your shutter speed fast enough to use all possible apertures.
Set the focal length of the lens to 55 mm, focus on the point closest to you and, going into aperture priority mode, set it minimum value so that the aperture is as open as possible (usually f/4-5.6) and press the shutter. Now close your aperture to f/22 and take a second photo. Next, set the lens to the minimum focal length, for example, 18mm and repeat shooting, setting the minimum and maximum aperture values.


Examine the four photographs carefully on your computer, zooming in to evaluate the lack of sharpness in any part of the image. At f/22 the image may not be completely sharp, but at a shorter focal length the depth of field will be greater and subjects that were previously completely out of focus will now be visible.
Often on various forums for professionals you can see an unusual abbreviation that is very similar to a cold. What does it mean? Depth of sharply depicted space, abbreviated as DOF. This is the name for the zone in which any object in the frame will stand out and look sharp.
Image depth of field
You need to remember that even the most seemingly harmless mistake made when focusing can greatly ruin your photo. And at the same time, it will be absolutely unimportant whether you shot a portrait or captured a full-length model. The lack of sharpness of the photo is very noticeable, so much so that even those who do not have knowledge of the rules of photography can notice it.
How to use depth of field when shooting close-ups? The answer is simple - focus on the eyes. In any portrait, the eyes are an indicator of sharpness, and when they are out of focus, your photo loses a lot.
Depth of field in photography: Separating the subject from the background
As we have already found out, optimal depth sharpness contributes to an excellent visual effect - the separation of the object from the background. The photo gains volume, the background is blurred, the subject attracts the viewer’s attention - in general, an excellent formula for success.
But you shouldn’t completely erase the background; it doesn’t look organic everywhere. It may turn out that you destroy a beautiful location and turn it into a sparse, spotted background that will resemble a studio photo for a school yearbook. When the background is “readable” (that is, you can visualize where the shoot is taking place), it adds a special ambiance to the photo that can make your photo more successful. Remember, when you want to highlight an object in the frame, think about how to achieve depth of field.
Controlling depth of field in the camera
It is the aperture value that most influences the depth of field of a photo. But there are two more points on which the depth of field depends. This is the focal length and the distance to the subject.
Once you understand from your own experience how the above-mentioned factors can affect a photo, learn how to combine them correctly, you will immediately understand how to change the depth of field and how to create a composition with the desired depth of field.
Now we propose to consider these three points in order of their importance for the final result. What does depth of field depend on?
Diaphragm
The effect of aperture on depth of field is what you need to pay attention to first.
And now a lyrical digression for beginners, so if you know where the aperture is in the camera and how to use it, then you can safely skip this passage of text.
Aperture in digital camera- This is the “hole” through which light passes onto your camera’s sensor. By using your aperture skillfully, you can take beautiful shots with excellent exposure. Also, using this simple hole you can adjust the background blur.
How to adjust the aperture on a camera? The aperture is designated by the letter f, next to which there are always numbers. So, to open the aperture, you need to set a lower number, and to close it, you need to do exactly the opposite.
Now let's talk about the connection between the aperture and the depth of field. Everything here is extremely simple: an open aperture means a shallow depth of field. Closed gives greater depth of field.
The maximum aperture value in a camera directly depends on the lens of your camera. Some allow you to set the aperture to 2.0 or even 1.2. True, such values will complicate your work.
How to determine depth of field? Of course there are various formulas, from which you can calculate the ideal depth of field, but we recommend using an online calculator.
Focal length

How to reduce depth of field? Increase your lens focal length!
Given: Aperture value 8.0, object at a distance of two meters.
To summarize: if you need to slightly blur the background while maintaining the same aperture value, simply use a long lens.
Distance to object

Here, shallow depth of field is achieved by the distance between you and your subject. The closer, the shallower the depth. How to increase depth of field? It's simple - move away from the object.
As you might have guessed, shallow depth of field blur in macro photography will present some challenges. If we have a focal length of 60 mm, an aperture value of f/22 and a distance to the object, for example, fifteen centimeters, then the resulting depth of field will be 0.33 cm, that is, only 3.3 mm.
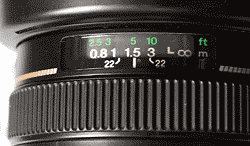
Lens depth of field
In fact, only lenses with great depth A sharp lens with a good lens (such as Canon's "L" series) can provide good sharpness in all conditions. Eg, Canon lens The 24-105 L IS and Canon 600 f4 L IS provide excellent clarity even at f/4.
Depth of field effect
You can also select an object in a photograph during processing. Any, even the simplest editor has a blur brush. Take a brush and carefully, gently blur required areas. This way you can create a more artistic effect and can be as creative as you like.
Conclusion
We hope that now you will not have any difficulties with decreasing or increasing the depth of field, and you can easily set the desired combination of aperture value, distance from the camera to the subject and focal length.
In order to simplify this procedure, many discrete lenses are equipped with a special scale, with which you can easily check the depth of field and harmoniously select shooting parameters.