Lanyard for a knife made of paracord, patterns and methods of weaving. How to tie a square lanyard for a folding knife
Lanyards for knives probably familiar to everyone who is interested in knives. Do they have a practical meaning or is it just a decoration for the knife? Let’s try to figure it out.
First, let's look at a couple of dictionaries:
« Lanyard- a loop made of a belt or ribbon with a tassel at the end of the hilt of a saber, sword, checker, worn on the hand; in the Russian army, a lanyard made from an order ribbon was a badge of honor.” Newest dictionary foreign words and expressions (Moscow, 2002).
« Lanyard– braid with a brush on a sword, saber; silver lanyard badge of officer rank. In general, both braid and cord and twine for things, for putting on the hand. A lanyard, a rope with a loop, or a hook is tied on top of the luggage or on the side of the cart to hold the cart on the rolls.” Dictionary living Great Russian language. Dal V.I.
Now everything is clear. The very concept of a “lanyard” is just a loop on the hand for holding an object (not necessarily a bladed weapon).
But a lanyard for a knife, what is it for and what is its use, let’s figure it out.
The first thing that comes to mind is the ease of removing the knife from its sheath. Especially if the sheath is of the “horseback” type and the handle of your knife is 2/3 immersed in it. Or the sheath is still new and not developed - in this case the knife is difficult to get out of it and the presence of a lanyard on the handle makes this procedure more convenient.
In some cases, a lanyard allows you to lengthen the handle of a knife and apply chopping blows with it.

Another advantage of having a lanyard on a knife is the ability to prevent it from slipping out of your hands. This is possible, for example, when fishing, when your hands are wet and slippery from fish. Let's not remember the stories of boats pierced with knives and lost knives.

The lanyard on the knife can be secured in such a way as to transfer part of the load to it, thereby increasing the force of the blow and increasing the convenience and safety of holding the knife in the hand.
Among the non-practical functions of the lanyard, I would like to highlight the decorative one. A skillfully woven lanyard can serve as a decoration for a knife, to the envy of your friends. Some knife owners are so skilled at tying knots and weaving that their lanyards look richer than the knife itself.

We are not sure that we have listed all the functions of knife lanyards. Each lanyard cannot perform all functions at once.
Choose from our selection of knives that come already equipped with lanyards or decorative lanyards to decorate your knife. The latter, by the way, are made of paracord and can carry out practical loads.
Lanyard- this is usually a cord, tassel or loop on the handle of a long-bladed weapon, but for decorative and utilitarian purposes, lanyards are also knitted onto knives. More often - folding ones.
The lanyard can be made separately, in which case it must have a loop long enough to thread through the hole in the handle and then insert the lanyard itself into the loop. As an option, for knives with a ring, you can make a lanyard in the form of a braided cylinder or a strip with a snap hook.
Square weaving
And we will consider another option, which I prefer. It is intended for those who wish to independently equip their knife with a braided cord.
First you need to have a suitable knife. The photos show Benchmade Ambush, it will be better visible later.
Then you need to have a suitable lace. There is no point in knitting something like this with leather, it is rigid. Let's take paracord, or, in the absence of it, shoe lace. IN in this case The laces are not shoe laces, but similar. Slightly flat. Each one is 40-50 centimeters long.
We continue to weave a square
Only one of the laces should be threaded through the hole in the handle of the penknife. Then the second one is placed on it, and the first one is bent - each of the ends. Next, the most primitive knot of four ends is sequentially knitted; how to do this is shown in the very first illustration.
Knits and knits. Changing the direction gives a square weave, as in my illustrations, it is the densest. If you knit in one direction, we get something like a cylinder, this can also be interesting.
But it’s better to knit a cylinder serpentine knot, I used it to complete the work, and it will also be in the pictures - further in the text.
Tightened square
We knit until there is enough rope. If the rope is long, then until the length of the lanyard reaches the desired size. You can always unravel the excess, but a tightened lace loses its original shape and it’s better not to do that. Since the lanyard is knitted disposable, it can only be cut off and not removed (well, unless you untie the whole thing), then stock up on the cord and train on the cord or lace that is worse.
You should finish weaving when there are about twelve centimeters of lace left - this is if you want to knit something similar to the thing shown in the photo.
The next knot is trickier, and even now I automatically knit it with some difficulty. It's easy to make a mistake here. In addition, uneven tightening will ruin the design. But since there are only two or three knots, tightening flaws will not be so noticeable.
Node to complete work
This knot should begin to be knitted in the same direction as the outermost square one. After tightening all four ends evenly, gently pull them away from the knife. The point of the knot is to ensure that the laces do not stick out to the sides at the end of the work.
As I said, you only need a few snake knots, but you can generally tie the entire lanyard out of them. But keep in mind that subsequently such a cylinder may unwind along its axis and the design will not be very beautiful. It’s better to make a square or a spiral of squares (a spiral will work if you don’t change the direction as you knit the squares).
If you are satisfied with the length of the product, tighten the loose ends further so that the knot squeezes them tightly and they do not come undone, even when undone.
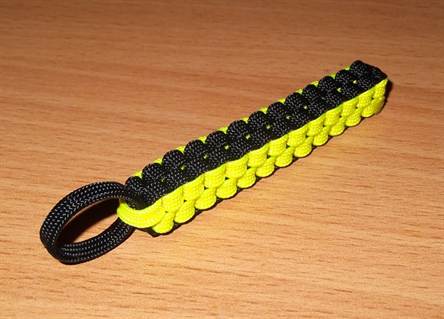
Blue and yellow
Now the lanyard is ready.
Something needs to be done with the loose ends of the laces. I did it simply. I tied the shortest lace as far from the lanyard as possible. The others are a little longer. The knots are the simplest, but eight would have been better (not long enough).
Alternatively, you can cut the laces and cauterize them. Can be tied and cauterized. The main thing is to prevent the lanyard itself from becoming fluffy, and how you achieve this is not important.
The color combination perfectly matches the black finish of the aluminum handle Ambusha. If the knife were gray or shiny, we would have to choose the appropriate colors :) The same khaki, black, dark green, perhaps even white. Light gray or variegated to gray will also work well.
Sealing the ends of the cord
The sixth picture clearly shows how the ends of the cord are sealed. In this case, two laces - blue and yellow - were the same length. If one of the cords is much shorter than the other, you can finish the job by tying a cylinder of the same color around two short cords.
Can be hung on laces turtles, beads, shark teeth, and so on and so forth.
Skulls, however, are difficult to obtain. And there are plenty of laces on every corner. Leather You can simply tie the laces to the knife and not knit anything with them. I cut them from an old belt.
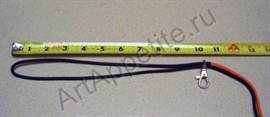
Benchmade Ambush plain
The final picture gives an idea of the size of the lanyard made. Of course, if you are aware of the size of Ambush. Ambush still the same. The blade is ten centimeters, the handle is even larger.
I’ll write more about Ambush, but for now a few words about the benefits of lanyards.
The benefit is doubtful, but aesthetic the component is strong.
Such a bright lanyard is very useful for a black knife - and in this case the knife is heavy and will easily slip out of your pocket (I carry it in my vest pocket, and not in my pants pocket). The knife is flat and will go into a jacket pocket, but the lanyard will get in the way there. It gets in the way even in your pocket, but for some it will help them get a knife.
A special aspect of using lanyards is that they help to hold the knife when gripping it koi That's why the lanyard is made thick. However, I am not keen on saber cutting :)
Since ancient times, people have woven, knitted, and wound lanyards around their knives and bladed weapons. Sometimes it had a practical meaning, sometimes it was purely decorative, sometimes it was just a tribute to fashion.
The purpose depends on the lanyard itself. Sometimes the lanyard forms a loop that can be draped over your hand to reduce the risk of losing the knife in an emergency. On small knives, or on knives with short handles, a thick braided lanyard can fill the void in the palm, increasing the length of the handle.
It can also be used to more conveniently and quickly remove a folding knife from a pocket or case.

By holding the knife by the lanyard and the end of the handle, you can increase the inertia of the knife due to the wrist whip, for more effective chopping blows.
It is better to weave a lanyard from a synthetic cord. Synthetic materials more resistant to wear and friction, and do not rot from dampness. In addition, the ends of the synthetic cord can be melted to prevent self-unraveling. It is better to take a cord not flat, but round, better if it is not hollow inside. Shoe laces work very well. If you plan to weave a short and thick lanyard that should fit comfortably in your hand, then you need to select the appropriate cord. The thicker, rougher and more prominent the cord is, the more grip the lanyard will have. If the lanyard is supposed to be in the form of a loop that will need to be thrown over the hand, then the cord should be thick so as not to cut the hand or dig into the skin, and the cord should also be smooth and round in cross-section so as not to wrinkle or rub. Lanyards that serve purely decorative functions can be woven from anything and in any way. The color of the cord is a purely individual matter. But when going out into nature, it is better to equip your knives with lanyards contrasting colors, i.e. bright red, poisonous green or purple, etc. The more unnatural and provocative the color of the lanyard, the less likely you are to lose the knife in the grass or fallen leaves.
Lanyards are not only used for knives. You can often find a lanyard on sheaths and sheaths.


The purpose of such lanyards is the same. Sometimes you need to secure the knife tightly, in which case you can unravel the lanyard and tie the knife to the equipment, leg or arm with a cord. You can also use the resulting cord to tie something (or someone), apply a tourniquet, etc.
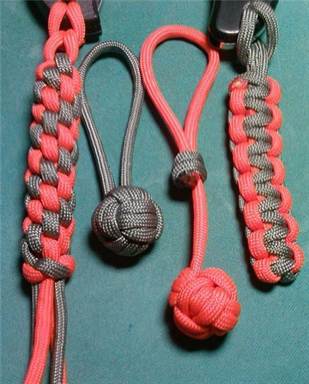
Here are a few examples of lanyards, their manufacture and use.
I. Weaving "Cage"
Two cords approximately 25cm long are tied with a knot in the middle.


Intertwined with each other in a cage. All ends overlap each other at right angles so that each previous one passes under the one in front.

Having finished the first tier, carefully tighten the ends, and repeat the same thing, adding a second tier to the first, a third to the second, etc.

We get a square lanyard. It is important to weave strictly in one direction, and not to break the order of alternation, otherwise the lanyard will turn out crooked and shapeless. The tighter you tighten the ends, the smoother and stiffer the lanyard will be; if you need to give it flexibility and softness, you need to tighten it looser accordingly. Once you have decided that your lanyard has reached the desired length, we complete the weaving and make the pommel. You can simply cut the cords and melt the ends.

You can gather all four ends of the cord together and tie it in a knot, then trim the ends and fuse them. We get something like a “monkey's paw”.

It is very important to leave a little play at the very beginning so that the lanyard is not tightly tied to the knife, but can easily move and be thrown from one side to the other.
This method has a couple of disadvantages. Firstly, a lanyard woven in this way cannot be unraveled and woven again (only if it is of a smaller size). The second drawback is that the cord is cut into two parts. It may happen that you need a strong cord or rope, then an unbraided lanyard can come in handy. But tying two halves of a cord is still not as convenient and reliable as using a solid cord. The third drawback is that the lanyard is static. If you equip a collapsible knife with such a lanyard, you will have to unravel the lanyard to disassemble it. Of course, you can try and not unravel it, but then disassembling and assembling the knife will turn into real torture.
This type of lanyard, especially in combination with the “monkey’s paw”, is recommended to be woven on knives with a small handle.
It is convenient to use it to pull a knife out of your pocket, or while holding it to make chopping blows with a knife.
II. Braiding "Whip" or "Hangman's Knot"
We will need a cord 25-30 cm long. We thread the cord through the hole on the handle of the knife.

We leave about a quarter of the length motionless, and fold the rest of the length into a loop, so that the long and movable end is at the very handle.

Having folded three layers of fixed cord, we begin to wind the long end onto them in turns.

Starting the winding at the handle itself, we apply even and tight turns. Once we have determined that the length is sufficient, we thread the movable end of the cord into the loop formed and tighten it from the opposite end.


The advantages of this method are directly opposite to the disadvantages of the previous one. This lanyard can be unraveled and woven again. By unraveling it, we get a rather long cord, which can be very useful. For example, tie a knife to a stick and make a spear. By loosening the knot and obtaining a fairly wide loop, you can easily disassemble and reassemble the knife for repair or cleaning.
III. Weaving "Tight loop"
It is performed in the same way as the “Whip” with the only difference that much fewer turns are wound. The ends of the cord should be left a little longer and tied at the end with a knot, then also cut and melted.

There should be few turns, and they should not be wound too tightly; the knot should move freely in both directions. Such a lanyard can be draped over the wrist, and the “hangman’s knot” makes it possible to tighten the loop more tightly to fit the wrist tightly, thereby preventing it from slipping off the hand.
VI. Weaving "Ribbon"
A lanyard like this requires a lot more cord. One cord is needed much shorter than the other. Two cords are tied in such a way that there are three short ends of equal length, and one much longer than the rest.

We leave the three short ends motionless, and the long end will be a runner. The long end is woven between three short ones checkerboard pattern, for example from left to right.


Having reached the far right end of the cord, we also weave it in a checkerboard pattern from right to left. This is how we get a wide ribbon. You can make the ribbon wider by using three cords instead of two, etc. As soon as we reach the desired length, we perform the pommel again. Here it is performed in the same way as in the previous methods. You can cut all the ends and fuse them, you can tie two knots, you can gather all the cords together and tie them into a knot.


There are also a great many other species, more beautiful and more complex, but we won’t go that far. However, nothing stops you from experimenting and coming up with something new. Good luck!
Material from the site: http://knifelife.ru
Not many people in our world are familiar with the concept of a lanyard. Many have seen this interesting decoration, but generally know nothing about its types and functions. But lovers of edged weapons often use a lanyard in their everyday life; moreover, many of them know how to weave this accessory themselves.
Lanyard - original look weaving, which is used to decorate the handles of various weapons - pocket and hunting knives, checkers, sabers, as well as tools. Weaving is done with a leather cord or synthetic cable, which is also called paracord.
 The history of this interesting device goes back several centuries.. And if now the lanyard often serves only a decorative function, then initially it served to prevent the weapon from being lost and slipping out of the hand. This term was first mentioned during the times of chivalry, that is, in the 14th–15th centuries. In the Russian army this accessory was a mandatory part military uniform, as well as an insignia on an award weapon. The presence of a lanyard on a weapon spoke of the soldier’s special services to the fatherland.
Types and functions
Although the lanyard is a simple loop of cable and looks like an ordinary modern keychain, it makes it much easier to carry a weapon and work with hand tools. Depending on its “responsibilities”, this woven bracelet comes in two main types:
- with a loop that is put on the hand - this option is more functional;
- with cord or tail - more suitable for decoration and ease of use.

Both types of this accessory are successfully used in our time to achieve the following goals:
- the ability to visually lengthen the handle of a weapon or tool;
- the ability to quickly free your hand without losing the tool;
- protecting your hand from cuts when it slips onto the blade;
- distribution of the load on the hand during work or impact.
- comfort when fastening, fast access to the knife in your pocket.
Along with this list, the main purpose of a lanyard is ease of use of a weapon or tool, because it is this factor that can be the key to a successful battle and quality work done.
Weaving tools
Weaving a lanyard for a knife is not difficult even for a novice craftsman. It's simple and exciting activity, which does not require special skills or significant costs.
To create a lanyard with your own hands, you will need:

When all the materials and tools are at hand, you can look for suitable patterns for weaving a paracord lanyard.
Most often, the weaving pattern is alternate knitting of straight and simple knots. The result of combining these knots is such fashionable patterns today as cobra, ball, square, snake, diamond.
Manufacturing instructions
It is better for a beginner to become familiar with lanyard weaving using the example of light equipment simple node. So, in order to make a lanyard for a knife, you need:

Having mastered the most basic technique, you can proceed to a more complex craft and weave a lanyard from paracord in two colors:
- take 2 cords different colors approximately 25 cm long each. Tie the ends of the cords together so that the accessory is bright and clearly visible;
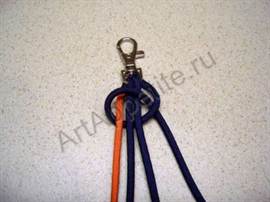
- fold the cord in half, put on a carabiner and use it to measure the length of the future keychain;
- after folding in half, two free ends of the cord are formed next to the carabiner. One of the cords (for example, blue) needs to be braided with the rest. To do this, place the blue cord under the bottom and then put it on top, forming a loop;
- The free end of a cord of a different color (for example, yellow) is inserted into this loop. Tie a knot, thereby securing the carabiner clasp;
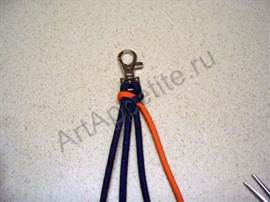
- The keychain turns the other way. Using tweezers, the yellow cord is pulled through the finished blue loop. This stage is repeated until the length of the key fob reaches the required mark. The two-color lanyard is ready to use!
Mounting methods
Before you start creating this unique accessory, you need to think about methods for attaching the lanyard to a knife or other tool.
For example, you can attach the decoration to the handle through a special hole. This is the simplest and reliable option fasteners

It is also possible to mount it through a ring or shackle; this method is compact, movable and allows you to quickly find a pocket weapon by touch. You can attach the lanyard using different techniques: with a knot or a clip, a loop or a special clip. Each method is good in its own way and depends on the tastes and wishes of the owner. The main thing in this matter is to secure the accessory in such a way as to ensure maximum comfort and safety for the future owner.
The type of weaving that is done with a cord is called a lanyard. In other words, a lanyard is a loop of cable or rope that is located at the end of a knife, saber, checker or other bladed weapon. Weaving a lanyard is a simple, useful, interesting and exciting activity that even novice needlewomen can master!
Weaving a lanyard for a knife is a rather ancient activity. Initially, lanyards were woven for the convenience of attaching a knife to a hand or to quickly find it in a pocket. Nowadays, a lanyard can be called a modern keychain, which is hung on a flash drive, flashlight, or keys. Therefore, the initial function is considered to be convenience for humans.

The secondary function is beauty and aesthetics. It was made as decoration. The presence of a lanyard on a Russian soldier was considered a badge of honor and meant that he had special services to his homeland. It was used to decorate weapons of any kind. Gun owner in free time made all kinds of lanyards from various materials. Knowing the patterns and methods of weaving a lanyard, for example, from leather, the master could decorate his weapon.
Popular types
You can weave a lanyard for a knife with your own hands, either for yourself, as a gift to your family, or for sale, which will bring a good profit. Owning various schemes and types of weaving knots, you can quickly and easily make a decoration in the form of a lanyard, even for a checker. Let's look at some of them.
- Simple knot;
Almost everyone has used this knot at least once in their life. That's why it's called that. A simple knot is made by first knitting a knot upward and then inward to the first knot.

- Straight knot.
This node is performed as follows. When connecting the ends in a simple knot weaving pattern, do it twice for both sides.
The first step in making a lanyard is choosing required material and preparing it for weaving. You can choose a variety of materials, depending on the purpose of the product. The second stage is the weaving itself. For example, decorative laces, cords, rope, leather or paracord are used as materials. Today, paracord is most often used to weave lanyards. This is enough durable material, from which it is very easy to weave even the most complex patterns.


Methods of execution
There are various ways to weave lanyards. For example:
- Snake;
- Hunting knot;
- Cobra;
- Square weave;
- Round weaving (ball);
- Diamond weave.


On the eve of the men's holiday, we invite you to weave a keychain from paracord using the technique of weaving a simple knot. This material is one of the most optimal for weaving a lanyard, so we will use it in practice.
Note. To make it two-color, first connect the ends of the paracord.
So let's get started.

How to do:
- To weave a keychain we will need: paracord (1.5 m) or two multi-colored cords (1 m and 0.5 m), a lobster clasp, a ruler, scissors, matches or a lighter, tweezers or tweezers.

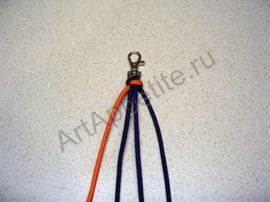
- The cord needs to be folded in half and threaded through the carabiner clasp. Then we measure the length of the product.
- We fix the clasp by tying the first two knots.

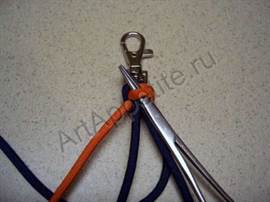
- Then turn the keychain reverse side. Now, when weaving, we will use tweezers, which we insert through the resulting blue loop and pull the orange cord through it. Tighten tightly.


- We turn the keychain again and now pull the blue cord through the orange loop. Do the same as with the orange cord.
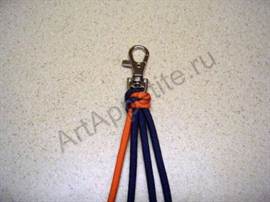
- We weave the keychain to the length you need. We cut the ends and carefully melt them using a lighter or matches. A stylish and original DIY paracord lanyard is ready! Having mastered this type weaving, you can proceed to more complex options. We will be glad if this master class is useful for you.


